3 Paper and Other Media
106
P
a
pe
r an
d
Ot
h
e
r M
e
di
a
3
Loading Paper in Tray 5 (Bypass)
When printing or copying with paper sizes or types that cannot be loaded on paper that has
not been loaded or with the paper size that cannot be loaded in Trays 1 to 3, 6 (optional)
and 7 (optional), use Tray 5 (Bypass).
Note
•
Remove any paper remaining in Tray 5, and then load that paper on top of the newly loaded paper.
•
Carefully fan the paper before loading it in a tray. Otherwise, paper jams may occur or multiple
sheets may be fed to the machine simultaneously.
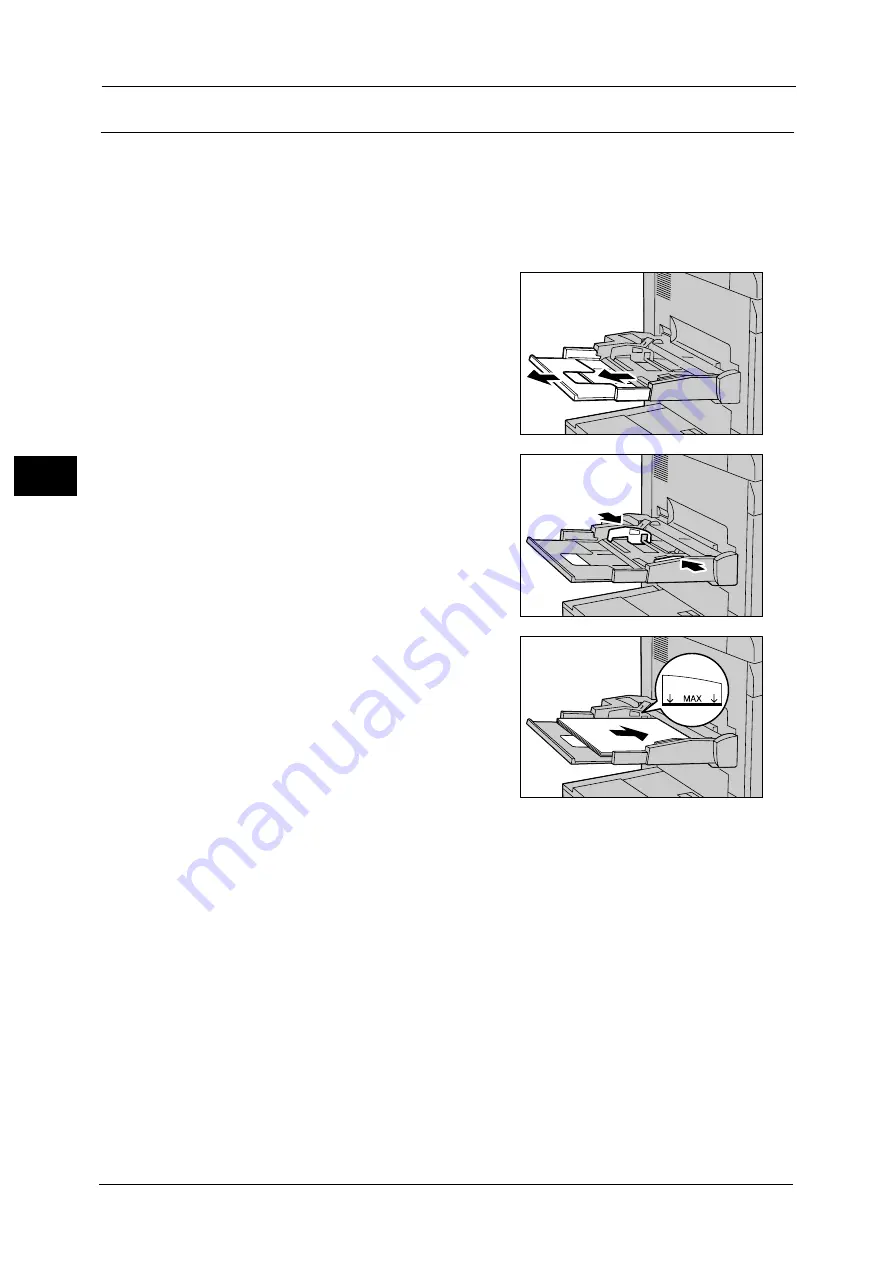
1
Open Tray 5 (Bypass).
Note
•
If necessary, extend the extension flap. The
extension flap can be extended in two stages.
When pulling out the extension flap, do it
gently.
•
The extension flap is not installed in the HCF
B1-S and the High Capacity Feeder C3-DS.
Proceed to step 2.
2
Hold the center of the paper guides and slide
them to the desired paper size.
3
Load paper with the side to be copied or
printed on facing up, and insert the paper
lightly along the paper guide until it stops.
Important •
Do not load mixed paper types into the tray.
•
Do not load paper exceeding the maximum
fill line ("MAX" in the right figure). It may
cause paper jams or machine malfunctions.
Note
•
When loading a postcard, place its bottom
edge along the machine.
•
When loading envelope with the flap
opening, place the bottom edge of the envelope (not the flap side) along the machine. When
loading envelope with the flap closing, place the flap along the machine or to the front side of the
machine. When loading adhesive envelope, place it with the flap closing. When loading envelope
with the flap closing and the flap placing to the front side of the machine, note that the quality of
the image printed on the trailing edge of the envelope may become poor.
•
Load paper straight along the paper guides; otherwise, the paper may be jammed or the printed
result may be skewed.
4
When loading a non-standard paper size, slightly move the paper guides to the desired
paper size.
Summary of Contents for Versant 80 Press
Page 1: ...User Guide Versant 80 Press ...
Page 18: ...18 Index 1007 ...
Page 159: ...Image Quality 159 Copy 4 2 Select a button to adjust the color tone ...
Page 214: ...4 Copy 214 Copy 4 ...
Page 304: ...5 Scan 304 Scan 5 ...
Page 382: ...11 Job Status 382 Job Status 11 ...
Page 562: ...14 CentreWare Internet Services Settings 562 CentreWare Internet Services Settings 14 ...
Page 580: ...16 E mail Environment Settings 580 E mail Environment Settings 16 ...
Page 618: ...18 Encryption and Digital Signature Settings 618 Encryption and Digital Signature Settings 18 ...
Page 916: ...22 Problem Solving 916 Problem Solving 22 ...
Page 1018: ...1018 Index ...


