background image

 Main Specifications 

107

IE

IE

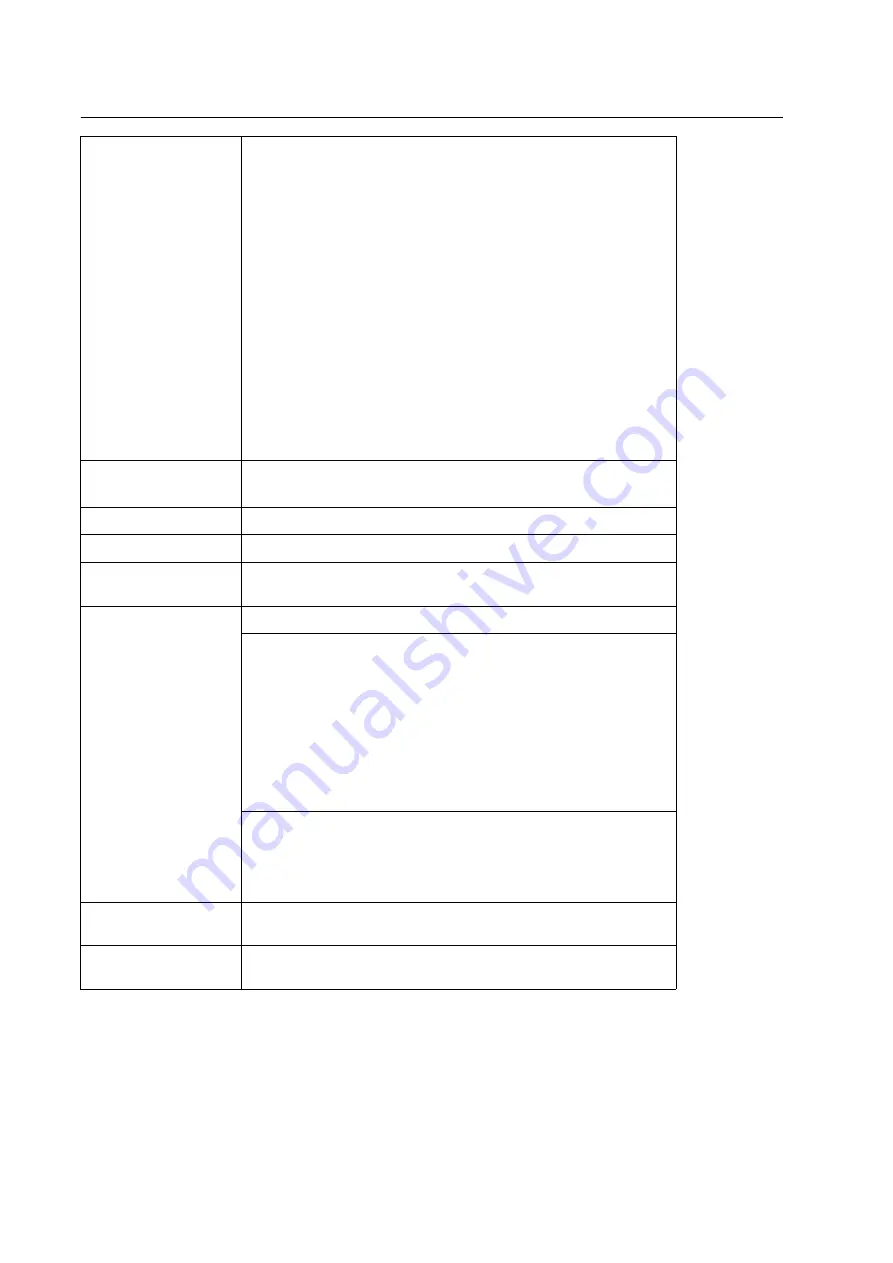
DocuScan Manager System Requirements

Supported OS

• Microsoft

® 

 Windows

® 

 98

• Microsoft

® 

 Windows

® 

 98 Second Edition

• Microsoft

® 

 Windows

® 

 Millennium Edition

• Microsoft

® 

 Windows NT

® 

 Workstation 4.0 (Service Pack4 or later)

• Microsoft

® 

 Windows NT

® 

 Server 4.0 (Service Pack4 or later)

• Microsoft

® 

 Windows

® 

 2000 Professional

• Microsoft

® 

 Windows

® 

 2000 Server

• Microsoft

® 

 Windows

® 

 XP Home Edition

• Microsoft

® 

 Windows

® 

 XP Professional

• Microsoft

® 

 Windows Server

®

 2003

• Microsoft

® 

 Windows Vista™

Note

• Since DocuWorks does not support Microsoft

® 

Windows NT

®

, DocuWorks 

files cannot be displayed in thumbnail view on Windows NT.

• On Microsoft

®

 Windows

®

 XP Home Edition, the Easy Setup mode cannot 

be used for registering addresses.

CPU

Pentium

® 

III 

400 MHz or higher (Pentium

® 


III

 850 MHz or higher is recom-

mended)

Hardware

PC/AT compatible machine

Memory

128 MB or more

Available hard disk space

For installation: 20 MB or more
For operation:  200 MB or more is recommended

Software

Microsoft Internet Explorer 5.0 or later

To import addresses stored in your e-mail application to Address Book, your 
e-mail application must be one of the followings:

• Microsoft

®

 Outlook

®

 Express 5

• Microsoft

®

 Outlook

®

 Express 6

• Microsoft

®

 Outlook

®

 2000

• Microsoft

®

 Outlook

®

 2002

• Microsoft

®

 Outlook

®

 2003

• Microsoft

®

 Outlook

®

 2007

• Windows

®

 Mail

To display DocuWorks files in thumbnail view on DocuScan Manager, Docu-
Works Viewer Light for Web 6.0.2 or higher (6.0.2 through 6.2.1) is required. 
DocuWorks Viewer Light for Web 6.2.1 and later versions are integrated into 
DocuWorks Viewer Light. DocuWorks Viewer Light can be installed from the 
Software Pack CD-ROM supplied with the product. 

Monitor

VGA or higher resolution monitor (graphics card of SVGA (800 x 600) or 
higher is recommended.

Others

• Network interface card
• CD-ROM drive (Required only upon installation)

Summary of Contents for DocuScan C3200A

Page 1: ...DocuScan C4250 C3200 A Setup and Quick Reference Guide ...

Page 2: ...ks is a trademark of Fuji Xerox Co Ltd In this manual safety instructions are preceded by the symbol Always read and follow the instructions before performing the required procedures Remember to read also the Safety Notes in this manual Important 1 This manual is copyrighted with all rights reserved Under the copyright laws this manual may not be copied or modified in whole or part without the wri...

Page 3: ...e scanner s control panel The names of keys that appears on your computer keyboard or the hardware buttons and lamps on the scanner 4 In this manual paper feed orientations are referred to as follows Long Edge Feed LEF Paper is fed into the scanner long edge first Short Edge Feed SEF Paper is fed into the scanner short edge first Should be read when using the Scan to PC feature Should be read when...

Page 4: ...Power Saver Mode 31 Loading Documents 32 Control Panel 38 Using the Screens 40 4 Scan 42 Using Scan to E mail 42 Using Scan to PC 48 Using Scan to Media 52 Displaying a Preview 54 Stopping a Scan Job 55 5 Copy 56 Copy 56 Stopping a Copy Job 59 6 Problem Solving 60 Identifying Your Problem 60 Problem Solving Procedure 60 Clearing Document Jams 61 Hardware Problems 64 Image Quality Problems 67 Scann...

Page 5: ... entry with a few touches of the touch panel To create Address Book Use CentreWare Internet Services Use DocuScan Manager Displays and edits scanned images on a computer Registers changes and deletes addresses in Address Book Monitors the scanner and its job history using a web browser Registers changes and deletes addresses in Address Book Refer to 7 DocuScan Manager in the User Guide Refer to 9 ...

Page 6: ... a desired scan ratio Scan Size Scans or copies in a desired size Adds margins to output or scans without unwanted areas Scan Resolution and Image Compression File Size Optimization Saves scanned data at a desired scan resolution and image compression rate Sharp Text Images Produces sharp text images with high scan resolution Mixed size Documents Scans or copies mixed size documents simultaneously...

Page 7: ...you should read when using the scanner Want to know all about the scanner s features Want to know how to troubleshoot error messages Want to know how to clean the scanner User Guide PDF Provides the scanning copying procedures maintenance information problem solving information and notes restrictions on use This manual contains all of the information included in the Setup and Quick Reference Guide...

Page 8: ...ss Book on the Scanner 5 Job Status 5 1 Using the Control Panel 5 2 Using CentreWare Internet Services 6 System Settings 6 1 System Setting Procedure 6 2 System Settings Setting Items 6 3 Screen Contrast 6 4 Common Settings 6 5 Network Settings 6 6 Copy Settings 6 7 Scan Settings 6 8 System Administrator Settings 7 DocuScan Manager 7 1 What is DocuScan Manager 7 2 Registering an Address 7 3 Import...

Page 9: ... by the recessed areas provided on both sides of the machine When lifting the DocuScan C3200 A one person should face the back of the machine and grip it firmly by the recessed areas provided on both sides of the machine Never try to lift the machine by gripping any other areas such as the control panel Lifting the machine by gripping any other areas can cause the machine to fall and result in inj...

Page 10: ... the machine may fall over and cause injuries The machine has ventilation holes on the rear panel Ensure that the machine is installed with enough clearance from the rear vent to the wall A poorly ventilated machine can cause excessive internal heat and fire The accompanying diagram shows the minimum clearances required for normal operation consumables replacement and maintenance to ensure your ma...

Page 11: ... a power cord with wet hands Danger of electric shock exists Stop operation immediately if your machine produces smoke excessive heat unusual noise or smell or if water is spilt onto the machine These conditions can cause fire Immediately switch off and unplug the machine and contact our Customer Support Center This product must be connected to a protective earth circuit This product is supplied w...

Page 12: ...they can short circuit internal components and cause fire or electric shock If debris metal or liquid gets into the machine switch off and unplug the machine Contact our Customer Support Center Operating a debris contaminated machine can cause fire or electric shock Never open or remove machine covers that are secured with screws unless specifically instructed in the accompanied manuals A high vol...

Page 13: ...Safety Notes 13 IE IE Caution Label Location ...

Page 14: ...d in For Installation and Relocation P 9 Locate the scanner where the temperature is 10 to 32 C and the humidity is 15 to 85 where dew condensation does not occur When the temperature is 32 C the humidity must be below 70 When the humidity is 85 the temperature must be below 28 C Do not expose the scanner to the direct sunlight Do not expose the scanner to the draft of an air conditioner or heater...

Page 15: ...re 3 Control panel The feature buttons indicator lamps and touch panel display are placed here Refer to Control Panel P 38 4 USB Connector Connects a USB flash memory to the scanner Note The USB interface of the scanner supports USB 2 0 Hi Speed USB hubs cannot be connected 5 Document feeder cover sensor Detects the size of documents loaded 6 Carriage lock DocuScan C4250 only Locks or unlocks the ...

Page 16: ...Note The Ethernet interface of the scanner supports 100BASE TX 10BASE T 4 5 USB connector Connects a USB cable to the scanner Note The USB interface of the scanner supports USB 2 0 Hi Speed USB hubs cannot be connected 6 Carriage lock DocuScan C3200 A only Locks or unlocks the carriage read head When in a locked position it locks the carriage in place to prevent it from shaking when moving the sca...

Page 17: ...pened when clearing document jams 4 Documents guides Adjusted to keep documents aligned 5 Document feeder tray Load documents here 6 Document output tray Holds scanned documents 7 Document indicator lamp DocuScan C4250 only Lights when documents are loaded correctly 8 Extension guide DocuScan C3200 A only Extended when scanning long documents DocuScan C3200 A DocuScan C4250 ...

Page 18: ...the unlock position to the rear direction Connecting and Switching On the Scanner When connecting the power cord to the scanner be sure to follow the precautions stated in For Power Earth Connection P 11 Note This product does not use electricity when the power is switched off even if the power cord is plugged in 1 Plug the power cord into the power cord connector located on the rear side of the s...

Page 19: ...t 5 Default Language and then select Change 7 On the 5 Default Language screen select the desired display language 8 Select Save Note To cancel the setting select Cancel Tools Close Screen Contrast System Settings Login Cancel Confirm System Administrator Password System Settings Close Network Settings Common Settings Scan Settings Copy Settings System Admin Settings Common Settings Close Machine ...

Page 20: ...ine Clock Timers 6 On the Machine Clock Timers screen select 5 Time Zone and then select Change 7 On the 5 Time Zone screen enter the time difference using 8 Select Save Note To cancel the setting select Cancel Tools Close Screen Contrast System Settings Login Cancel Confirm System Administrator Password System Settings Close Network Settings Common Settings Scan Settings Copy Settings System Admi...

Page 21: ...onnect the scanner to a printer with the USB cable Make sure that the scanner is compatible with the firmware of the printer Note The USB interface supports USB 2 0 Hi Speed For information about the supported firmware and printers that can be connected to the scanner refer to our website URL http www fujixerox co jp 1 Plug the USB cable into one of the USB connectors on the scanner Be sure to plu...

Page 22: ...n to PC 2 Configure the network settings on your computer 3 Scan a document and send save the scanned data Register an e mail or server address Refer to 7 DocuScan Manager in the User Guide Scan a document and send the data by e mail Refer to Using Scan to E mail P 42 Scan a document and save the data on a computer Refer to Using Scan to PC P 48 Configure the settings for Scan to E mail Refer to C...

Page 23: ...e changed under System Settings Refer to For information on how to change the system administrator password refer to System Administrator Settings in the User Guide 4 Select Network Settings 5 Select Protocol Settings 6 Select 2 Get IP Address and select Change Note The values under Current Settings on the Protocol Settings screen are the addresses you set manually or obtained automatically Tools ...

Page 24: ... to PC feature on the scanner configure the following settings using CentreWare Internet Services To use Scan to E mail Set the e mail parameters Set the DNS parameters Refer to Setting the E mail Parameters P 28 Setting the DNS Parameters P 28 To use Scan to PC Set the DNS parameters Set the WINS parameters Refer to Setting the DNS Parameters P 28 Setting the WINS Parameters P 30 Note Set the DNS...

Page 25: ...en using Netscape 7 1 To set the display language 1 From Edit on the menu bar select Preferences 2 From the Category tree select Language under Navigator 3 Set the display language at the top of the Language in order of preference list Example English en English United States en US Chinese zh Korean ko 4 Click the OK button To set your browser not to use a proxy server 1 From Edit on the menu bar ...

Page 26: ...e Advanced button set the scanner s IP address in Exceptions and then click the OK button 4 Click the OK button 5 On the Internet Options screen click the OK button Using CentreWare Internet Services To access CentreWare Internet Services use the following procedure Note If the following procedure does not display the top page of CentreWare Internet Services refer to CentreWare Internet Services P...

Page 27: ...the administrator s e mail address Configuration Displays the main specifications of the scanner Counters Displays the number of scanned copied pages to date Initialization Initializes the NV memory of NIC Network Interface Card set under Properties Internet Services Settings Sets the administrator ID and password for CentreWare Internet Services The default administrator ID and password is admin ...

Page 28: ...er Name POP3 User Password Maximum E mail Size Data Size to Split Send Refer to For information no how to access CentreWare Internet Services refer to Starting CentreWare Internet Services P 24 For operating instructions of CentreWare Internet Services refer to the CentreWare Internet Services Online Help For information on how to display the online help refer to Using the Online Help P 28 Setting...

Page 29: ...wing operating systems provide a shared folder feature Microsoft Windows 98 Microsoft Windows Me Microsoft Windows NT 4 0 Microsoft Windows 2000 Microsoft Windows XP Microsoft Windows Server 2003 Microsoft Windows Vista Important If using Windows NT 4 0 DocuWorks files cannot be displayed in thumbnail view on DocuScan Manager Creating a Folder on a Server Create a folder to which scanned data is t...

Page 30: ...4 For operating instructions of CentreWare Internet Services refer to the CentreWare Internet Services Online Help For information on how to display the online help refer to Using the Online Help P 28 For information on how to set a Save In location for the Scan to PC feature refer to 2 5 Using Scan to PC in the User Guide Registering an Address in Address Book Addresses for Scan to E mail or Scan...

Page 31: ...l 2 Press the power switch to the O position to switch off the scanner Setting Exiting the Power Saver Mode The scanner has the Power Saver feature which reduces the power consumption during the periods of inactivity As delivered the scanner automatically switches to the Power Saver mode 10 minutes after the last operation During the Power Saver mode all indicator lamps on the control panel except...

Page 32: ...ocuments Documents that meet the following criteria can be scanned from the document glass or document feeder 1 Gram per square meter g m refers to a weight in grams of one square meter of paper 2 These values apply when scanning or copying documents 2 sided Document Glass Document Feeder Document size C4250 Max 334 5 x 452 0 mm Min 100 0 x 148 0 mm Max 297 0 x 432 0 mm C3200 A Max 220 0 x 300 0 m...

Page 33: ...esulting in an error message or image loss Remedy this problem as follows Important Do not load documents that contain a lot of moisture The moisture may get inside the scanner and cause it to malfunction Do not load documents that weigh more than 5 kg Doing so may break the document glass or the scanner itself Note Documents that use photo holders may not be properly scanned or copied depending o...

Page 34: ... Features or More Copy Features screen When the output file format is TIFF Multi page TIFF or JPEG load documents in Head to Left orientation When scanning 2 sided documents make sure that they are loaded in the orientation specified in 2 Sided Orig if scanning or in Original Orientation if copying Head to Top Head to Left Refer to For information about Original Orientation refer to Screen Functio...

Page 35: ...d size documents follow the guidelines below Align the top left corner of documents to prevent them from jamming Load A5 documents in LEF orientation Loading Documents The following explains how to load documents Using the Document Glass Use the following procedure to scan a document from the document glass 1 Open the document feeder cover Important Raise the document feeder cover until the docume...

Page 36: ...ings in mind to prevent the documents from being jammed or damaged Do not hold the documents while they are being fed into the document feeder Constantly remove the documents from the document output tray after they are output Do not leave them on the tray until they are piled up Do not put any objects on the document output tray Using the Document Feeder DocuScan C3200 A Up to 50 sheets of docume...

Page 37: ...s in mind to prevent the documents from being jammed or damaged Do not hold the documents while they are being fed into the document feeder Constantly remove the documents from the document output tray after they are output Do not leave them on the tray until they are piled up Do not put any objects on the document output tray ...

Page 38: ...o display the copy feature setting screen Scan to PC button Pressed to display the Scan to PC setting screen Scan to E mail button Pressed to display the Scan to E mail setting screen All Services button Pressed to display the All Services screen 3 Numeric keypad Pressed to enter numbers and characters 1 7 8 9 10 3 6 11 4 5 12 14 2 13 Paper Supply Auto Paper 100 Auto More More Tray 1 A4 Tray 2 A3 ...

Page 39: ...er Saver mode to reduce the power consumption during periods of inac tivity This button lights when the scanner is in the Power Saver mode Refer to For information about the Power Saver mode refer to Exiting the Power Saver Mode P 32 7 Clear All button Pressed to reset the features to the defaults 8 Stop button Pressed to stop scanning or copying 9 Start button Pressed to start scanning 10 Error l...

Page 40: ... pages 5 entry box Allows you to enter characters Refer to For information on how to enter characters refer to Character Entry Procedure P 101 6 button Toggles between When the button is selected it toggles to 7 button or button Allows you to change setting values 8 button Displays the setting screen corresponding to the button When the feature is enabled or when a value other than the default is ...

Page 41: ... screen On a setting screen this applies the changes and closes the screen Enter Change Comment Select from List Clear Field Cancel Save Comment Scan to E mail Close abcde fghij xxxxx com aaa fff xxxxxx com ccc xxxxx xxx com Result Error Job Ended 2005 07 29 15 00 Pages Transferred 1 1 Output Color Black Scan Size A4 Entries 27 Split 1 Resolution 600dpi 1 SNMP Cancel Save Disable Enable Setting Sc...

Page 42: ... to scan a document and e mail it via the Scan to E mail feature Load a document 1 Place a document on the document glass or into the document feeder Refer to For information on how to load documents refer to Loading Documents P 32 Display the Scan to E mail setting screen To configure the settings for the Scan to E mail feature display the E mail Address screen Refer to For information about char...

Page 43: ...of errors The default sender s address is the address set for Machine E mail Address Machine E mail Address can be set under Properties Protocol Settings E mail Machine E mail Address on CentreWare Internet Services This setting is optional If you leave this blank however an error may occur when attempted to send e mail depending on the SMTP server 1 Select the From entry box and enter the sender ...

Page 44: ...eselected each time you touch them If you need to search for an address in Address Book refer to Address Book and Subject Comment List in the User Guide To view the details of an address display the Details screen by selecting the address followed by the Details button 4 The To button can toggle between To CC BCC each time you touch it As necessary touch the To button to change it to CC or BCC 5 W...

Page 45: ...t an address that can receive e mail such as the administrator s address in case the e mail server returns e mail in the event of errors 1 On the Details screen select Reply To and select Change The Enter Change Reply To screen appears 2 If you do not set Reply to the e mail will be sent without a return e mail address To set the return e mail address enter it in the Reply to entry box Note The re...

Page 46: ...n appears 3 Select the comment to be used Note Selecting Full Comment displays the entire comment After verifying the content select Save 4 Select Save repeatedly until you return to the E mail Address screen Set the basic scan features As necessary set the features such as Output Color and File Format on the Basic Scanning screen 1 Select the Basic Scanning tab The Basic Scanning screen appears 2...

Page 47: ... The scanner starts scanning after verifying the status of the Save In location When you have more documents to scan When you have more documents to scan select Next Original on the touch screen while the first document is being scanned The scanner recognizes that there are more documents to be scanned and scans them as a single job Up to 500 pages can be scanned per a single job Note When the num...

Page 48: ...For information on how to load documents refer to Loading Documents P 32 Display the Scan to PC setting screen To configure the settings for the Scan to PC feature display the Save In screen Refer to For information about character entry limits refer to Screen Functions and Character Entry Restrictions P 79 Note There are three setting screens for the Scan to PC feature Save In Basic Scanning and ...

Page 49: ... the control panel resets them to the defaults Set the Save In location Set the Save In location using Address Book If you enter the Save In location using Address Book Server Shared Name for SMB only Save In User Name and Password will be set automatically based on the information registered in Address Book Note In this example we will use Address Book to specify the Save In location The Save In ...

Page 50: ... to be taken if a file name conflict occurs 1 Select Change File Name The Change File Name screen appears 2 The file name will be assigned automatically if you do not specify it To specify the file name enter the file name in File Name within 20 characters Refer to For information on how to enter characters on the control panel refer to Character Entry Procedure P 101 Note Selecting Restore Auto r...

Page 51: ...res screen P 86 For information on how to set the features available on the More Scan Features screen refer to Setting Other Scan Features in the User Guide Display the preview As necessary display the preview of the scanned data to verify the scan result Refer to For information on how to display the preview screen refer to Displaying a Preview P 54 Start the scan job 1 Display the Save In screen...

Page 52: ...for the feature you will be prompted to enter the password before entering into the Save In screen If prompted enter the password using the numeric keypad and select Confirm For information on how to set passwords refer to 6 4 Common Settings Service Login in the User Guide If the feature is disabled a message informing you of this appears To enable or disable each feature refer to 6 4 Common Sett...

Page 53: ... appears 2 Select the buttons for the desired features and configure the settings Refer to For information about the features available on the More Scan Features screen refer to More Scan Features screen P 86 For information about how to set the features available on the More Scan Features screen refer to 2 8 Setting Other Scan Features in the User Guide Display the preview As necessary display th...

Page 54: ...ail Address Save In Scan to PC Save In Scan to Media screen Note In this example we will used the E mail Address screen 2 Press the Start button A screen appears informing you that the scanning is in progress When the screen disappears the preview of the first page appears 3 Verify the scan result on the preview Images scanned in DocuWorks or PDF format can be rotated and saved as they appear on t...

Page 55: ...Stop Selecting Stop displays the following screen Selecting Yes stops the scan job and displays the following screen 5 Press the Start button on the control panel The scanning starts Stopping a Scan Job Use the following procedure to stop a scan job 1 Press the Stop button on the control panel A message appears confirming the cancellation of the job 2 Select Yes A message appears informing you tha...

Page 56: ...Image Quality and More Copy Features screens To display each screen select the corresponding tab on the top of the touch panel The features and defaults displayed on the screens vary depending on the features provided by the printer The screens used in this manual are of when the printer supports all copy features of the scanner There are two ways to display the setting screens for the copy featur...

Page 57: ...the number of copies using the numeric keypad The number entered is displayed in the top right corner of the touch panel Up to 999 copies can be made Note To cancel an incorrect entry press the C button and enter the correct quantity Start the copy job 1 Press the Start button The copying starts When the job is complete the copies of the document is printed from the printer Important When the docu...

Page 58: ...nel The All Services screen appears on the touch panel 2 Select Job Status The Completed Jobs screen appears 3 Check the status of the job 4 As necessary select the button for each job to view its details 5 Select Close repeatedly until you return to the All Services screen 70 7 10 Black 100 Collated Scanning Documents Next Original Last Original Pages Scanned Pages Transferred 70 7 10 Press Start...

Page 59: ...ave not been transferred to the printer can be cancelled Important Depending on the printer you may need to cancel jobs on the printer instead of on the scanner In such case the touch panel will display a message informing you of this When using the scanner on a network make sure not to cancel other jobs by mistake When starting a new job after cancelling a job make sure that the printer is in the...

Page 60: ...4 Is it an image quality problem Image Quality Problems P 67 Did it occur while using one of the scanner s features It occurred while using one of the scanner s features Scanner Feature Problems P 69 Refer to Notes and Restrictions P 109 in Appendix Check the usage restrictions Is it a network related problem It is a network related problem Is an error code displayed on the control panel An error ...

Page 61: ...comes to a stop Note The cover fixes into place when opened completely When opening the cover do it gently If only one side of the document is jammed 2 Turn the green wheel as illustrated and pull the document out slowly towards the direction of the arrow If both sides of the document are jammed 3 Pull the green lever and open the inner cover 4 Remove the document using one of the following ways T...

Page 62: ...To close the left cover 8 Close the left clover until it clicks into place 9 Verify that the document is not ripped wrinkled or creased and re load it into the document feeder DocuScan C3200 A To open the left cover 1 Hold the left cover of the document feeder by the center and lift it until it comes to a stop Note The cover fixes into place when opened completely When opening the cover do it gent...

Page 63: ...ant Do not attempt to pull out the document without turning the wheel You may damage the document 5 Close the inner cover opened in Step 3 If the document is jammed at the output area 6 While lifting up the document feeder tray pull the document out slowly 7 Close the document feeder tray gently To close the left cover 8 Close the left cover until it clicks into place 9 Verify that the document is...

Page 64: ...s the Low Power button lit The scanner is in the Power Saver mode Press the Low Power button on the control panel to exit the Power Saver mode Refer to 1 4 Setting Exiting the Power Saver Mode in the User Guide The scanner will not scan or copy Is a message displayed on the touch panel Follow the message to remedy the problem Is the power cord plugged into the power cord connector Switch the power...

Page 65: ...rts the version of the printer s firmware URL http www fxprinters com If it is not supported download the version that is supported from the fol lowing website and update the firm ware URL http www fxprinters com Forgot the system administrator pass word and thus cannot enter the System Set tings screen If the system administrator pass word is set you cannot enter the System Settings screen withou...

Page 66: ...n irregular size doc ument business card transpar ency or lightweight paper Did you remove all paper clips sticky notes and cellophane tapes from the document Removing all paper clips sticky notes and cellophane tapes from the docu ment and scan or copy it again Are the document guides adjusted properly Adjust the document guides properly Refer to Loading Documents P 32 Is a torn piece of paper fr...

Page 67: ...pots appear on the scan copy output Is the document glass or docu ment feeder cover clean Clean the document glass or docu ment feeder cover Refer to 9 2 Cleaning the Scanner in the User Guide Is the document highly translu cent such as a transparency Any dirt or smudges on the document feeder cover may appear on the out put when the original is highly translu cent Scan or copy the document with a...

Page 68: ...guides to the width of the document Refer to Loading Documents P 32 Are you trying to copy scan a folded or a paste up document The portions of the document that are pasted or folded may be curled up preventing the document from being attached completely to the document glass Place a blank sheet of paper on top of the document so it will not curl up Stripes appear on the output Isn t the copy rati...

Page 69: ...k of the transfer protocol is set correctly Is the server name IP address entered correctly Check if the server name IP address is entered correctly Is the Save In location entered correctly Check if the save in location is entered correctly When SMB is selected for the transfer protocol is the shared name set correctly Check if the shared name is entered correctly Is the user name entered cor rec...

Page 70: ... Does the service support the web browser you are using Refer to Monitoring Managing the Scanner on a Web Browser in the User Guide to see if the browser is supported by the service The content in the right frame does not change even when a different topic is selected in the left frame The contents projected on the screen is distorted Change the window size setting on the web browser The screen do...

Page 71: ... browser Refer to Online help provided for the web browser A connection to CentreWare Internet Services was rejected or a message saying The page does not contain data is displayed This may happen if you refresh your web browser too often Try not to refresh the browser too often Also do not display the Status Jobs or Maintenance screen on multiple browsers Pressing the Enter key on the keyboard in...

Page 72: ...ner off while an error code is displayed scanned data and information accumulated on the scanner or the scanner s memory will be erased The Category row in the table is classified into the followings C Copy P Scan to PC M Scan to E mail U Scan to Media O Others XXX XXX Fault Error A fault has occurred Switch off the machine Ensure that the screen disappears before switching it on Error Code Catego...

Page 73: ...k if the POP3 server have been set correctly on CentreWare Internet Services Also check whether the DNS server setting is correct Refer to Starting CentreWare Internet Services P 24 031 505 O Cause While attempting to send the e mail the login to the POP3 server failed Remedy Check if the user name and password entered to access the POP3 server have been set correctly on CentreWare Internet Servic...

Page 74: ...ser guide provided for the printer 031 701 O Cause The communication to the printer has been shut off Remedy Check the printer s power cord installation and see if the power switch is on 031 702 O Cause The job was canceled on the printer Remedy Check the printer 031 710 O O O O Cause The scan area was not identified successfully Remedy Re load the document and try scanning again If the same messa...

Page 75: ...dy 1 Check if the e mail address is correct and try scanning the document again Cause 2 A POP before SMTP authentication error occurred on the SMTP server Remedy 2 Check if the authentication method for e mail transmissions is set to POP before SMTP on CentreWare Internet Services To use POP before SMTP authentication the settings for POP3 server must be made Refer to Starting CentreWare Internet ...

Page 76: ...le of the same name already exists Remedy Set the File Name Conflict setting to Overwrite or Change Name and Save Or delete the file of the same name in the folder Refer to Change File Name P 83 031 789 O Cause The file was not processed successfully after it was transferred Remedy Check if you have a right to rename delete the file Also if Windows Server 2003 of the computer where the file was tr...

Page 77: ...Compression P 88 031 986 O O O Cause The file attempted to save exceeds the maximum file format Remedy Remedy this by one of the following methods Reduce the number of document pages Lower the resolution If scanning in full color increase the compression rate Refer to Scan Resolution P 88 Image Compression P 88 031 987 O Cause The scanner s memory is full and cannot save the scanned data Remedy Re...

Page 78: ...name via Scan to PC or Scan to Media Remedy Select Close 131 703 O O O O Cause The number of pages scanned has reached the maximum 500 pages Remedy Re load the rest of the pages and scan again Error Code Category Cause Remedy C P M U O Error Code Category Cause Remedy C P M U O A fault has occurred Switch off the machine Ensure that the screen disappears before switching it on xxx yyy O O O O O Ca...

Page 79: ... also when the scanner is switched on Feature Function Reference Page 1 Copy Allows you to use various copy features 5 Copy P 56 2 Scan to E mail Allows you to use the Scan to E mail feature Using Scan to E mail P 42 3 Job Status Allows you to check the status of jobs Check the job status P 48 Check the job status P 58 4 Scan to Media Allows you to use the Scan to Media feature Using Scan to Media...

Page 80: ...s to be sent The recipient s address can be selected from Address Book or entered using the numeric keypad When selected from Address Book the name set for Recipient Name will be set as the name of the recipient s address Enter this within 64 characters or symbols Spaces control characters such as linefeeds and the following symbols cannot be used This can be a character string without an symbol M...

Page 81: ...The return address can be selected from Address Book or entered using the numeric keypad When selected from Address Book the name set for Recipient Name will be set as the name of the return address Scanner cannot receive e mail It is recommended to set an address that can receive e mail such as the administrator s address in case the e mail server returns e mail in the event of errors This settin...

Page 82: ...s recommended to set an address that can receive e mail such as the administrator s address in case the e mail sever returns e mail in the event of errors The characters that can be used when entering the sender s address is the same as for the recipient s address e mail address entry box The default sender s address is the address set in Machine E mail Address This setting is optional If you leav...

Page 83: ...strator Your computer name can be found in My Computer Properties on Windows If using Windows XP your computer name is under Change Computer Name on the Computer Name tab If using Windows 2000 your computer name is under Properties Computer Name on the Network ID tab The IP address of your computer can be displayed by entering ipconfig in Command Prompt and pressing the Enter key If entering this ...

Page 84: ...computer name user name For details check Control Panel Users and Passwords NetBIOS format domain user Enter this in a format of domain user Example pcname smith Use the following guidelines when entering the domain and user portions Control characters such as linefeeds and the following symbols cannot be used Leading and trailing spaces are not allowed This cannot be a character string that only ...

Page 85: ...d 2 Sided Displays the 2 Sided Originals screen On this screen you can set whether to scan both sides or only one side of the original When 2 Sided is selected set the original s printing orientation head to head or head to toe and the orientation it is loaded Output Color Full Color Black PDF DocuWorks More Grayscale TIFF File Format Original Type Lighten Darken 2 Sided Orig E mail Address Basic ...

Page 86: ...ption Original Type Cancel Save Text Text Photo Halftone Photo Type Photograph Photo Feature Description 1 Scan Size Auto Size Detect Standard Size Variable Size Displays the Scan Size screen On this screen you can set the scan size Normal Off Head to Left 200dpi 100 Auto Size Detect Scan Size Image Compression Reduce Enlarge Mixed Sized Orig Scan Resolution Original Orientation 1 2 E mail Address...

Page 87: ...eset is selected select the desired scan ratio from the list Note When the scan ratio is selected from Preset the output size may not match the paper size options displayed on the screen Use the paper sizes on the screen only as a reference When Auto is selected select the desired output size from the list Feature Description Scan Size Cancel Save Auto Size Detect Standard Size Variable Size 1 2 A...

Page 88: ...Top Head to Left Displays the Original Orientation screen On this screen you can set the orientation of the original Feature Description Cancel Save Scan Resolution 300 dpi 200 dpi 400 dpi 600 dpi Image Compression Cancel Save Higher Normal Lower Higher File Size Small Lower Resolution High This feature does not work when Black is selected as Output Color Mixed Sized Originals Cancel Save Off Sele...

Page 89: ...en deleting unwanted marks on the original s back ground 9 Contrast 5 levels of adjustment from Higher to Lower Displays the Contrast screen On this screen you can set the contrast of the output using or The closer the level is to Higher the higher the degree of contrast The bright area is made more brighter while the dark area is made more darker The closer the level is to Lower the lower the deg...

Page 90: ...d on hard disk or is monochrone instead of color For more information refer to the charts from the next page onward Paper Supply Auto Paper 100 Auto More More Tray 1 A4 Tray 2 A3 70 A3 A4 Reduce Enlarge Output Color Lighten Darken 2 Sided Basic Copying Image Quality More Copy Features Normal Y 0 0 0 M 0 0 0 C 0 0 0 K 0 0 0 Sharper Normal On Text Photo Halftone Presets Color Balance Original Type S...

Page 91: ... Size under Paper Size When Standard Size is selected set the desired paper size under Paper Size When Non standard Size is selected set the size using in increments of 1 mm Paper Supply Cancel Save Auto Paper Plain Recycled Plain Recycled Recycled Tray 1 A4 Tray 2 B4 Tray 3 A3 Tray 4 A5 Bypass A5 1 2 Bypass Cancel Save Paper Type Paper Size Standard Size Non standard Size Plain Bond Recycled Tran...

Page 92: ... printer only Black Full Color Displays the Output Color screen On this screen you can select the desired output color from Black and Full Color 4 2 Sided 1 1 Sided 1 2 Sided 2 2 Sided 2 1 Sided Note 1 2 Sided and 2 2 Sided are not available if the printer does not have a 2 sided copying feature Displays the 2 Sided Copying screen On this screen you select whether to make a 1 sided or 2 sided copy...

Page 93: ...nner is connected to a color printer Text Text Photo Photo Map Displays the Original Type screen On this screen you can select the type of the original When Text Photo or Photo is selected Photo Type displays on the right side of the screen When scanning photos printed on photo graphic paper select Photograph Feature Description Original Type Cancel Save Text Text Photo Halftone Photo Type Photogr...

Page 94: ... 2 Original Type This appears on the Basic Copying screen when the scanner is connected to a monochrome printer Text Text Photo Photo Map Displays the Original Type screen On this screen you can select the type of the original Selecting Text Photo or Photo displays Photo Type on the right side of the screen Select Photograph when scanning photos printed on photographic paper 3 Auto Exposure Off On...

Page 95: ...sing or 5 Sharpness 5 levels of adjustment from Sharper to Softer Displays the Sharpness screen The sharpness can be adjusted using or The closer the level is to Sharper the sharper the contour of the image The closer the level is to Softer the softer the contour of the image 6 Color Saturation available only when the scanner is connected to a color printer This feature is available only when Outp...

Page 96: ... 2 Up 1 Up 2 Up Displays the 2 Up screen On this screen you can set whether to copy two originals onto one page When 2 Up is selected select the image order on the right side of the screen 3 Original Orientation Head to Top Head to Left Displays the Original Orientation screen On this screen you can specify the orientation of the original Copy Output Cancel Save Uncollated Collated Copies will be ...

Page 97: ...ize Detect Standard Size Variable Size Displays the Original Size screen On this screen you can set the original size Auto Size Detect automatically detects the size of the original When Standard Size is selected select the desired size from the list displayed on the right side of the screen Note The paper size options displayed on the screen can be changed For more information refer to 6 System S...

Page 98: ...System Settings Sets the scanner s default settings Common Settings Network Set tings Copy Settings Scan Settings and System Admin Settings Refer to 6 4 Common Settings 6 8 System Administrator Settings in the User Guide 2 Screen Contrast Allows you to adjust the contrast of the touch panel Refer to 6 3 Screen Contrast in the User Guide Feature Description Original Size Cancel Save Auto Size Detec...

Page 99: ... File Name Preview SMB FTP Save In Basic Scanning More Scan Features Server Save In Address Book Folder Close 01 Common 02 Jones 03 Accounting 06 Brown 05 Jones 04 Smith 07 Potter 08 Administration 10 Not in Use 11 Not in Use 12 Not in Use 09 Misc 01 12 13 24 25 36 37 48 or Select Service Close Scan to PC Scan to E mail Note If a password is set to the folder you selected a password entry screen a...

Page 100: ...en the upper case characters When a button is displayed continuously after the last character is displayed it goes back to display the first character and then the rest of the characters in the same order Example When the 2 button is pressed repeatedly the touch panel displays 2 a b c A B C 2 a If you press the button repeatedly when a character is displayed before confirming its entry the rest of...

Page 101: ...ted by pressing the C button Note Depending on the entry field an entire character string can be deleted at once by pressing the C button or by selecting the Clear button on the touch panel Modifying a Character To modify a character move the cursor to the right of the character and press the C button Then enter the correct character using the numeric keypad Character Entry Procedure Use the follo...

Page 102: ...102 A Appendix 5 Press the OK button to confirm your entry 6 Select Save Catalog Enter Change Subject Cancel Save Subject Select from List Restore Auto ...

Page 103: ...he Product Information Updating the Scanner s Firmware We provide software embedded within the scanner called firmware The latest firmware can be obtained from our website Follow the instructions on the website to download firmware appropriate for your scanner and update your current firmware to the latest version http www fxprinters com Note The communication fee shall be borne by users Product N...

Page 104: ...m sec 50 m 100 60 5 mm sec 120 9 mm sec 100 m 200 30 2 mm sec 60 5 mm sec Interface 100BASE TX 10BASE T USB 2 0 Hi Speed HOST USB Output format Format Black TIFF single page multi page XDW PDF Grayscale TIFF JFIF JPEG XDW PDF Full color TIFF JFIF JPEG XDW PDF Note Uncompressed formats are not supported Data compression format Black MH photo MMR text text photo Grayscale JPEG Full color JPEG Suppor...

Page 105: ...n C3200 A 60 105g m2 Capacity 50 sheets Important plain paper 60 100g m2 Scanning speed DocuScan C4250 1 Sided Resolution Document Size Black Color Gray 300 dpi A4 40 sheets min 23 sheets min 600 dpi A4 25 sheets min 12 sheets min 2 Sided Resolution Document Size Black Color Gray 300 dpi A4 10 sheets min 7 sheets min 600 dpi A4 7 sheets min 4 sheets min DocuScan C3200 A 1 Sided Resolution Document...

Page 106: ...Microsoft Windows Vista IIS 6 0 FTP service NetWare 5 11 5 12 FTP service standard for your OS OS for SMB server Microsoft Windows 98 Microsoft Windows 98 Second Edition Microsoft Windows Millennium Edition Microsoft Windows NT Workstation 4 0 Microsoft Windows NT Server 4 0 Microsoft Windows 2000 Professional Microsoft Windows 2000 Server Microsoft Windows XP Home Edition Microsoft Windows XP Pro...

Page 107: ...C AT compatible machine Memory 128 MB or more Available hard disk space For installation 20 MB or more For operation 200 MB or more is recommended Software Microsoft Internet Explorer 5 0 or later To import addresses stored in your e mail application to Address Book your e mail application must be one of the followings Microsoft Outlook Express 5 Microsoft Outlook Express 6 Microsoft Outlook 2000 ...

Page 108: ...nlargement Ratios Scan Copy A6 B6 A5 B5 A4 B4 A3 A6 100 122 141 173 200 B6 82 100 116 142 164 A5 71 86 100 123 141 174 200 B5 58 70 81 100 115 141 163 A4 50 61 70 87 100 122 141 B4 50 58 71 81 100 115 A3 50 61 71 86 100 Document ...

Page 109: ...Settings Maintenance Diagnostics Address Book Maintenance Refer to For more information refer to 6 System Settings in the User Guide Copy Features Copying from the bypass tray When copying on non standard size paper by selecting Bypass for Paper Supply additional settings on the printer may be required For more information refer to the user guide provided for the printer Making a 2 sided copy of A...

Page 110: ...or occurs try scanning at a reduced scan ratio The above error occurs for example when a 2 sided A3 document is enlarged by 166 or above About the printer status If the printer breaks down the scanner may not accurately obtain the status of the printer In such case check the display on the printer s control panel To accurately obtain the status of the printer use the copy features after repairing ...

Page 111: ...clearing document jams 61 documents not supported 33 documents supported 32 loading documents 32 when you have more documents to scan 47 document feeder cover 15 document feeder cover sensor 15 35 document feeder tray 17 62 63 document glass 15 document guides 17 document indicator lamp 17 document output tray 17 DocuScan Manager 30 duplex automatic document feeder 17 E Edge Erase Copy 97 E mail A...

Page 112: ...Scan 87 related information sources 7 Reply To Scan 45 return e mail address see Reply to Scan S Save In location 50 Save In screen Scan to PC 82 scan 42 starting a scan job 47 51 53 stopping a scan job 55 Scan Resolution Scan 88 Scan Size Scan 86 87 Scan to E mail Scan 42 Scan to E mail button 38 Scan to Media Scan 52 Scan to PC Scan 48 Scan to PC button 38 scanner stand 103 screen 79 using the s...

Page 113: ...pment generates uses can radiate radio frequency energy and if not installed and used in accordance with the instruction manual may cause harmful interference to radio communications Operation of this equipment in a residential area is likely to cause harmful interference in which case the user is required to correct the interference at their own expense Changes and modifications to this equipment...

Page 114: ...tup and Quick Reference Guide ME3654E2 3 Edition 1 Fuji Xerox Co Ltd Copyright 2007 by Fuji Xerox Co Ltd CentreWare Internet Services If you want to know about the setting items Manuals included in the Software Pack CD ROM Insert the Software Pack CD ROM into your CD ROM drive The following manuls can be browsed on the startup screen DocuScan Manager If you want to know about the features and oper...

Reviews: