Printer Connection and Software Installation
105
Specifying the Queue
To perform printing, you must set up the print queue on your workstation.
NOTE:
•
When you have finished specifying the queue, you can then sent print jobs from applications. Start a print job
from an application, and specify the queue in the print dialog box. Depending on the application (Mozilla, for
example), however, you may have to use the default queue for printing. In such a case, you must specify a
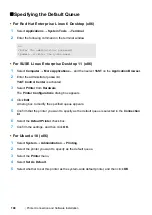
queue you want to use as the default queue. For details on specifying the default queue, see
.
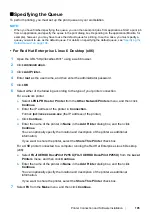
• For Red Hat Enterprise Linux 6 Desktop (x86)
1
Open the URL "http://localhost:631" using a web browser.
2
Click
Administration
.
3
Click
Add Printer.
4
Enter
root
as the user name, and then enter the administrator password.
5
Click
OK
.
6
Select either of the following according to the type of your printer connection.
For a network printer:
a
Select
LPD/LPR Host or Printer
from the
Other Network Printers
menu, and then click
Continue
.
b
Enter the IP address of the printer in
Connection.
Format:
lpd://xxx.xxx.xxx.xxx
(the IP address of the printer)
c
Click
Continue
.
d
Enter the name of the printer in
Name
in the
Add Printer
dialog box, and then click
Continue
.
You can optionally specify the location and description of the printer as additional
information.
If you want to share the printer, select the
Share This Printer
check box.
For a USB printer connected to a computer running the Red Hat Enterprise Linux 6 Desktop
(x86):
a
Select
FUJI XEROX DocuPrint P255 X (FUJI XEROX DocuPrint P255 X)
from the
Local
Printers
menu, and then click
Continue
.
b
Enter the name of the printer in
Name
in the
Add Printer
dialog box, and then click
Continue
.
You can optionally specify the location and description of the printer as additional
information.
If you want to share the printer, select the
Share This Printer
check box.
7
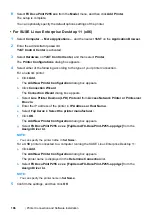
Select
FX
from the
Make
menu, and then click
Continue
.
Summary of Contents for DocuPrint P255 dw
Page 1: ...User Guide DocuPrint P255 d P255 dw ...
Page 6: ...6 Contents ...
Page 26: ...26 Product Features ...
Page 38: ...38 Basic Operation ...
Page 69: ...Printer Connection and Software Installation 69 5 Select Advanced ...
Page 114: ...114 Printer Connection and Software Installation ...
Page 197: ...Troubleshooting 197 4 Lower the levers to the original position 5 Close the rear cover ...
Page 226: ...226 Troubleshooting ...
Page 248: ...248 Contacting Fuji Xerox ...
Page 252: ...252 Index X XML Paper Specification print driver 58 96 ...

