116
3 Printing
Note
• Setting items are fixed regardless of your machine specifications. Therefore, the print result may differ from the
settings, depending on the machine used.
Problem Solving
This section describes troubles that may occur with the machine and their solutions.
If the problem does not solve even after performing the remedy, contact our Customer Support
Center.
Problems on Registering
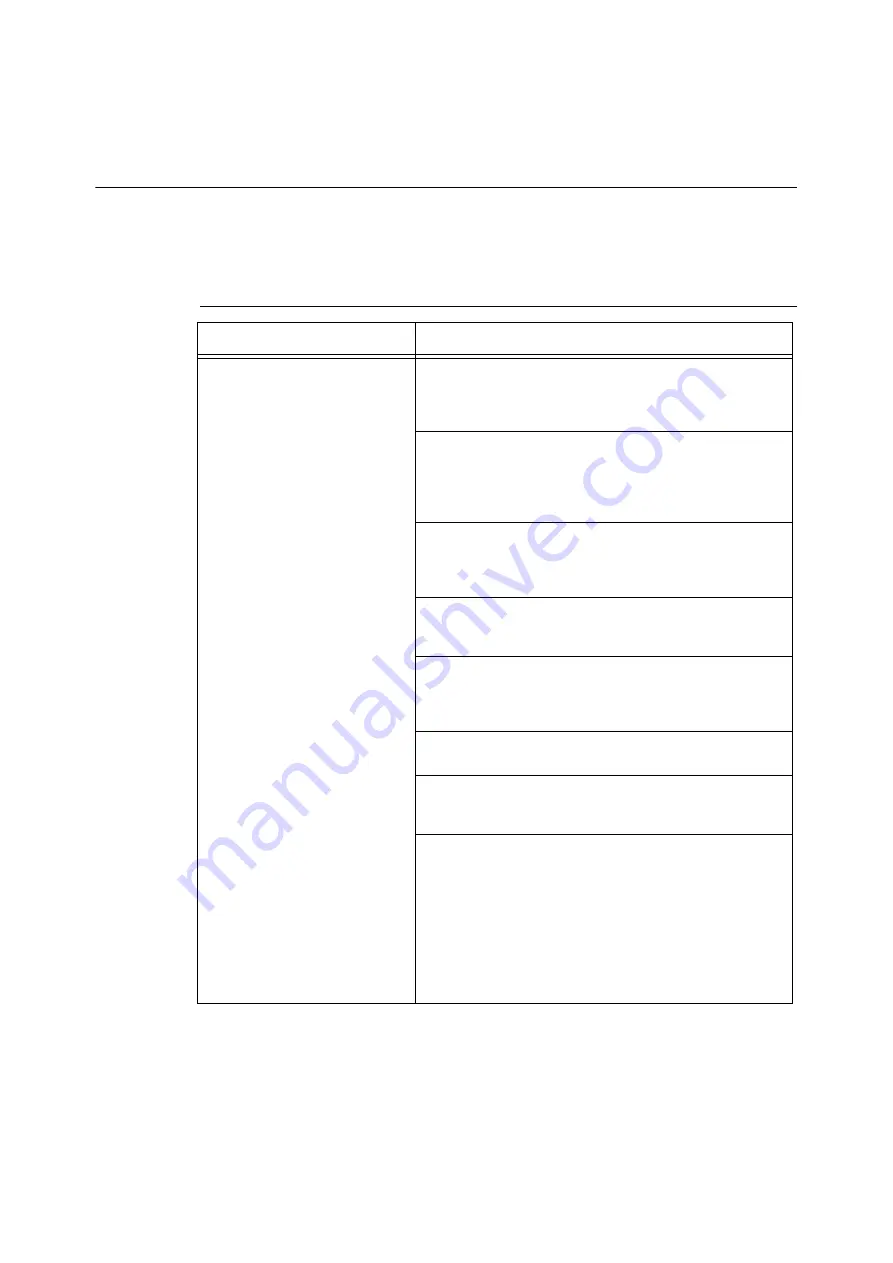
Symptom
Cause and Remedy
The message does not change to
[Registered] even after clicking the
[Properties] tab > [Connectivity] >
[Protocols] > [Google Cloud Print] >
[Register This Device to Google Cloud
Print] in CentreWare Internet Services.
[Cause] The machine could not connect to the Internet.
[Remedy] Check the network settings.
For more information on network settings, refer to "Configuration on
the Machine and CentreWare Internet Services"(P.110).
[Cause] Proxy server is used in the network environment.
[Remedy] Make proxy server settings in CentreWare Internet
Services.
For more information on network settings, refer to "Configuration on
the Machine and CentreWare Internet Services"(P.110).
[Cause] The proxy server in the network environment uses
authentication.
[Remedy] This feature cannot be used with proxy authentication.
Change your network setting not to use the proxy authentication.
[Cause] DNS is not correctly set.
[Remedy] Check the DNS settings from [Admin Menu] > [Network/
Port] > [DNS Server].
[Cause] The certificate verification feature of the machine is
validated.
[Remedy] Disable the certificate validation. Or, import the adequate
root certificate.
[Cause] Connection has timed out because of the busy network.
[Remedy] Wait for a while, and then execute the procedure again.
[Cause] A firewall is installed in the network environment.
[Remedy] The communication with "*.google.com" needs to be
allowed. Check the firewall settings.
[Cause] An error occurred in the machine.
[Remedy] Check the error code from [Error History] in CentreWare
Internet Services.
1 Start a web browser from a computer.
2 Enter the IP or Internet address of your machine to the address
box of the browser, and press the <Enter> key.
3 From the [Jobs] tab > [Error History], check [Date & Time] and
[Error Code].
4 For information on the cause and remedy, refer to "Error
Summary of Contents for DocuPrint 5105 d
Page 1: ...DocuPrint 5105 d User Guide...
Page 75: ...3 3 Printing on Custom Size Paper 75 2 Click the Device Settings tab 3 Click Custom Paper Size...
Page 78: ...78 3 Printing 6 Click Print on the Print dialog box to start printing...
Page 94: ...94 3 Printing 8 Press the Print Menu button to return to the Ready to print screen...
Page 418: ...418 Control Panel Menu Tree...


