


4
FRONT PANEL FUNCTIONS
Power Station
OPERATE
VOLUME
PRESENCE
DEPTH
BYPASS
POWER
ON
Variable Reactive Load + Vacuum Tube Power PS-100
EDGE
SELECT
FLAT
BRITE
DEEP
LEVEL
FLAT
WARM
®
HI
LO
Dual-Mode Reactance Amplifier
1
2
5
4
6
7
8
9
3
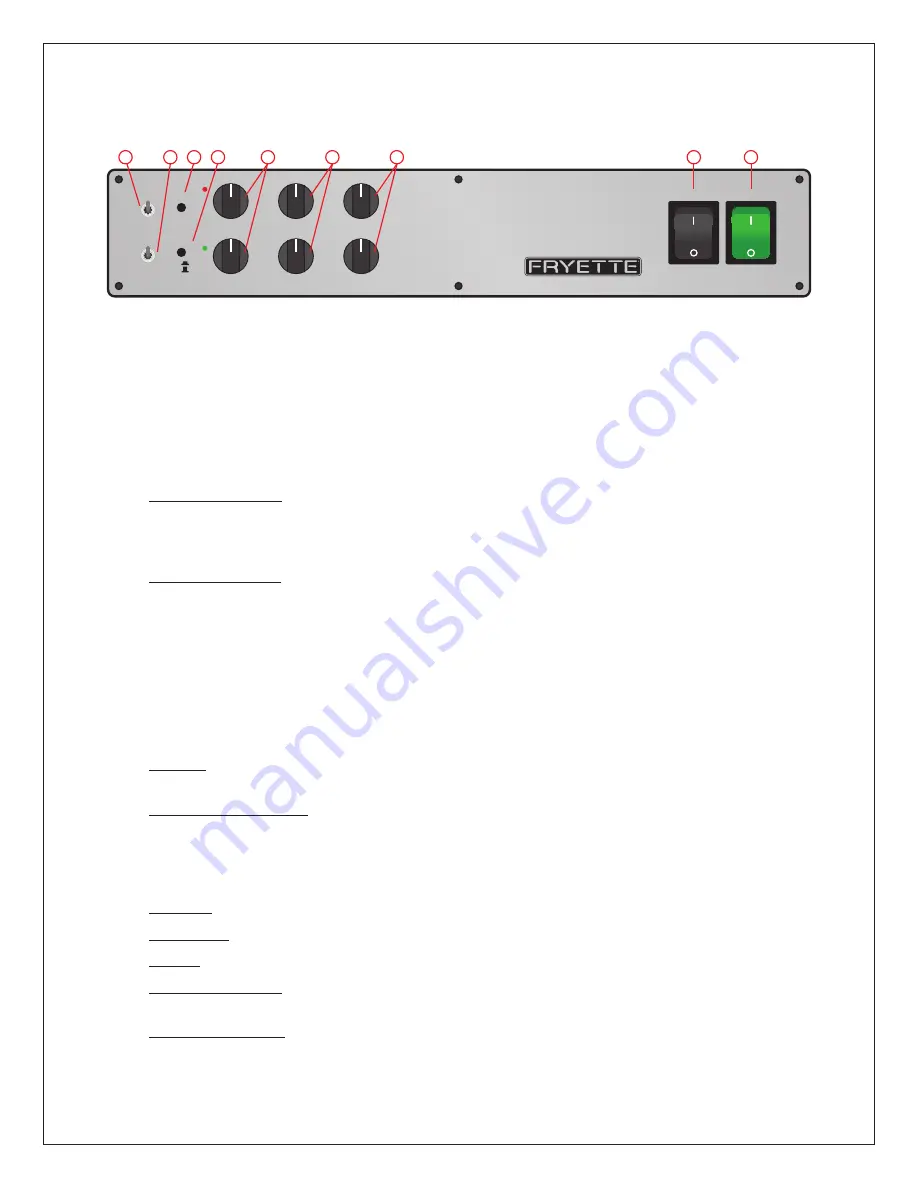
REACTIVE LOAD VOICING SWITCHES
The Reactive Load in the Power Station is what absorbs the output power of the amplifier connected to
the Amp In jack, and therefore the volume of that amplifier. It’s easier to think of the Reactive Load as
a substitute or dummy speaker. It reacts to your amplifier in the same way that a speaker reacts to your
amplifier and this is what helps your amplifier retain its original tone and feel at any volume. Like the
speaker connected to an amplifier, the response of the Reactive Load and it’s interaction with the load
amp changes at different volume settings. The Voicing Switches allow you to fine tune the response of the
Reactive Load at your preferred playing volumes.
1. EDGE/BRITE/FLAT – This switch sets the high frequency (Treble/Presence) response of the
reactive load in the Power Station. This will determine how much of your load amplifier’s top end
presence and clarity will be retained. At high volume settings, this switch will normally be set FLAT
or possibly BRITE if you want a little more cut in your live or recorded mix.
2. DEEP/WARM/FLAT - This switch sets the low frequency (Bass/Resonance) response of the reactive
load in the Power Station. This will determine how much of your load amplifier’s low end punch and
depth will be retained. At high volume settings, this switch will normally be set FLAT or possibly
WARM if you want a little more low-end projection in your live or recorded mix.
NOTE: These switches only operate when your load amplifier’s speaker output is connected to
the Power Station Amp In jack. They remain operational in normal attenuation mode as well as in
Silent Mode, whether the Power Station is powered on or off.
POWER AMPLIFIER CONTROL FUNCTIONS
3. SELECT – Switches between the Red and Green front panel Volume, Presence and Depth controls.
This function can also be controlled by a remote footswitch (see #12 on page 6).
4. INPUT LEVEL SWITCH – Sets usable range of the Volume control relative to strength of Line Input
or Amp In signal level. This is useful for setting your ideal playing volume whether you are attenua-
ting a high powered amp, boosting a low powered amp or connecting a preamp to the Line In. Set
the Level switch to HI for attenuating high powered amps or hot Line In signals or LO for boosting
small amps or when using low level Line In signals.
5. VOLUME – Sets the overall playing volume, or sound coming out of your speaker cabinet.
6. PRESENCE – Sets the high-end frequency response of the power amplifier stage in the Power Station.
7. DEPTH – Sets the low-end frequency response of the power amplifier stage in the Power Station.
8. STANDBY/BYPASS – In Standby mode, this switch bypasses the Power Station, puts the internal
tube power amplifier stage on standby and connects the load amplifier directly to the speaker cabinet.
9. AC MAINS SWITCH – Turns AC power on and off and indicates AC operation.
NOTE: The Standby/Bypass switch only allows sound to pass directly through to the speaker in
Bypass mode when your load amplifier speaker output is connected to the Amp In jack. When
using only the Line In jack, this switch turns the Power Station on Standby mode. In Standby
mode there will be no sound from the speaker.