Frigidaire FTF530FS0 Installation Instructions Manual Download Page 3

3

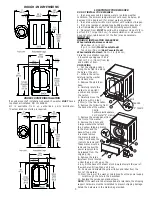
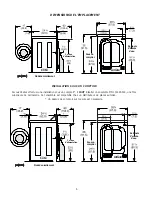
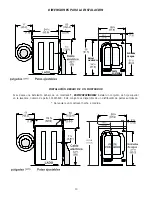
ROUGH-IN DIMENSIONS

UNDER COUNTER INSTALLATION

If an under counter* installation is desired, the washer 

MUST

 have a

top sheet kit installed, P/N 131445600.
Kit is available from an authorized parts distributor.
*Custom sized countertop is required.

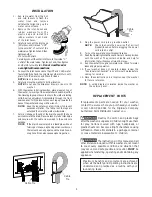
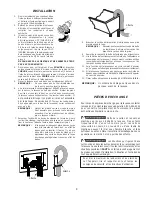
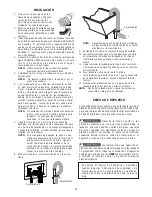
11. From the rear of the washer, carefully pull out the power supply

cordthrough the hole in the backsheet.

12.  Replace the service panel and screws.

NOTE:

  If the washer is to be transported at a later date, the shipping

support hardware must be reinstalled to prevent shipping damage.
Retain the hardware in the plastic bag provided

.

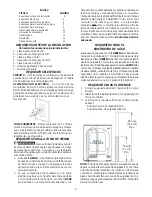
SPACER

BOLT

"P" CLAMP

LOCATION OF YOUR WASHER

DO NOT INSTALL YOUR WASHER:

1.  In an area exposed to dripping water or outside weather
conditions. The ambient temperature should never be below 60
degrees F (15.6 degrees C) for proper washer operation.
2.  In an area where it will come in contact with curtains or drapes.
3.  In an area (garage or garage-type building) where gasoline of
other flammables are kept or stored (including automobiles).
4.  On carpet. Floor 

MUST

 be solid with a maximum slope of 1/2 in.

per foot (1.27 cm per 30.5 cm). To ensure vibration or movement
does not occur, reinforcement of the floor may be necessary.

IMPORTANT
MINIMUM INSTALLATION CLEARANCES
When installed in alcove or closet:

      Sides, Rear = 0 in. (0 cm)
      Top = 0 in. (0 cm) 

Front Console Model

      Top = 15 in. (38.1 cm) 

Rear Console Model

When installed in closet:

  Front = 1 in. (2.54 cm)

Closet door ventilation required:
 2 louvered openings each 60 in

2

 (387 cm

2

), 3 in. (7.6 cm) from top

 and bottom of door.

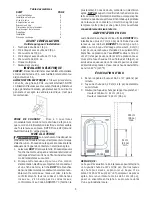
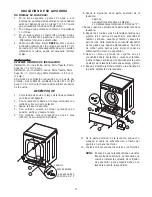
UNPACKING

1.  Cut the shipping carton
 along the dotted line along
the base of the unit.
2.  While in the carton
carefully lay the washer
 on its back side.

3.  Remove the styrofoam
base.
4.  Carefully return the
washer to an upright
 position and remove
 the carton.
5.  Carefully move the
washer to within 4 feet
(122cm) of the final location.
6.  Remove the following from
 the back side of the washer:
                        3 bolts,

                3 yellow plastic spacers,
                2 or 3 metal "P" clamps.

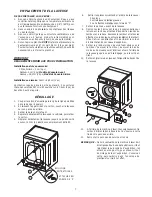
7.  Remove the service panel from
 the front of the washer.
8.  Remove the 4 nuts and
6 large washers that attach
the 2 yellow shipping braces
to the drum and the
base. Lift up on the
 drum and remove
 the braces (a yellow
 ribbon surrounds the
 items to be removed).
These braces must be
removed to allow the
power supply cord to
be released from the
shipping ring.
9.  Remove the large
styrofoam block located
 under the drum. Lift up on the
 drum, tilt the base of the foam block inwards toward the rear of
the washer until free, then pull it out.
10.  Remove and discard the yellow ribbon and label from the
front of the washer.

Summary of Contents for FTF530FS0

Page 1: ... las cercanías de este ni cualquier otro electrodoméstico QUE HACER SI NOTA UN OLOR A GAS No trate de encender ningún electrodoméstico No toque ningún interruptor eléctrico no use ningún teléfono de su edificio Haga que todo el mundo salga del cuarto edificio o área Llame inmediatamente al proveedor del gas desde el teléfono de un vecino Siga las instrucciones del proveedor del gas Si no puede pon...

Page 2: ...Max Max Max OUTLET RECEPTACLE Properly grounded 3 prong receptacle to be located so the power supply cord is accessible when the washer is in an installed position NOTE GFI Ground Fault Interrupter receptacle is not required GROUNDING REQUIREMENTS Improper connection of the equipment grounding conductor can result in a risk of electrical shock Check with a licensed electrician if you are in doubt ...

Page 3: ...cessary IMPORTANT MINIMUM INSTALLATION CLEARANCES When installed in alcove or closet Sides Rear 0 in 0 cm Top 0 in 0 cm Front Console Model Top 15 in 38 1 cm Rear Console Model When installed in closet Front 1 in 2 54 cm Closet door ventilation required 2 louvered openings each 60 in2 387 cm2 3 in 7 6 cm from top and bottom of door UNPACKING 1 Cut the shipping carton along the dotted line along th...

Page 4: ...s located inside the washer on the service panel INSTALLATION 1 Run some water from the hot and cold faucets to flush the water lines and remove particles that might clog up the water valve screens 2 Remove the inlet hoses and rubber washers from the plastic bag and install the rubber washers in each end of the inlet hoses 3 Carefully connect the inlet hose 90 elbow end marked HOT to the outside H...

Page 5: ...n à ce que le cordon d alimentation électrique soit accessible une fois la laveuse en place NOTE Prise à GFI Ground FaultInterrupter n estpasrequise MISE À LA TERRE Le branchement inadéquat du conducteurdemiseàlaterrepourraitprésenterunrisque d électrocution En cas de doute quant à la mise à la terre adéquate de l appareil contacter un électricien agréé 1 LalaveuseDOITêtremiseàlaterre Encasdemauva...

Page 6: ...e est disponible chez un distributeur de pièces autorisé Un dessus de comptoir sur mesure est nécessaire DIMENSIONS DE L EMPLACEMENT po cm po cm po cm po cm po cm Côté Piedsdenivellement Cordon d alimentation Arrière Sous un comptior Robinets d arrivée d eau Piedsdenivellement po cm po cm po cm po cm po cm Côté Cordon d alimentation Arrière Robinets d arrivée d eau Sous un comptior ...

Page 7: ... LAVEUSE NE PAS INSTALLER LA LAVEUSE 1 Dans un endroit exposé à un écoulement d eau ou aux conditions atmosphériques La température ambiante ne doit jamais descendre en dessous de 15 6 C 60 F pour que la laveuse fonctionne correctement 2 Dans un endroit où elle serait en contact avec des rideaux ou des tentures 3 Dans un endroit garage ou structure semblable où de l essence ou d autres produits in...

Page 8: ... de pièces authentiques Frigidaire le plus proche Détruire le carton et les sacs en plastique après avoir déballé la laveuse Des enfants risqueraient de s en servir comme jouet Les cartons recouverts d un tapis d un couvre lit ou d une feuille de plastique peuvent former une chambre étanche et faire suffoquer un enfant Placer le matériel d emballage dans une poubelle ou le mettre hors de portée de...

Page 9: ...INA Requisitos antes de la instalación 9 Requisitos eléctricos 9 Requisitos para la toma de tierra 9 Requisitos para el suministro de agua 9 Requisitos para el drenaje 9 Dimensiones para la instalación 10 Ubicación de su lavadora 11 Desempaque 11 Instalación 12 Piezas de repuesto 12 TOMACORRIENTES El tomacorrientes con 3 orificios y toma de tierra correcta debe estar ubicado de manera que el cable...

Page 10: ...r ES IMPRESCINDIBLE instalar un conjunto de hoja superior en la lavadora número de parte 131445600 Este conjunto es disponible de un distribuidor de partes autorizado Se requiere un mostrador hecho a medida DIMENSIONES PARA LA INSTALACION Bajo el mostrador Entradas deagua PARTE POSTERIOR ...

Page 11: ...de espuma 4 Con cuidado vuelva a colocar la lavadora en posición vertical y saque la caja 5 Con cuidado mueva la lavadora a unos 4 pies 122cm de su ubicación definitiva 6 Saque lo siguiente de la parte posterior de la lavadora 3 pernos 3 separadores amarillos de plástico 2 o 3 abrazaderas metálicas en forma de P 7 Saque el panel de servicio de la parte delantera de la lavadora 8 Saque las 4 tuerca...

Page 12: ...estico 5 Cuidadosamente coloque la lavadora en su ubicación permanente NOTA No levante la lavadora por la puerta ni por el cajón dispensador 6 Con la lavadora en su ubicación permanente ponga un nivel encima de la lavadora La lavadora no debe mecer Ajuste las piernas niveladoras frontales para arriba o para abajo para asegurar que la lavadora se quede firmamente en el suelo En las instalaciones de...

Reviews: