Frigidaire CTF140ES0 Installation And Safety Instructions Download Page 6

This warranty does not cover the following:

1.

All labor costs on commercial laundry products.

2.

Payment acceptance devices for commercial laundry products.

3.

Products with original serial numbers that have been removed, altered or cannot be readily determined.

4.

Normal wear and tear and gradual deterioration.

5.

Product that has been transferred from its original owner to another party or removed outside the USA or Canada.

6.  Rust on the interior or exterior of the unit.
7.  Products purchased "as-is". 
8.  Food loss due to any refrigerator or freezer failures.
9.

Damage caused at any time during shipment.

10.  Service calls which do not involve malfunction or defects in materials or workmanship, or for appliances used other than in 

accordance with the provided instructions.

11.  Service calls to correct the installation of your appliance or to instruct you how to use your appliance.
12.  Expenses for making the appliance accessible for servicing, such as removal of trim, cupboards, shelves, etc., which are not a part of 

the appliance when it is shipped from the factory. 

13. Service calls to replace appliance light bulbs, air filters, water filters, other consumables, or knobs, handles, or other cosmetic parts.
14. Surcharges including, but not limited to, any after hour, weekend, or holiday service calls, tolls, ferry trip charges, or mileage 

expense for service calls to remote areas, including the state of Alaska.

15.  Damages to the finish of appliance and/or location that are incurred during installation, including but not limited to floors, cabinets, 

walls, etc.

16. Damages caused by: services performed by unauthorized service companies; use of parts other than genuine Electrolux parts or parts 

obtained from persons other than authorized service companies; or external causes such as abuse, misuse, inadequate power supply, 
accidents, fires, or acts of God.

17. Labor costs after ninety (90) days from your original date of purchase incurred for product repair or replacement as provided herein 

for appliances operated by a concessionaire or vendor in a trailer or other motorized vehicle or at varying locations.

Keep your receipt, delivery slip, or some other appropriate payment record to establish the warranty period should
service be required. If service is performed, it is in your best interest to obtain and keep all receipts. Service under
this warranty must be obtained by contacting Electrolux at the addresses or phone numbers below.

Your appliance is covered by a 

one year limited warranty

. For one year from your original date of purchase, Electrolux will

pay all costs, except as set forth below, for repairing or replacing any parts of this appliance that prove to be defective in
materials or workmanship when such appliance is installed, used, and maintained in accordance with the provided instructions.

This warranty only applies in the USA and Canada. In the USA, your appliance is warranted by 

Electrolux Major Appliances North

America, a division of Electrolux Home Products, Inc.

In Canada, your appliance is warranted by 

Electrolux Canada Corp.

Electrolux

authorizes no person to change or add to any obligations under this warranty. Obligations for service and parts under this warranty must
be performed by Electrolux or an authorized service company. Product features or specifications as described or illustrated are subject
to change without notice.  

USA
1.866.738.1640

Electrolux Major Appliances
North America
P.O. Box 212378 
Augusta, GA  30907

Canada

1.866.738.1640 

Electrolux Canada Corp.

5855 Terry Fox Way

Mississauga, Ontario, Canada

L5V 3E4

Exclusions

If You Need
Service

Commercial Appliance Warranty Information

DISCLAIMER OF IMPLIED WARRANTIES; LIMITATION OF REMEDIES

CUSTOMER'S SOLE AND EXCLUSIVE REMEDY UNDER THIS LIMITED WARRANTY SHALL BE PRODUCT REPAIR OR REPLACEMENT
AS PROVIDED HEREIN. CLAIMS BASED ON IMPLIED WARRANTIES, INCLUDING WARRANTIES OF MERCHANTABILITY OR FITNESS
FOR A PARTICULAR PURPOSE, ARE LIMITED TO ONE YEAR OR THE SHORTEST PERIOD ALLOWED BY LAW, BUT NOT LESS THAN
ONE YEAR. ELECTROLUX SHALL NOT BE LIABLE FOR CONSEQUENTIAL OR INCIDENTAL DAMAGES SUCH AS PROPERTY DAMAGE
AND INCIDENTAL EXPENSES RESULTING FROM ANY BREACH OF THIS WRITTEN LIMITED WARRANTY OR ANY IMPLIED WARRANTY.
SOME STATES AND PROVINCES DO NOT ALLOW THE EXCLUSION OR LIMITATION OF INCIDENTAL OR CONSEQUENTIAL DAMAGES,
OR LIMITATIONS ON THE DURATION OF IMPLIED WARRANTIES, SO THESE LIMITATIONS OR EXCLUSIONS MAY NOT APPLY TO YOU.
THIS WRITTEN WARRANTY GIVES YOU SPECIFIC LEGAL RIGHTS. YOU MAY ALSO HAVE OTHER RIGHTS THAT VARY FROM STATE
TO STATE.

Summary of Contents for CTF140ES0

Page 1: ...uedelalaveusedoitrespecterlescodesetordonnanceslocauxainsiquel éditionlaplusrécentedu Code ANSI NFPA 70 ou au Canada le Code canadien d électricité ACNOR C22 1 partie1 Pour votre sécurité suivre les directives données dans le présent guide afin de minimiser les risques d incendie d explosion de dommages matériels de blessures et de mort Ne pas entreposer ni utiliser d essence ou d autres vapeurs o...

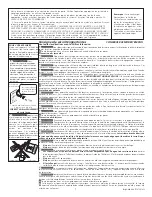
Page 2: ...eriod before using the washer turn on all hot water faucets and let the water flow from each for several minutes This will release any accumulated hydrogen gas Hydrogen gas is flammable do not smoke or use an open flame during this time Failure to comply with these warnings could result in fire explosion serious bodily injury and or damage to the rubber or plastic parts of the washer Protect Child...

Page 3: ...al shock Check with a licensed electrician if you are in doubt as to whether the appliance is properly grounded 1 The washer MUST be grounded In the event of malfunction or breakdown grounding will reduce the risk of electrical shock by a path of least resistance for electrical current 2 Since your washer is equipped with a power supply cord having an equipment grounding conductor and a grounding ...

Page 4: ...its back side 3 Remove the styrofoam base 4 Carefully return the washer to an upright position and remove the carton 5 Carefully move the washer to within 4 feet 122cm of the final location 6 Remove the following from the back side of the washer 3 bolts 3 yellow plastic spacers 2 or 3 metal P clamps 10 Remove and discard the yellow ribbon and label from the front of the washer 11 From the rear of ...

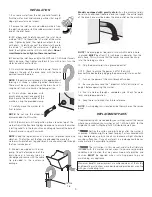
Page 5: ...with your laundering tasks INSTALLATION 1 Run some water from the hot and cold faucets to flushthe water lines and remove particles that might clog up the water valve screens 2 Remove the inlet hoses and rubber washers from the plastic bag and install the rubber washers in each end of the inlet hoses 3 90 elbow end Carefully connect the inlet hose marked HOT to theoutside H outlet of the water val...

Page 6: ... to establish the warranty period should service be required If service is performed it is in your best interest to obtain and keep all receipts Service under this warranty must be obtained by contacting Electrolux at the addresses or phone numbers below Your appliance is covered by a one year limited warranty For one year from your original date of purchase Electrolux will pay all costs except as...

Page 7: ...s graves ou la mort Ne pas utiliser plus d un seul produit à lessive par brassée à moins d indications contraires sur l emballage Ne pas mélanger d eau de javel avec de l ammoniaque ou des produits acides comme le vinaigre Pour prévenir les blessures graves et ne pas endommager la laveuse Les réparations et l entretien doivent être effectués uniquement par un agent de service autorisé à moins d in...

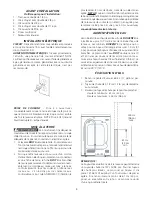
Page 8: ... 24 po min 244 cm 96 po max ARRIÈRE PRISE DE COURANT Prise à 3 ouvertures convenablement mise à la terre et située de façon à ce que le cordon d alimentation électrique soit accessible une fois la laveuse en place NOTE Prise à GFI Ground FaultInterrupter n estpasrequise MISE À LA TERRE Le branchement inadéquat du conducteurdemiseàlaterrepourraitprésenterunrisque d électrocution En cas de doute qua...

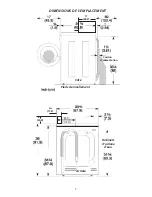
Page 9: ...9 DIMENSIONS DE L EMPLACEMENT 43 2 17 Côté Cordon d alimentation Pieds de nivellement 8 43 8 v 20 4 11 2 Arrière Robinets d arrivée d eau ...

Page 10: ...délicatement la laveuse à la verticale puis retirer le carton 5 Déplacer délicatement la laveuse jusqu à ce qu elle soit à environ 122 cm 4 pieds de son emplacement définitif 6 Retirer les pièces suivantes de l arrière de la laveuse 3 boulons 3 entretoises en plastique jaunes 2 ou 3 attaches métalliques en forme de P 10 Retirer et jeter le ruban jaune et l étiquette du devant de la laveuse 11 A l ...

Page 11: ...orgerlefiltredes robinets 2 Enlevez du sac en plastique les tuyaux d arrivée et les rondelles caoutchouc et installez les rondelles à chaque extrémité 3 Quantre vingt dixdegrédescoudes Branchez soigneusement le tuyau d arrivée marqué HOT CHAUDE à la sortie inférieure de la soupape d eau Serrez à la main puis serrez encore de 2 3detouràl aidedepinces Branchezsoigneusementl autretuyau COLD FROIDE d ...

Page 12: ...on électrique inadéquate ou les cas de force majeure 17 Les coûts de main d œuvre suivant quatre vingt dix 90 jours de la date originale d achat engagés pour la réparation ou le remplacement de produit tel que stipulé aux présentes pour les appareils opérés par un concessionnaire ou un vendeur dans une remorque ou un autre véhicule motorisé ou dans divers emplacements AVIS DE NON RESPONSABILITÉ SU...

Reviews: