freor VEGA SPACE QB Operation Manual Download Page 25


25 


ELECTRICAL CONNECTION 

6.1.


Connecting the unit to the power supply 

Unit  connection  to  the  to  the  power  supply  must  be  carried  out  only  by  qualified 
personnel. 

Note the following before connecting the unit: 


Applicable local electrical safety regulations. 


The power supply voltage and frequency must match the specifications on the 
technical data sticker. 


Do not connect a damaged unit or damaged parts (such as electrical cables) to 
the power supply. 


Only connect the unit to a mains circuit with protective grounding. 


Do not use extension cords or multiple socket strips.  

7.


DRAINAGE 

7.1.


Drainage system 

Freezer Vega Space QB Freezer to be equipped with suitable drainage system. The 
condensate can be drained to the tub trough the drainage siphon.  

Also,  condensate  drainage  can  be  connected  to  the  common  sewerage  system. 
Drainage connection points are indicated in the furniture layouts. It is necessary to 
check the condensate collection tub to prevent it from the entry of food remains, 
sand or larger dust particles.  

8.


MAINTENANCE, DEFROSTING, CLEANING 

8.1.


Maintenance  

In  general,  this  equipment  does  not  need  any  maintenance.  However,  they  need 
defrosting and cleaning as described in further sections. 

8.2.


Defrosting  

Warm ambient air can get into self-service showcases. It is particularly probable when 
the showcase is without doors, or its door is left open. Due to it, evaporator can frost. 
Evaporators  must  be  regularly  defrosted  in  accordance  with  programs  set  in  the 
control. During the defrosting refrigeration is not run.  

Evaporators  of  high-temperature  cabinets  can  be  defrosted  using  recirculation  air 
flows. Evaporators of medium- and low-temperature can be defrosted using electrical 
heating elements.  

The ventilator operation during defrosting is described in the technical characteristics. 

Summary of Contents for VEGA SPACE QB

Page 1: ...OPERATION MANUAL SERVE OVER VEGA SPACE QB FREEZER...

Page 2: ...ant circuit 10 2 9 Opening closing the doors 10 2 10 Recommended working conditions and ambient temperature 10 2 11 Purpose of use 11 3 UNPACKING 11 4 INSTALLATION 14 4 1 Requirements for installation...

Page 3: ...g 25 8 3 Cleaning 26 9 ENERGY SAVING 27 10 DISPOSAL 27 11 STORAGE 27 12 TRANSPORTATION 27 13 TESTING 28 14 ACCESSORIES 28 15 TECHNICAL DATA 28 15 1 Electrical layouts 28 15 2 Failures and troubleshoot...

Page 4: ...turer information Manufacturer address FREOR LT UAB Katiliskiu St 92 LT 02212 Vilnius Lithuania T 370 5 232 9188 EN Made in Lithuania Customer Installation date Installation place Start of the product...

Page 5: ...Fig 1 Fig 1 Example of sticker Intention of this document is to provide information about maintaining and operating of the freezer Vega Space QB Freezer In accordance with the EU Directive the refrig...

Page 6: ...6 1 2 Dimensions Fig 2 Dimensions of Vega Space QB Freezer LU...

Page 7: ...pliance Do not store any explosive substances such as aerosol containers with flammable propellant gas in the freezer Do not make any technical changes to the freezer 2 2 R290 refrigeration cabinets s...

Page 8: ...ce e g careless handling with a forklift or floor cleaning machine Do not crush or bend pipes Only qualified maintenance personnel may carry out work on the refrigerant circuit Only open the refrigera...

Page 9: ...setup and installation Protection from contact with liquid leaking refrigerant in the event of leakage in the refrigerant circuit Protection from low temperature during loading and cleaning For removi...

Page 10: ...ut work on the refrigerant circuit In the event of fault messages or damage to the appliance contact the maintenance service 2 9 Opening closing the doors Hand or other body parts may become caught on...

Page 11: ...e manufacturer will be exempted from warranty obligations 3 UNPACKING To protect the equipment from damage it may be transported and kept only in the use condition Before and during unpacking of the d...

Page 12: ...12 x 2 Size 17 15 min Use appropriate equipment for unit transportation refer to unit weight and dimension information Lift the serve over Remove pallet s screws Pick up the freezer...

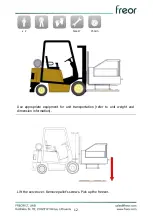
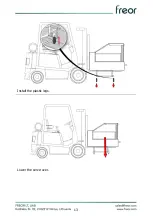
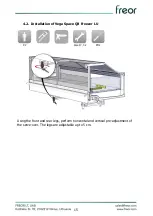
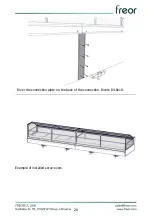
Page 13: ...13 Install the plastic legs Lower the serve over...

Page 14: ...y both depth and length and installed in the stable position Set up the unit only on the designated adjustable legs It is forbidden to install the unit close to any heating equipment or any HVAC eleme...

Page 15: ...15 4 2 Installation of Vega Space QB Freezer LU X2 Size 17 32 PH2 Using the front and rear legs perform horizontal and vertical pre adjustment of the serve over The legs are adjustable up to 5 cm...

Page 16: ...16 Apply the foam tape around perimeter of connection Apply silicone to seal the perimeter of connection...

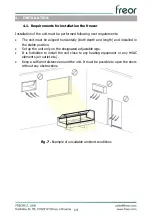
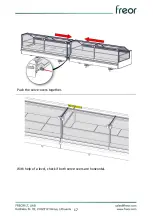
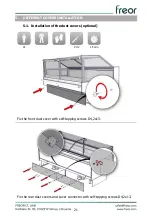
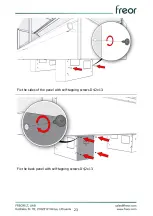
Page 17: ...17 Push the serve overs together With help of a level check if both serve overs are horizontal...

Page 18: ...18 All 4 connection slot positions in the figure Front connection slot position Connection slots are fixed together with threaded pins M10x90 ISO 7985...

Page 19: ...19 Remove the back decoration Back connection slot position Connection slots are fixed together with threaded pins M10x90 ISO 7985...

Page 20: ...20 River the connection plate on the back of the connection Rivets D4 8x10 Example of installed serve overs...

Page 21: ...COVERS INSTALLATION 5 1 Installation of the dust covers optional X1 PH2 15 min Fix the front dust cover with self tapping screws D4 2x13 Fix the rear dust covers and cover connector with self tapping...

Page 22: ...22 Fix the side dust covers with self tapping screws D4 2x13 5 2 Installation of the leg panels optional X1 PH2 15 min Attach the front panel to the leg...

Page 23: ...23 Fix the sides of the panel with self tapping screws D4 2x13 Fix the back panel with self tapping screws D4 2x13 fd...

Page 24: ...5 15 min To adjust the angle and the height of the stand slightly loosen the bolts indicated on the left of figure above Adjust the stand angle and height by rotating the bolts indicated on the right...

Page 25: ...ommon sewerage system Drainage connection points are indicated in the furniture layouts It is necessary to check the condensate collection tub to prevent it from the entry of food remains sand or larg...

Page 26: ...does not leave dust linen chamois and cotton Dyed components must be cleaned with liquid cleaning agents without abrasive materials It is recommended to use special detergents purposed for dyed surfa...

Page 27: ...Collect the refrigerant from the freezing coil The elements of the refrigerated cabinet require specific disposal therefore it is necessary to contact organizations that dispose of certain types of ma...

Page 28: ...sories available on request such as partitions tabs price holders a drainage collection tub evaporation baths safety bumpers etc For more information please call FREOR LT or sales partner 15 TECHNICAL...

Page 29: ...rtments Contamination of the freezing coil Damage of the tightness of the freezing coil Failure of the control valve TRV ERV Leakage of the refrigerant Call the refrigeration technician service depart...

Page 30: ...ments can be operational Check switches Check the power network The compressor is out of order Refrigeration cycle malfunction Signals of the pressure sensors Fluctuations of the electrical network vo...

Page 31: ...F SYMBOLS Symbol Meaning Type Qualified specialist Work clothing Protective gloves Brittle surfaces Wrench Sizes 13 17 32 Screwdriver PH2 Rubber hammer 1 Protective goggles Silicone pistol 1 Clamp 2 H...

Page 32: ...ufacturer of the commercial refrigeration equipment Katiliskiu St 92 LT 02212 Vilnius Lithuania T 370 5 232 9188 E sales freor com www freor com DOM 1KKOX 00000E_v1 0 FREOR LT is not affiliated with C...

Reviews: