background image

27

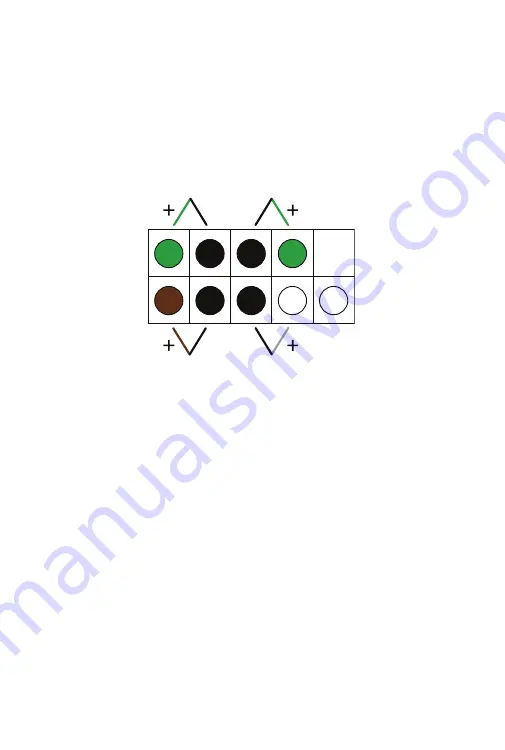
SYSTEM PANEL HEADER CONNECTION

Reattach the System Panel Header connectors.  These include the Power 
LED, HDD LED, Power Switch, and Reset Switch. 

Power LED

Power Switch

HDD LED

Reset Switch

Line up each connector with the correct pins on the header and gently  
press down until it is fully seated.  Make sure wire colors match the dia-
gram above. 

Summary of Contents for Mini

Page 1: ...FreeNAS Mini and XL Motherboard Replacement Guide May 2017 Edition ...

Page 2: ...Removal 12 Network Interface Card NIC Removal 13 Motherboard Removal 14 Part II Installing Motherboard Components and Cables 15 Motherboard Installation 15 RAM Installation 16 Network Interface Card NIC Installation 18 Motherboard Tray Installation 21 FreeNAS Mini SATA Cable Connection 22 FreeNAS Mini XL SATA Cable Connection 23 FreeNAS Mini SATADOM Installation 24 FreeNAS Mini XL SATADOM Installa...

Page 3: ...XL PREPARATION A Philips screwdriver is needed for internal screws Shut down the FreeNAS system and unplug the power cable Make a note of where the data cables are connected and unplug them If a Tamper Resistant sticker is present removing or cutting it to open the case will not affect the warranty on the unit ...

Page 4: ...2 PART I REMOVING MOTHERBOARD COMPONENTS AND CABLES OPENING THE FREENAS MINI CASE Unscrew the four thumbscrews on the rear of the Mini 1 3 2 4 Slide the black metal cover off the back of the chassis ...

Page 5: ... FREENAS MINI XL CASE The FreeNAS Mini XL has two side panels which are removed separately For a motherboard replacement remove all four thumbscrews then slide each panel back and remove it from the chassis 3 4 1 2 ...

Page 6: ...NNECTOR REMOVAL The power supply is connected to the motherboard with a 24 pin connector Press in on the upper part of the latch and pull the connector upward to disconnect the power supply cable Note Force may be needed as the connector is tight It helps to hold the motherboard tray in place while pulling upward on the connector Press Latch Inward ...

Page 7: ...the motherboard is removed in this step One end of each memory slot has a hinged latch while the other end has a fixed latch Press down on the hinged latch to release the memory module from the memory slot Gently pull upward to remove the memory module from the memory slot If a second memory module is present remove it also ...

Page 8: ...essary flex the locking tab outward with a fingernail to get the connector to release FRONT PANEL AND USB 2 0 CABLE REMOVAL Switch to the other side of the Mini to remove the four Front Panel Header connectors and the USB 2 0 Header For each connector grip the cable and gently pull upward to disconnect USB 2 0 Front Panel ...

Page 9: ...Header With each connector grip the wires and gently pull upward to disconnect FREENAS MINI XL FRONT FAN CABLE REMOVAL The Mini XL has two extra fans that connect to the two front fan headers on the motherboard Disconnect each connector by gripping and gently pulling upward Auxiliary Panel ...

Page 10: ...8 SATADOM POWER CABLE REMOVAL Gently use thumb and index fingernails to grip the flanges on the SATADOM power connector then pull to remove it Be careful this connector and wires are fragile ...

Page 11: ...TADOM from the SATA slot FREENAS MINI SATA CABLE REMOVAL Remove the four SATA cables connected to the blue SATA connectors and any optional SATA cables connected to the white slots Remove each connector individually by gently pulling upward on the black part of the connector Latch ...

Page 12: ...A CABLE REMOVAL The FreeNAS Mini XL has four extra SATA cables that are plugged into the white connectors behind the FRNT_FAN2 header Remove each cable individually by gently pulling upward on the black part of the connector ...

Page 13: ...ry on this side of the motherboard is removed in this step Press the hinged latch outwards to release the memory module from the memory slot Gently lift the memory module out of the memory slot If a second memory module is present remove it also ...

Page 14: ...12 MOTHERBOARD TRAY REMOVAL Remove the three motherboard tray back panel screws and the two inside edge screws 4 5 1 3 2 Gently lift and slide the motherboard tray out of the chassis ...

Page 15: ...13 NETWORK INTERFACE CARD NIC REMOVAL Skip this section if the optional network card has not been installed Remove the screw attaching the network card bracket to the back panel ...

Page 16: ...14 Hold both ends and pull gently upward to remove the NIC from the PCIe slot MOTHERBOARD REMOVAL Remove the four screws securing the motherboard in place Lift to remove the motherboard from the tray ...

Page 17: ...15 PART II INSTALLING MOTHERBOARD COMPONENTS AND CABLES MOTHERBOARD INSTALLATION Mount the new motherboard in place on the tray with four screws one at each corner ...

Page 18: ...ue and white pair on the opposite side of the chassis One end of each memory slot has a hinged latch while the other end has a fixed latch Memory is installed in pairs in the same color sockets blue first then white Gently insert the the memory module into the memory slot putting the notch on the end of the module under the fixed latch ...

Page 19: ... module into the slot pressing down on both ends of the module until the hinged latch swings in locking into place Repeat for the second memory module which goes in the same color of slot on the other side of the chassis ...

Page 20: ...rk card for a FreeNAS Mini When installed in a FreeNAS Mini XL a full height bracket is used Half Height Full Height NETWORK INTERFACE CARD NIC INSTALLATION To change the bracket remove the two retaining screws exchange brackets then replace the screws ...

Page 21: ...Skip this section if the optional network interface card is not present The optional network interface card is installed in the PCIe slot Press down on the ends of the card firmly until it is fully seated ...

Page 22: ...20 Use the bracket screw removed earlier to attach the network card to the back panel ...

Page 23: ...21 MOTHERBOARD TRAY INSTALLATION Slide the motherboard tray gently back into place Replace the three motherboard tray back panel screws and the two inside edge screws 4 5 1 3 2 ...

Page 24: ...n the optional SSD cache drives are not present the unused cables are usually zip tied to the chassis Connect these cables to the white motherboard SATA ports For more information on SSD cache drive installation see the FreeNAS Mini and XL Hardware Guide at https www ixsystems com FreeNAS_Mini_HW_ Upgrade pdf Gently press each connector into place until it stops The SATA cables connected to the dr...

Page 25: ...ed key and only fit into the motherboard connector one way Reconnect the six SATA cables connected to the drive cage into any of the blue and white motherboard SATA ports next to the I O panel If the optional SSD cache drives are present connect their SATA cables to the SATAIII_M0 and SATAIII_M1 motherboard connectors It does not matter which cable goes to which connector ...

Page 26: ...EENAS MINI SATADOM INSTALLATION Align the SATADOM connector with the SATAIII_M1 slot Press down until it clicks into place The connectors both have L shaped keys that only allow them to be connected one way ...

Page 27: ...ENAS MINI XL SATADOM INSTALLATION Align the SATADOM connector with the SATAIII_M2 slot Press down until it clicks into place The connectors both have L shaped keys that only allow them to be connected one way ...

Page 28: ...26 SATADOM POWER CONNECTION Gently insert the SATADOM power cable with the black wire on top and the red wire on the bottom The power connector is polarized and only fits this way ...

Page 29: ...nnectors These include the Power LED HDD LED Power Switch and Reset Switch Power LED Power Switch HDD LED Reset Switch Line up each connector with the correct pins on the header and gently press down until it is fully seated Make sure wire colors match the dia gram above ...

Page 30: ...wo are used Power LED USB 2 0 CABLE CONNECTION Align the 9 pin USB connector with the blue USB connector One pin of the connector is missing and one hole on the cable connector is filled Align the pins and gently press down until the connector is fully seated ...

Page 31: ...de two NIC LED cables and the OH LED cable Line up each connector with the pins make sure the wire colors match the diagrams below and gently press down until the connector is fully seated NIC LED BLACK AND YELLOW Insert the first NIC LED connector with the black wire on the left and the yellow wire on the right NIC LED ...

Page 32: ...K Insert the second NIC LED connector with the orange wire on the left and the black wire on the right NIC LED OH LED RED AND BLACK Insert the OH LED connector with the red wire on the left and the black wire on the right OH LED ...

Page 33: ...XL FRONT FAN CONNECTION The FreeNAS Mini XL has two extra fan headers which are in front of the SATADOM Gently press the white fan cable connector down until it is fully seated on the FRNT_FAN1 and FRNT_FAN2 connectors ...

Page 34: ...ress the white fan cable connector down until it is fully seated on the REAR_FAN2 connector next to the heatsink POWER SUPPLY CONNECTION Align the power supply cable with the connector Press down firmly with both hands until fully seated and the latch is engaged CLOSING THE CASE Slide the case back on being careful not to pinch any cables Replace the four thumbscrews in the back ...

Page 35: ...urations not mentioned in this Motherboard Removal Replacement Guide For help upgrading hardware refer to the FreeNAS Mini and XL Hardware Upgrade Guide https www ixsystems com FreeNAS_Mini_HW_Upgrade pdf For complete documentation http doc freenas org The FreeNAS Forums provide an opportunity to interact with other FreeNAS users and to discuss their configurations Visit the forums http forums fre...

Page 36: ...Copyright 2017 iXsystems FreeNAS is a registered trademark of iXsystems Inc All rights reserved ...

Reviews: