DFA400 Rev0708
14
Weldment Installation
Note:
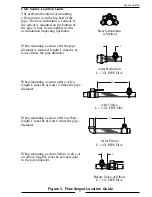
Ensure that the mounting location meets the requirements for uniform
water flow. (Refer to Flow Sensor Location Guide.)
Note:
Ensure that there is enough room for the weldment, sensor, and
connector to fit. (Refer to Figure 5.)
1. Drill and deburr a 1 11/16" to 1 3/4" diameter hole at mounting location.
2. Center weldment mount over hole and weld it to pipe. The weld must be
continuous around the fitting with no gaps or voids.
3. Screw sensor housing into weldment far enough to make sure it goes through
the pipe freely, then back it out.
Note:
The paddlewheel sensor must be correctly aligned in the water stream.
The alignment tab is used to set the sensor position. Make sure the
alignment tab is centered on the pipe centerline. (Refer to Figure 5.)
4. Set sensor housing to dimension A in Figure 5. Make sure alignment tab is
centered on the pipe as shown (it can be on upstream or downstream side).
5. Install tru-seal locknut and tighten with 2" wrench using light to medium torque.
Make sure the sensor housing alignment tab remains centered and the sensor
housing does not rotate causing dimension A to change.
6. Insert flow sensor into sensor housing. Align flat spot on sensor rim with
alignment tab and make sure o-ring is in groove.
Note:
The retainer cap is hand-tightened. There is an inside lip that stops
the cap from turning when it makes contact with the alignment tab. This
provides the correct pressure to make the seal at the o-ring. Make sure the
flow sensor engages the alignment tab and does not rotate.
7. Install retainer cap and hand-tighten.
8. Connect cable from display module to flow sensor (cable is color coded blue).
(Refer to Wiring Section.)


