FRANKE FOUNTAIN MODELS
KEPWSMSBF-STN, KEPWSMEBF-STN
INSTRUCTIONS
INSPECTION
Inspect the cartons and various components for evidence of rough handling and concealed damage. Damage claims should be filed with the
carrier.
INSTALLATION & ELECTRICAL / PLUMBING CONNECTIONS
1.
2.
Local plumbing codes may prohibit use of saddle tapping valves for water line connection in some applications.
All connections must conform to applicable plumbing codes.
3. Plumbing and electrical (if required) rough-in and wall opening should be prepared as shown on Roughing-in drawing and template.
This drinking water cooler is designed to be operated at a water supply line pressure of up to 100 psi (690 kPa). A pressure regulator
must be installed in front of the unit’s water inlet if the water pressure (including any possible pressure spikes) could exceed 100 psi
(690 kPa).
4.
For sensor equipped models,
check the available power supply against the dispenser data plate to assure correct electrical service.
This drinking water dispenser is intended to be connected to a ground fault circuit interrupting (GFCI) device to meet UL
requirements.
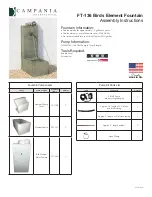
5. Prep the unit for installation by removing internal wall frame from cabinet. Remove 6 torx screws (T15) from sides and top. Save
screws for reconnection later.
6. Place wall frame in appropriate location and attach to wall. The back panel has 4 rows of slots to provide optimum securing location.
NOTE: As frame is put in place, slide drain tube into drain stub extending from wall.
7. As you put bottle filler in place on frame, connect water supply line and plug in cord for sensor operation, if applicable.
8. Check plumbing connections for leaks.
9. Fasten cabinet to frame using 4 torx screws removed earlier. Follow directions below to set up sensor model before putting top back
on cabinet.
10.
For sensor equipped models
, display to upper right of alcove should be lit. Follow Sensor-Activation Instruction guide to adjust
program settings. Water will shut off immediately after container is removed from alcove. Maximum run time is 30 seconds should
someone tamper with sensor. NOTE: Walls with a reflective finish, i.e., ceramic tile, across from sensor may cause false actuation no
matter what sensor adjustment is for distance. Therefore, do not install unit in such an area or dull surface of walls so it will not
reflect light
11. On new plumbing installations, run water through spout until water taste is satisfactory.
For sensor equipped models
, place cup or
bottle into alcove to activate sensor and open solenoid valve. Sensor will automatically shut off solenoid valve after programmed run
time is reached. To reactivate, move container away for an instant and then again place it in front of sensor.
12. Place top back on cabinet and reattach using remaining 2 torx screws.
WARNING
THE WARRANTY FOR THIS MACHINE IS AUTOMATICALLY VOIDED IF THIS MACHINE IS ALTERED, MODIFIED, OR COMBINED WITH ANY
OTHER MACHINE OR DEVICE. ALTERATION OR MODIFICATION OF THIS MACHINE MAY CAUSE SERIOUS FLOODING.
EXCEPT AS SET FORTH HEREIN, THE MANUFACTURER MAKES NO OTHER WARRANTY, GUARANTEE OR AGREEMENT EXPRESS, IMPLIED
OR STATUTORY, INCLUDING ANY IMPLIED WARRANTY OR METCHANTABILITY OR FITNESS FOR A PARTICULAR PURPOSE.
COMMERCIAL
SYSTEMS
Franke Kindred Canada Ltd. | 1000 Franke Kindred Road | Midland | ON L4R 4K9 | Canada
www.franke-commercial.com | [email protected] | Tel. 1-855-446-5663| Fax 1-866-227-3050
036865-033