

Step 1
: Assemble Three Sides
Step 2
: Slide “Artwork Sandwich” Into Frame
Step 3
: Attach Fourth Side
Step 5
: Tighten All Four Corners
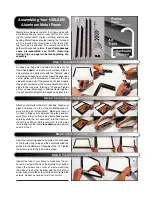
Assembling Your NIELSEN
Aluminum Metal Frame
Metal picture frames consist of four frame sides with
a Hardware Channel and an inner Art Track for hold-
ing the “art sandwich” of glass, matting, artwork and
backing. Metal frames are side loading: the “art sand-
wich” is inserted into three sides of the frame, then
the fourth side is attached. The corners are held to-
gether with expansion plates.
If your frame package
came pre-assembled see
NOTE: Removing
Spring Clips
on page two before beginning dis-
assembly.
Arrange one long side and two short sides of your
frame
face down
on a safe work surface. Stack a
screw plate and a back plate with the “Nielsen” sides
up, making an expansion corner. Insert the expansion
corner plates into the Hardware Channel of the long
side with screws up. If the plates do not insert easily,
loosen (do not remove) the screws. Attach both short
sides to the long side, forming a “U”
shape. Tighten
all four screws just enough to hold the frame together.
You will adjust and tighten the expansion plates later.
Attach your artowrk to the mat or backing. Clean your
glass and place it on top of the matted/backed art-
work, making an “art sandwich”. Make sure there is
no dust or finger prints between the glass and art-
work. Now turn your three sided frame
face up
and
carefully slide the “art sandwich” into the frame on
the Art Track. When the “art sandwich” is all the way
in, carefully turn the frame
face down
again and pro-
ceed to Step 3.
Insert the remaining expansion plates into both ends
of the fourth (long) side and then carefully slide the
plates into the Hardware Channels of the “U”. Tighten
the screws to hold the forth side in place.
Inspect the face of your frame to make sure the cor-
ners are closing at the front. If adjustment is needed,
loosen the screws one corner at a time, gently tap
the sides of the corner together with the butt of your
screw driver. Hold the corner firmly and re-tighten the
screws. Repeat as needed for all four corners.


