background image

PostBase Vision

150

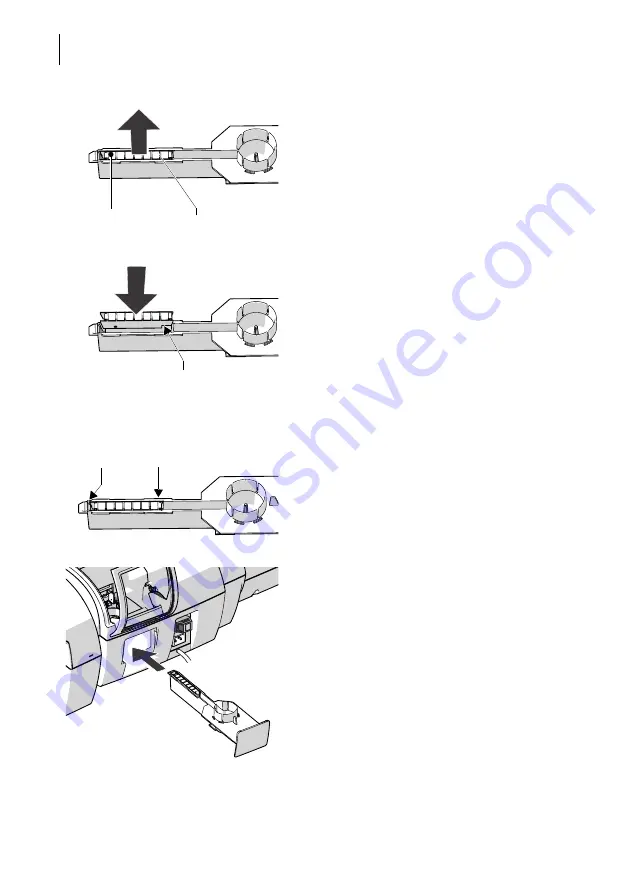
• Lift the basket with the sponge out of the 

tray. 

• Clean sponge or replace with a new one. 

• Put a new sponge (with basket / sponge 

holder) into sealing fluid before inserting it, 
and let it soak completely. The flaps are 
thus correctly moistened from the first letter 
on. 

• Carefully insert the basket with sponge into 

the tray until basket and tray are flush. 
Mind the position of the cut-out. 

• Check if the basket is correctly seated: 

It must rest on the extreme left in the tray 
and close on top in a flushed manner.

• Insert the complete tray into the housing 

until it clicks into place. 

• Check if the sponge is correctly seated. It 

should be directly below the moistening felt 
and brush.

Basket / sponge holder  

Sponge

Cut-out

Check:

Basket on the 
extreme left

Basket flushed on top

Summary of Contents for PostBase Vision

Page 1: ...Franking system Reference Guide postbase vision ...

Page 2: ...verview of the most important functions for everyday use In this Reference Guide the product name appears in its plain form PostBase Vision The following keywords and signs identify the safety instructions and additional information in this manual Warning indicates a potentially hazardous situation which could result in death or serious injury if disregarded Caution indicates a potentially hazardo...

Page 3: ...On screen keyboard ____________________________________46 4 3 8 Pop up windows ________________________________________47 4 3 9 Procedures wizards ____________________________________48 4 4 Adjusting the display angle _______________________________48 4 5 Adjusting the display brightness ___________________________49 4 6 Adjusting the volume ____________________________________49 4 7 Inserting lab...

Page 4: ...___ 75 6 3 3 5 Working with the batch counter ____________________________ 77 6 4 Franking labels ________________________________________ 79 6 5 Displaying and resetting the item counter ____________________ 81 7 Displaying and printing registers ________________________________ 82 8 Download postage ____________________________________________ 83 9 Printed Postage Impression PPI optional _______...

Page 5: ..._______106 15 Synchronising _______________________________________________108 16 Advanced settings system information ________________________110 16 1 System information ____________________________________110 16 2 Contact Information ____________________________________110 16 3 Access control Administrator PIN ________________________111 16 4 Low postage warning _________________________________...

Page 6: ...tBase Vision Feeder optional __________________________ 144 18 9 1 Filling with sealing fluid _________________________________ 144 18 9 2 Adjust moistening level _________________________________ 147 18 9 3 Cleaning changing the moistening sponge _________________ 148 18 9 4 Cleaning changing the moistening brush __________________ 152 18 10 Sealer optional _______________________________________...

Page 7: ..._______________________________________190 The Security Device PSD ______________________________________190 Declaration of Conformity _______________________________________191 License _____________________________________________________192 Security Declaration for data usage _______________________________194 United States Patents __________________________________________194 FCC Compliance Sta...

Page 8: ...zards Operate the PostBase Vision franking system only with a grounded single phase power outlet Make sure that the power connection conforms to the power require ments indicated on the type plates Make sure the outlets for connecting the PostBase Vision franking system are close by and easily accessible at all times Unplug the PostBase Vision franking system power plugs from the outlets in case o...

Page 9: ...yp com General safety instructions Set up and install the PostBase Vision franking system as described in the Installation and commissioning section Never transport the PostBase Vision franking system by attachments such as weigh ing platform label compartment display or drawer The best way to transport the indi vidual components is to hold them on the side at the bottom in the recesses on the hou...

Page 10: ... button the home screen is displayed with an intuitive layout and design to make mail processing easy PostBase Vision also displays on screen guidance for certain functions such as changing the ink car tridge With this operating concept even inexperienced and occasional users can easily operate the PostBase Vision franking system Franking Simply position the mail piece the PostBase Vision will tak...

Page 11: ...Your password protected access will provide you with all the important infor mation about your franking system for example account management orders contracts invoices etc information and updates consumable supplies and much more The discoverFP customer portal is the place where you can conveniently manage cost accounts user profiles advertise ments and access franking system analytics and reporti...

Page 12: ...mes the high capacity Drop Stacker can hold up to 250 letters Mail can easily be removed during operation keeping the mail moving Differential weighing speeds processing mixed weight mail Place the entire stack of mail on the integrated scale As each piece is removed the weight is calculated PPI feature Print PPIs Printed Postage Impression onto the mail pieces to indicate that the postage has bee...

Page 13: ...l compartment ON OFF button Catch tray Scale with weighing platform Drawer Access flap to print system Drawer latch lever Hand feed tray illustrated here Optional hand feed Sealer Stylus for touch screen operation is inserted on the right of the display housing Touch screen motor adjustable ...

Page 14: ...view USB port Power connection PC connection not used Ethernet LAN port Cover flap at rear security device PSD Slider for unlocking the security device Type plate on the bottom side CAN BUS Feeder connection Emergency release for ink cartridge ...

Page 15: ...nvelope flaps under roller transport Flap with viewing pane below Sealant tank LED status indicator Letter guide adjustable Ramp Seal non seal switch Open flap Press key Roller transport Releasebutton move roller transport upward Latch lever adjust inclination Safety sign Pendulum Sensor for letter detection ...

Page 16: ...ion 16 Feeder rear view Power connection Termination plug plugged in the factory Tray with sealer sponge Catches lugs for coupling with the franking machine housing CAN BUS connection to franking machine Type plate ...

Page 17: ...er to ensure successful installation Step 1 Unpacking and checking the contents of the package Unpack all the boxes Keep the packing Use it again if you need to transport the franking system or send it in to the Customer Support Check that the contents of the packages are complete and free from any damage The scope of delivery is listed on the following pages Warning Damage or the absence of parts...

Page 18: ... 5 6 7 8 9 10 1 PostBase Vision franking machine 2 Weighing platform 3 Ink cartridge packaged 4 Hand feed tray 5 Power cable 6 Ethernet cable 7 Catch tray and stop 8 Labels 9 Installation and safety brochure 10 Quick Reference Guide leaflet Extra delivery by e mail or postal mail R PIN Repository PIN 1 2 1 Hand feed Sealer 2 Bottle of SEALIT sealing fluid ...

Page 19: ... 1 box not illustrated The delivery package of the Drop Stacker is shown and listed in the installation instruc tions which come together with the Drop Stacker 1 3 4 5 6 2 1 Feeder automatic feeder with sealer 2 Power cable 3 Bottle of SEALIT sealing fluid 4 Replacement sponge holder with sponge 5 Ramp 6 Pendulum ...

Page 20: ...erature in the range from 15 C to 35 C 59 F to 95 F No direct sunlight Relative humidity within a range of 15 to 80 non condensing Power outlet in the immediate vicinity Network LAN or Wi Fi connection with internet access The PostBase Vision franking machine must be placed on a suitable surface Remove the protective film from the display Assembling the weighing platform Hold the weighing platform...

Page 21: ...side The bottom side of the housing features slots where the catch trays are fastened Slide the catch tray under the franking machine so that the catches engage in the slots Carefully place the franking machine on the catch tray Assembling the Drop Stacker Instead of the catch tray the optional high capacity FP Drop Stacker can be placed to the right of the franking machine For details on setting ...

Page 22: ...tems to the left of the franking machine Slightly lift the franking machine on the left side and push the hand feed tray towards the franking machine so that the front sides are flush Carefully lower the franking machine so that the catches of the hand feed tray engage in the slots on the bottom side of the franking machine ...

Page 23: ...y couple the two components and fasten them in position relative to each other Assembling the sealer Place the sealer to the left of the franking machine Gently lift the franking machine on the left side and push the sealer towards the frank ing machine so that the front sides are flush Carefully lower the franking machine so that the catches of the sealer engage in the slots on the bottom side of...

Page 24: ...PostBase Vision Caution If the PostBase Vision was previ ously in a cold environment i e below 10 C 50 F Wait at least two hours after unpack ing before connecting the franking machine The PostBase Vision needs this time to adapt to the environmental conditions Caution Do not connect the PostBase Vision Feeder the optional automatic feeder until Step 7 The PostBase Vision franking machine must be ...

Page 25: ...onnection con forms to the power requirements indicated on the type plate Make sure that the power outlet is nearby and easily accessible at all times Connection Computer Network Router If you want the PostBase Vision to use the wired connection to your local area network LAN Connect the Ethernet cable to the franking machine and the local network router Power connection Plug the power cable into ...

Page 26: ... installation procedure Step 6 Installing the PostBase Vision The swiping method of operation and other basic functions regarding the touch screen and stylus are described in the chapter The basics of operation The PostBase Vision will guide you step by step through the installation procedure Sim ply follow the instructions on the display Have the R PIN ready received separately from the rest of t...

Page 27: ...ec tivity Settings must be adjusted Tap CHANGE to open the entry wizard for setting up the network connection First select the desired connection type Confirm the selection and continue with the CONTINUE button Set the appropriate parameters for the net work step by step If necessary ask your network administrator The Connectivity Settings overview shows and explains the possible settings see page...

Page 28: ...ink cartridge Tap CONTINUE to insert the ink cartridge Note Do not touch the cover flap of the print system or otherwise obstruct the automatic opening PostBase Vision moves the print system to the change position and then opens the cover flap The flashing green LED indicates that no cartridge has been inserted yet The screen sequence in the display shows the sequence of the cartridge change The i...

Page 29: ...the ink cartridge Avoid eye contact with the ink Avoid ingestion of the ink Keep ink cartridges away from children Open the cartridge packaging Remove the ink cartridge from the packaging Note Depending on the model the ink car tridge may be fitted with a clip that acts as a transportation protection If the ink cartridge has such a clip Remove the clip Pull off the protective strip nozzle protec t...

Page 30: ...r Press the ink cartridge down and click it into place at the rear If the cartridge is inserted correctly the green LED lights up continuously Close the cover flap of the print system In the area of the PostBase Vision logo press down the cover flap until the lock engages Please wait The PostBase Vision will now prepare the cartridge for use PostBase Vision displays the Full cartridge icon in the ...

Page 31: ...ation has been successfully completed To install the PostBase Vision Feeder con tinue with Step 7 The MENU button is used to access other system settings e g PIN protection standby time Volume display inclination and brightness can be adjusted directly on the display frame Visit the customer portal discoverFP Your password protected access will provide you with all the important information about ...

Page 32: ...ys tem will not work Turning off the franking machine Press the ON OFF button for three seconds The PostBase Vision will complete any cur rent actions return the display to its home position and then turn itself off Setting up the feeder Place the ramp feeder and franking machine as shown in the illustration above When assembling ideally proceed from left to right starting at the ramp 3 seconds Ra...

Page 33: ...er in this way Lift the feeder slightly align it to the ramp and lower it carefully The catches on the ramp must snap into the slots on the Feeder Couple the feeder to the franking machine in the same way Remove the protective film from the trans parent cover flap Mounting the pendulum Insert the base of the pendulum into the fixture of the ramp Press down firmly on the pendulum until it clicks in...

Page 34: ...nnecting the feeder The feeder needs this time to adapt to the environmental conditions Connection on the franking machine Connect the feeder connection cable to the CAN BUS interface of the franking machine Screw the connector on tightly Power connection Plug the power cable into the power con nection for the feeder Only then plug the power cable into the power outlet ...

Page 35: ...g fluids When filling the tank make sure that no live parts become wet However if this does occur Immediately disconnect the power plug Have the PostBase Vision frank ing system checked by the Customer Sup port before using it again The sealant tank is located under the trans parent flap To open the flap Press the key Remove the sealant tank from the housing ...

Page 36: ...l the sealant tank with SEALIT sealing fluid Replace sealant tank screw cover and tighten Turn sealant tank upside down in a non dangerous area e g over a sink to check if the cover is well sealed Insert sealant tank into the feeder with the cover downward ...

Page 37: ... the running startup procedure in the display Upon system startup PostBase Vision acti vates the connected system components the LED status indicator sealing function ON OFF on the feeder starts to light up After the system has started up successfully the Home screen with the additional FEEDER button appears on the display The PostBase Vision franking system with feeder is ready for operation ...

Page 38: ... PostBase Vision franking system ON OFF Turning on Press the ON OFF button The LED lighting switches on and the system starts The progress of the process can be followed on the display PostBase Vision greets the user acoustically accompanied the display moves to the last position used and finally the Home screen appears on the display If access control is activated you must enter your PIN during t...

Page 39: ...s is the only way to prevent drying up and to ensure a permanently high print quality Press the ON OFF button for three seconds to turn the PostBase Vision off When the illumination is off Unplug the power plug from the power outlet 4 2 Standby Sleep mode If you do not use the franking system for a while it automatically switches to Sleep mode standby The display is dark and the ON OFF button is i...

Page 40: ...n it does not matter whether you use your finger fingernail pen or gloves The touch screen supports different methods of operation Tapping and Swiping Depending on the desired action you can select your preferred method General operating instructions Tapping Briefly tap the desired element on the screen in the example this is the button with the postage PostBase Vision carries out the correspond i...

Page 41: ...blue dot indicates the current screen Tap the arrows to scroll through the list Tap on a dot to jump directly to this screen Stylus for touch screen operation The supplied stylus for touch screen opera tion is located in the back of the display hous ing on the right You can simply pull the stylus out to the right It is best to put the stylus back in its place in the display housing after use It is...

Page 42: ...t can be tapped Button is active it can be tapped This colour is used for buttons with special functions such as shortcuts Button is selected The button is currently being tapped Button is deactivated it cannot be tapped Standard buttons The term standard button refers to the but tons OK SAVE CANCEL CONTINUE and BACK The marking can vary depending on the function ...

Page 43: ... additional functions using the buttons in the menu bar Operation philosophy To select a function setting tap the button Depending on the function selected PostBase Vision then opens a selection list a setting menu or a menu with additional selection options You can also simply swipe the selection list with the shortcuts Postage OpenProductCalculationmenu Info panel Date in franking imprint Postag...

Page 44: ...ust the colour of the menu bar according to your taste Read more about it in chapter 16 6 on page 114 4 3 4 The menu You can use the MENU button to open the menu in which you have access to the system settings administrative functions special features and service functions Use the arrows to scroll through the menu By tapping the dots you jump directly to the corresponding menu screen You can also ...

Page 45: ...he corre sponding button 4 3 6 Setting menus A separate menu opens for adjusting and selecting settings Setting menus are available in various versions e g as a list with possible settings for selection or with a keypad for entering digits Lists The left area shows the available settings The current setting is highlighted in colour light blue with a dark blue bar If there are more than six choices...

Page 46: ...board PostBase Vision opens the on screen key board to enter text numbers and special characters e g for an individual text as advertising imprint for entering shortcut names and searching cost accounts The entered text can be seen at the top of the display Use the arrows to the left and right of the text field to move the cursor in the text You can place the cursor directly at the desired text po...

Page 47: ...e available special characters and digits Switches back to letters Use OK to apply the displayed text Use CANCEL to discard your entry and exits the text entry 4 3 8 Pop up windows Some settings open a window that partially covers the current window pop up window The pop up calls for an action Messages label printing and batch processing with feeders also appear as pop ups Some pop up messages ack...

Page 48: ...and proceed to the next step Use BACK to return to previous steps 4 4 Adjusting the display angle The display angle can be adjusted by using the motor Simply press the sensitive areas to the left and right of the icon on the display frame Press and hold the desired function raise lower until the display is in the desired position When turning off the unit PostBase Vision lowers the display to its ...

Page 49: ...the desired setting 4 6 Adjusting the volume You can see the current volume setting for the sound signals in the menu bar at the top left To adjust the volume press the sensitive areas to the left and right of the speaker icon on the display frame Press and hold the desired function louder or quieter until the test signal is at the desired volume Turning off the speaker Turn the volume down until ...

Page 50: ...ucts not approved by FP and therefore not vouch for such products We can ensure correct label processing only when you comply with this To fold the label compartment out Press on the knurled surface until you hear a click then release Remove package band from the package of labels Insert the complete package 50 labels in the label compartment The side to be printed on faces up Insert the package o...

Page 51: ...larger quantities of outgoing mail the Drop Stacker with a capacity of up to 250 letters ISO DL containing one sheet ISO A4 is a practical alternative to the letter catch tray Installation Install the Drop Stacker according to the assembly instructions The detailed assembly instructions for the Drop Stacker are included in the package Adapting to the envelope format You can move the right side wal...

Page 52: ...ble advertising imprints Postage Royal Mail product see chapter 5 1 Date see chapter 5 2 Advert imprints see chapter 5 3 You can check the franking imprint settings and the imprint quality using a zero test print Read more about it in chapter 5 4 Note The examples in this reference guide show actual postal products In case the Royal Mail changes prices products on short notice corresponding softwa...

Page 53: ... weighing an optional weighing mode for the built in scale can be used for efficiently processing mixed weight mail Read more about it in chapter 5 1 3 2 For mail pieces whose weight exceeds the scale s weighing range enter the weight manually Read more about it in chapter 5 1 3 3 5 1 1 Setting a product using a shortcut You can store and select up to 20 shortcuts directly from the Home screen Com...

Page 54: ...ete shortcuts as well as reset them to factory defaults 5 1 2 Setting mailing data In the Home screen Tap postage PostBase Vision opens the Product Calcula tion menu Selecting mailing data PostBase Vision requests all necessary information on the mail piece in turn Tap each of the desired settings The selected mailing data appears on the right of the display As soon as all the neces sary mailing d...

Page 55: ...or feature upgrade The scale only determines a new weight if the scale has previously been unloaded Therefore always clear the weighing platform before placing a mail piece on it for weighing The scale does not determine a new weight while the letter transport unit is running Wait until the letter transport unit stops before placing a mail piece on the weighing platform When weighing large format ...

Page 56: ...d by the scale is set PostBase Vision sets the postage based on the weight displayed and the mailing data selected You can weigh your mail pieces both in the Home screen and in the Product Calculation menu using the built in scale Set weight ...

Page 57: ...rve the following instructions for handling the built in scale Observe the maximum weight capacity depending on the model or feature upgrade The scale does not determine a new weight while the letter transport unit is running Wait until the letter transport unit stops before removing a mail piece from the weighing platform When weighing large format mail pieces make sure that the mail pieces do no...

Page 58: ...hange and calculates the postage When you clear the weighing platform PostBase Vision asks if you want to use the last weight determined Confirm with YES to determine the postage for the last letter of the stack Or Tap on NO to discard the determined weight e g because you last took the empty box from the weighing platform PostBase Vision does not determine a postage ...

Page 59: ... need this function for example for mail pieces with a weight that exceeds the weight capacity of the built in scale 3 kg 5 kg or 7 kg In the Home screen Tap postage PostBase Vision opens the Product Calcula tion menu Set the desired mailing data In the exam ple UK First Class Medium Parcel Tap the MANUAL WEIGHT INPUT option PostBase Vision opens the weight setting menu Enter the weight Confirm wi...

Page 60: ...me screen Tap postage PostBase Vision opens the Product Calcula tion menu Select the desired mailing data for example WITHIN UK FIRST CLASS LETTER LETTER Select PRE PAY REPLY service CONFIRM and return to the Home screen The Pre Pay Reply product is set for franking Notes Reply Mail imprints are identified by the addition PP Reply in the product field Reply Mail is franked without date Advertising...

Page 61: ...Home screen Tap postage PostBase Vision opens the Product Calcula tion menu Select the desired mailing data for example WITHIN UK SECOND CLASS LETTER LETTER Select the BUSINESS MAIL ADV anced service CONFIRM and return to the Home screen The Business Mail Advanced product is set for franking Note Business Mail Advanced is a Data Dependent Product The product usage data must be uploaded on the same...

Page 62: ...ng You can see the currently set date in the Home screen Setting the franking date Open the MENU Choose CHANGE DATE PostBase Vision opens the setting menu for the franking date Type the desired date or set the date using the buttons and Confirm the displayed date with OK If the date is in the future an icon appears before the set date If you generally frank your mail after the last pick up or past...

Page 63: ...ising imprint In the Home screen Tap one of the two advertising imprint buttons PostBase Vision opens a selection list with all available advertising imprints Tap the desired advertising imprint PostBase Vision returns to the Home screen The advertising imprint is set for franking Note Long texts may be cut off on the button in the Home screen Set the second advertising imprint in the same way Ref...

Page 64: ... Home screen tap postage PostBase Vision opens the Product Calcula tion menu Choose ZERO TEST PRINT CONFIRM and return to the Home screen The Zero test print product can be stored as a shortcut Printing the zero test print When the Home screen shows the Zero test settings you can start printing Proceed exactly as when franking Place an empty envelope or a postcard on the hand feed tray Or Place an...

Page 65: ...up for PostBase Vision In this case select the user during system startup and enter the appropriate PIN This loads the corre sponding user profile Among other things the following settings are defined in the user profile Name PIN budgets allocated cost account s default cost account and the approval to load postage Switching user Briefly press the ON OFF button PostBase Vision displays the list of...

Page 66: ...utton directly below the postage Tap the cost account button on the Home screen PostBase Vision opens a selection list with all available cost accounts The current cost account is highlighted in colour light blue with a dark blue bar In this example it is Cost Account 1 Tap the desired cost account PostBase Vision sets the cost account and returns to the Home screen If users are set up only the co...

Page 67: ...t This way you can get to the desired cost account quickly especially for long lists Enter the character sequence that the cost account should contain Upper lower case have no influence on the search results Confirm with OK The filtered list of cost accounts appears The selection list only shows those cost accounts that contain this character sequence at any point in the name ...

Page 68: ... mail pieces for franking Place the letter on the hand feed tray The side to be printed facing up address field is visible The upper edge is flush with the contact area Push the letter in the direction of the arrow and release PostBase Vision feeds the letter prints and ejects the franked letter to the right into the catch tray You can feed more letters one by one while the letter transport is run...

Page 69: ...screen shows a postage value you can feed mail pieces for franking Please refer to the mail piece specifications on page 187 Moistening the envelope flap Hold the letter with the open flap facing downward Latch in the letter in the sealer in the direc tion of the arrow The image shows the correct position of the letter in the sealer The flap is below the stop The stop edge is exactly in the flap f...

Page 70: ...t and moistens it Align the upper edge of the letter on the contact area in the direction of the arrow and release Pressing down the moistened envelope flaps To ensure that the envelope is securely sealed we recommend pressing down the envelope flaps after franking Use your hand and forcefully stroke along the stack of letters in the area of the enve lope flaps ...

Page 71: ...king 71 Large sized mail pieces Preferably use both hands to feed large sized mail pieces while moistening them Once the franking machine has detected the letter you should only lightly support the let ter ...

Page 72: ...nywhere near the sensor Do not allow any objects to reach the sensor area This way you can avoid accidentally starting the letter transport To set up the feeder you can open the MENU PostBase Vision is not ready for franking at this time and the letter transport cannot start Preparing letter stacks Sort letter stacks so that all envelope flaps are facing downward Align top edges flush Position the...

Page 73: ... Lift up or lower the ramp Release the lever to lock the ramp in the desired position 6 3 3 2 Switch the sealing function on off If the letters up to a max thickness of 7 mm are to be sealed Set the seal non seal switch to the rear to the seal position The sealing function is switched on The LEDs below the sealant tank flap light up brightly If the letters are not to be sealed or have already been...

Page 74: ...letter thickness you see the current setting Normal or Thick In the pop up tap on the button for the letter thickness Select NORMAL or THICK depending on the letters you are franking The selected setting is highlighted in colour light blue with a dark blue bar Apply the displayed setting by tapping OK If thick letters is set the PostBase Vision speed is reduced to process letters Remember to reset...

Page 75: ...e a unit quantity before franking Read more about it in chap ter Working with the batch counter on page 77 Caution Automatic start up When the PostBase Vision is ready for franking the letter transport starts up as soon as a letter is placed on the feeder You can start processing from the Home screen or from the pop up Automatic Feeding simply by feeding a stack of letters Swivel the pendulum upwa...

Page 76: ...sing starts automatically The letters are taken from the stack one by one mois tened and sealed if necessary franked and stacked in the catch tray ready for mailing You can interrupt the processing by tapping on the STOP button Starting continuing processing After an interruption or if letters are already in the feeder In the Home screen tap FEEDER PostBase Vision opens the pop up Automatic Feedin...

Page 77: ... a stack Caution Automatic start up When the PostBase Vision is ready for franking the letter transport starts up as soon as a letter is placed on the feeder Once the Home screen shows the desired franking settings In the Home screen tap FEEDER PostBase Vision opens the pop up Automatic Feeding Open the setting menu for the batch coun ter by tapping QUANTITY Enter the desired amount of letters to ...

Page 78: ...rs refer to pages 72 to 76 Processing starts automatically The letters are taken from the stack individually mois tened and sealed if necessary franked and stacked in the catch tray ready for mailing The pop up shows the number of mail pieces left to frank You can interrupt the processing at any time with the STOP button Number of mail pieces left to frank ...

Page 79: ...ot assess the reliability safety and applicability for products not approved by FP and therefore not vouch for such products We can only guarantee correct label processing with the use of FP approved products Franking a label In the Home screen tap LABEL PostBase Vision opens the pop up Print label Press START to print the set franking imprint onto the label Franking several identical labels In th...

Page 80: ...ision prints the set number of labels The counter shows the number of labels left to print The pop up shows the number of labels left to print Interrupt label printing at any time with the STOP button Number of labels left to print ...

Page 81: ...ed Independently of other counter functions you can reset this item counter to zero or use it as a daily or job counter Displaying the item counter Open the MENU Select PIECE COUNTER PostBase Vision opens a pop up in which you can see the number of mail pieces that have been franked since the last reset Tap on NO to return to the menu without deleting the item counter Resetting the item counter In...

Page 82: ...nting registers Tap the PRINT button Tap the LABEL button to print the report on a label Or Position an empty envelope or a postcard to print the report The registers store the following information POSTAGE AVAILABLE Available postage balance POSTAGE USED Total value of all franking imprints performed CONTROL TOTAL Sum of postage available and postage used TOTAL ITEMS Number of all franking imprin...

Page 83: ...nection via LAN cable or Wi Fi Open the MENU Choose DOWNLOAD POSTAGE Keep the displayed amount Or Type the desired amount Confirm the displayed amount with LOAD and continue To load the displayed sum Confirm the confirmation prompt with YES PostBase Vision will then establish a connection to the data centre Loading continues automatically Please stand by Data exchange may take some time The new ba...

Page 84: ...nabled in your PostBase Vision For activation of the PPI feature please contact the FP aftersales service or your local sales agent Example First Class PPI PostBase Vision can print the following PPIs for 1st Class for 2nd Class for Economy for Advertising Mail with Big Book option All imprints contain the POSTAGE PAID mark and your PPI license number Addition ally advertising imprints may be prin...

Page 85: ...rs label printing and using the feeder please read chapter 6 PostBase Vision records the number of PPI imprints in separate PPI counters Displaying PPI information Open the MENU Choose PPI ROYAL MAIL PostBase Vision opens the PPI Product menu Tap the REPORT STATISTIC button You see your PPI license number and the number of PPI imprints as well as the current date and time Resetting the PPI counter...

Page 86: ...Vision prints DX MAIL the product price in Pence the DX license code and the date The DX imprint can also comprise two adver tising imprints Special features of franking DX mail PostBase Vision captures all DX franking procedures in a separate counter The postage costs for DX franking proce dures are settled directly with the private carrier Apart from the separate DX counter you can use the reset...

Page 87: ...product Weigh the mail piece if needed PostBase Vision sets the postage based on the selected DX product and the displayed weight CONFIRM and return to the Home screen Check all other settings for the imprint and if necessary edit them accordingly date advertising imprints You can use the shortcut function for setting DX products just like setting Royal Mail products ...

Page 88: ...rinting and using the feeder please read chapter 6 10 3 Displaying DX information PostBase Vision records the number and the value of all DX franking procedures Open the MENU Choose DX REPORT You see the DX license code the number and the total sum of all DX imprints as well as the current date and time You cannot reset the DX counter When a new DX license code will be as signed to your PostBase V...

Page 89: ...an assign each one of these buttons either an advert or a text message just like in the Home screen You can start printing when both buttons show the desired imprints Proceed exactly as when franking Position an envelope a postcard Or Start label printing Or Use the feeder For detailed information on feeding letters label printing and using the feeder please read chapter 6 The Print Only Advert Te...

Page 90: ...Open the MENU Choose SPECIAL FUNCTIONS Choose PRINT ONLY ADVERT TEXT Choose ADVERT COUNTER STATISTIC PostBase Visions displays the number of adverts printed since last resetting the advert counter Resetting the advert counter Choose RESET PostBase Vision shows a confirmation prompt Tap YES to reset the advert counter Or Tap NO to return to the previous screen without clearing the advert counter ...

Page 91: ...alue is set to 000001 and the direction of counting to Ascending Setting the start value and direction of counting Tap the START VALUE button PostBase Vision opens the menu for setting the start value and direction of counting Enter the desired start value You can choose any number between 1 and 999999 To change the direction of counting Tap the direction of counting button The indication on the b...

Page 92: ...ro ceed exactly as when franking Position an envelope a postcard Or Start label printing Or Use the feeder For detailed information on feeding letters label printing and using the feeder please read chapter 6 When leaving the function the start value is reset to 000001 and the direction of count ing to 1 2 3 Ascending ...

Page 93: ...Base Vision systems with feeder Open the MENU Choose SPECIAL FUNCTIONS Choose FEED ONLY PostBase Vision opens the Automatic Feed ing pop up for the Feed Only function All settings for automatic feeding preparing and positioning letter stacks are done exactly as when franking mail For detailed informa tion please read chapter 6 3 3 Position letter stack on the feeder start letter transport PostBase...

Page 94: ...ed ing pop up for the Seal Only function All settings for automatic feeding preparing and positioning letter stacks are done exactly as when franking mail For detailed informa tion please read chapter 6 3 3 On the feeder switch on the seal function Set the switch to the position seal see also chapter 6 3 3 2 page 73 Position letter stack on the feeder start letter transport The Seal Only special f...

Page 95: ...eceived mail stamp advertising imprint date imprint offset Note The table below describes the possible settings Changing these settings is done in the usual manner Set advertising imprint Set received mail stamp Counter Set imprint offset Set date PRINT DATE OF MAIL ENTRY possible settings Received mail stamp Depending on your order one or several received mail stamps are available Incoming date Y...

Page 96: ...il stamp For detailed information on feeding letters label printing and using the feeder please read chapter 6 The Incoming Mail special function has its own counter PostBase Vision shows the number of prints on the upper right side of the display When leaving the Incoming Mail function the counter is reset to 0 Offset You can adjust the position of the received mail stamp default position about 1...

Page 97: ...oduct in the Home screen as a shortcut including the weight The first shortcut is the default used after turning on or waking up from sleep mode Set the product that you would like to save as a shortcut To set mailing data and weight please read chapters 5 1 2 and 5 1 3 Press the button NEW for about two seconds Or Press on an existing shortcut for about two seconds to overwrite it with a new assi...

Page 98: ...ily change the names of the shortcuts Open the MENU Choose MANAGE SHORTCUTS Choose RENAME Tap on the shortcut you want to change PostBase Vision opens the on screen keyboard The text field shows the shortcut name Enter the desired name The preview top left shows how the new name will appear on the shortcut Confirm with OK For information on how to use the on screen keyboard please refer to chapter...

Page 99: ... prompt PostBase Vision deletes this shortcut Shortcuts with an assignment defined by the rate table default shortcuts cannot be per manently deleted These shortcuts will be available again after the franking system has restarted 12 4 Resetting shortcuts to default When shortcuts are reset all shortcut storage spaces are emptied and the default shortcuts defined by the rate table are restored Open...

Page 100: ...have five lines available for your text Once the maximum line length has been reached PostBase Vision will not allow you to enter anything further in this line You insert line breaks manually Confirm with OK The text is stored and appears immediately in the selection list for advertising imprints For information on how to use the on screen keyboard please refer to chapter 4 3 7 on page 46 You can ...

Page 101: ... immediate ly in the selection list for advertising imprints You can also open texts in the selection list for editing Tap on the text you would like to change until the on screen keyboard opens 13 3 Deleting a text Open the MENU Choose PRINTED TEXT Choose DELETE PostBase Vision displays all of the saved texts Tap on the text that you want to delete PostBase Vision deletes the text and informs you...

Page 102: ...d be con strued as a Return Address may be included on the face of the mail piece The Return Address block must contain a maximum of 5 lines of text including the Return Address phrase The Return Address must be a full and valid UK PAF Address Where space for the Return Address is limited it may be truncated by omitting the least significant elements provided that sufficient information is retaine...

Page 103: ...he portal run independently from one another The reporting and administration functions available on the PostBase Vision franking system for cost accounts are described below 14 1 Display print cost account report Open the MENU Choose LOCAL ACCOUNTS Choose SHOW REPORT PostBase Vision shows the list of all cost accounts with the current usage data value and number of franked mail pieces Print repor...

Page 104: ...our Tap on the cost account that you want to see usage data for PostBase Vision displays the usage data value and number of franked mail pieces for this cost account Print report optional Tap the PRINT button The pop up for label printing appears Tap the START button to print the cost account report on a label Or Insert an empty envelope postcard onto the hand feed tray or the feeder PostBase Visi...

Page 105: ...TO ZERO PostBase Vision opens the selection list with all cost accounts The current cost account is highlighted in colour Tap on the cost account for which you want usage data to be deleted After a confirmation prompt the value and amount of franked mail pieces for this cost account are reset to zero Set all accounts to zero Open the MENU Choose LOCAL ACCOUNTS Choose RESET ALL TO ZERO After a conf...

Page 106: ...unt is highlighted in colour Tap on the cost account that you want to match advertising imprints to PostBase Vision opens the window for setting the default advertising imprints You see the cost account and the two advertising imprint buttons with the current default setting Select the desired setting for both advertising imprints Note The table on the next page shows and explains the possible set...

Page 107: ...D When setting up the cost accounts the advertising imprints in the home screen remain unchanged NO ADVERT OR TEXT When setting the cost account the advertis ing imprints are switched off No advert Text is printed here An advert or a text This advertising imprint is set along with the cost account ...

Page 108: ...hoose SYNCHRONISE PostBase Vision offers various functions for synchronising the data in the SYNCHRONISE menu They are displayed and explained in the table below Select the desired function PostBase Vision displays information about the status and purpose of the selected func tion Start synchronising the data with YES The connection setup data transfer as well as testing and update processes run a...

Page 109: ...Vision automatically synchronises with the portal about every 5 minutes POSTAL SYNC Uploads product usage data Note Your PostBase Vision franking system needs to upload product usage data daily If you keep your PostBase Vision switched on and connected to the internet this will happen automatically each day at midnight PostBase Vision will also remind you when it is time to upload the product usag...

Page 110: ...plays the system infor mation 16 2 Contact Information All important information phone website you need to contact FP can be found directly on your franking machine Open the MENU Choose FP CONTACT INFORMATION You will see a list with phone numbers and website address from where you can receive advice and support for anything relating to the PostBase Vision franking system and where you can order a...

Page 111: ...NAGE ADMIN PIN Follow the instructions on the screen You must enter a four digit PIN and enter it a second time for verification SAVE activates the access control You need this administrator PIN in the cus tomer portal as well to set up a user specific access control for your franking system Disabling access control Open the MENU Choose MANAGE ADMIN PIN Turn off access control by tapping YES If a ...

Page 112: ...g low Defining adjusting the threshold Open the MENU Choose LOW POSTAGE WARNING Enter the desired threshold Confirm with OK The Low postage warning is set up and will take effect immediately Once the set threshold is reached PostBase Vision will notify you that your postage is running low A red caution icon will appear in the Home screen next to the avail able postage Set the threshold to 0 to dis...

Page 113: ...ting Apply the displayed setting by tapping OK You can set the volume for the sound signals on the bottom left of the display frame Read more about it in chapter 4 6 on page 49 SOUND SIGNALS possible profiles and their meaning ALL Acknowledgment sound for each entry sound signals for messages errors etc Shutting down and waking up from stand by turning off among others are accompanied with a sound...

Page 114: ... to your colour imme diately Feel free to try different colours Apply the selected colour for the menu bar by tapping OK 16 7 User interface language The PostBase Vision user interface supports multiple languages Open the MENU Choose LANGUAGE PostBase Vision opens the language setting menu The current setting is highlighted in colour light blue with a dark blue bar Tap the desired language The use...

Page 115: ... OK 16 9 Product after standby This feature lets you define which product will be set for franking after reactivating PostBase Vision from standby the product stored as the first shortcut or the product that was last used Open the MENU Choose STANDBY SETTINGS Choose RATE AFTER STANDBY PostBase Vision opens the setting menu for this function Tap the desired setting Apply the displayed setting by ta...

Page 116: ...e in minutes Confirm with OK The value 0 disables the Auto Off function 16 11 Automatic date advance If mail is franked after the last pick up or past the deposit time you can set the Auto Date Advance to automatically advance the date at a predefined time PostBase Vision will then remind you every day at the defined time to set the date Open the MENU Choose AUTO DATE ADVANCE PostBase Vision displ...

Page 117: ...the possible settings and their meaning AUTO DATE ADVANCE possible settings and their meaning Current Setting ON PostBase Vision opens a window to set the franking date every day at the set auto advance time The following options are available to you Apply the suggested date Select a different date Keep the current date OFF The function is not enabled Auto Advance Time HH MM Time of day The time d...

Page 118: ...s PostBase Vision automatically offers the next Monday as a franking date SKIP SUNDAYS Only skip Sundays OFF Do not check whether the suggested date falls on a weekend PostBase Vision always suggests the next calendar day as franking date AUTO DATE ADVANCE possible settings and their meaning ...

Page 119: ...ighing mode The current setting is high lighted in colour light blue with a dark blue bar Tap the desired weighing mode NORMAL or DIFFERENTIAL Apply the displayed setting by tapping OK WEIGHING MODE possible settings and their meaning NORMAL Determines the weight of a mail piece upon placing it on the weighing platform see chapter 5 1 3 1 DIFFERENTIAL Display in the Home screen Determines the weig...

Page 120: ...hecks availability and enables the corresponding network connection LAN or Wi Fi whereas any wired connection will always be given priority You can recognise the enabled connection by the icon in the menu bar see page 44 16 13 1 Displaying connectivity settings Open the MENU Choose MANAGE CONNECTION PostBase Vision displays the saved connec tivity settings and the corresponding status information ...

Page 121: ...tting LAN Local Area Network connection Use this setting if you want PostBase Vision to use the wired connection to your local network router WI FI Use this setting if you want PostBase Vision to connect to the local network router wirelessly SSID Service Set Identifier Name of a local wireless network such as router name SELECT WI FI Select the desired access point from the list of detected Wi Fi...

Page 122: ...ubnet mask Default gateway IP address of the DNS server Please contact your network administrator for details Note When entering IP addresses you have to enter the dots too Proxy Server Intermediary server that facilitates access to the internet PROXY DISABLED default setting Select this setting if your network does not use a proxy server PROXY ENABLED Select this setting if your network uses a pr...

Page 123: ... IP v4 only through an https connection using TLS v1 2 over port 443 In certain cases it may also use an http connection over port 80 These two ports must therefore be enabled in any firewall It will attempt to make a connec tion to francotyp com Proxy Authentication only when Proxy Enabled Access control to the proxy server user name and password DISABLED default setting Select this setting if yo...

Page 124: ...CTION Tap CHANGE to open the procedure for set ting up the network connection Tap WI FI Tap CONTINUE PostBase Vision displays the name of the configured Wi Fi connection Tap DELETE After the confirmation prompt the configured Wi Fi connection is deleted in the PostBase Vision franking system ...

Page 125: ...eck the address data see page 126 In the menu bar tap on the button showing the shopping cart Or Open the MENU Choose ORDERING Choose NEW ORDER PostBase Vision establishes a connection to the online ordering system and then shows the available items and any discounts Set the desired order quantity per item using the buttons and You will see the relevant net price directly below the order quantity ...

Page 126: ...order status Open the MENU Choose ORDERING Choose ORDER HISTORY PostBase Vision shows the order number and status of current and completed orders placed with the franking system You can find information on the orders in the customer portal as well You can also print the information from there if needed 17 3 Displaying address data Open the MENU Choose ORDERING Choose ADDRESSES PostBase Vision show...

Page 127: ...oistening brush feeder Clean replace felts sealer 18 1 Cleaning the housing Warning Electrical hazard Disconnect the power plug before cleaning the franking system Warning Electrical hazards due to short circuits Be extremely careful when handling fluids Take special care that no foreign objects penetrate the sys tem s interior If this should happen have the franking system checked by FP Customer ...

Page 128: ...n order to ensure faultless operation at all times we recommend cleaning the sensors once a month A special compressed air spray for cleaning the sensors is available from FP How to clean the sensors Turn PostBase Vision off Sensors in the housing top cover Sensors in the letter receiving wall Feeder optional Franking machine Sensor for letter detection 3 seconds ...

Page 129: ...an underlay The flashing LEDs in the letter entrance area indicate the drawer is missing The sensors are now accessible from below They are located right inside the bottom sec tion of the housing Remove the dust from the sensor area with a few puffs of the compressed air spray Slide the drawer in to the stop Make sure that the drawer latches correctly on both sides When the drawer is correctly ins...

Page 130: ...mpressed air spray Press the release button The roller transport moves upwards The sensors in the letter receiving wall are now accessible from the front operator side Remove the dust from the sensors with a few puffs of the compressed air spray Press down firmly on the roller transport until it clicks into place Sensor for letter detection Sensors ...

Page 131: ...rogress Check the quality of the imprint with a Test Imprint see chapter 18 4 Intensive cleaning You should start intensive cleaning if normal cleaning fails to improve the print quality to your satisfaction Open the MENU Choose INK CARTRIDGE Choose INTENSIVE CLEANING A message informs you about the cleaning process in progress Check the quality of the imprint with a Test Imprint see chapter 18 4 ...

Page 132: ...ened with dem ineralised water Small fibres could clog the nozzles Too hard or dry cloths could scratch the nozzle plate Such scratches render the ink car tridge useless because they prevent the ink jet from being correctly posi tioned during printing Never use any chemical cleansers Removing the cartridge Open the MENU Choose INK CARTRIDGE Choose CHANGE CARTRIDGE Remove the ink cartridge For deta...

Page 133: ...ust point downwards Slowly and carefully wipe the print head with the cloth in the direction of the arrow Repeat this action several times The water will blend with ink residues and clean the nozzles Reinsert the cartridge see page 139 Close the flap of the print system see page 140 ...

Page 134: ...CARTRIDGE Choose TEST IMPRINT PostBase Vision prompts you to position a letter Print Test Imprint on an empty envelope Place an empty envelope or a postcard on the hand feed tray Or Place an empty envelope or a postcard on the feeder optional PostBase Vision feeds the envelope and prints the Test Imprint consisting of a series of different plane and line patterns Print Test Imprint on a label Tap ...

Page 135: ...k spots in the imprint Clean print system Read chapter 18 3 on page 131 18 5 Print system show ink level The approximate ink level of the cartridge is shown by the icon in the menu bar full 75 50 25 empty With this feature you can track ink consumption at a glance You can also view the ink level as a percentage in the INK CARTRIDGE menu Open the MENU Choose INK CARTRIDGE Choose INK LEVEL PostBase ...

Page 136: ...he CHANGE CARTRIDGE function from the INK CARTRIDGE menu The flap then opens by itself We recommend to use only approved FP equipment and FP original parts The manufacturer FP has established reliability safety and applicability The manufacturer cannot assess the reliability safety and applicability for products not approved by FP and therefore not vouch for such products Always use a brand new in...

Page 137: ...ocedure of changing the cartridge The required steps are described in detail below Removing the ink cartridge Slightly push the cartridge down on the Push here mark In doing so the car tridge tilts to the front The cartridge is unlatched The green LED flashes Ease off against the spring pressure and let the cartridge slide upwards past the green catch Take the ink cartridge upward and out of the s...

Page 138: ...ge only after it has adapted to the ambient temperature of the PostBase Vision e g after storage in the basement or after transport in a cold vehicle Open the cartridge packaging Remove the ink cartridge from its packaging Note Depending on the model the ink car tridge may be fitted with a clip that acts as a transportation protection If the ink cartridge has such a clip Remove the clip Clip not p...

Page 139: ...ards i e towards the back of PostBase Vision The green arrow on the cartridge points towards the green catch on the cartridge bracket Insert the ink cartridge into its bracket Push down the ink cartridge and let it snap to the back under the catch When the cartridge is inserted correctly the green LED glows continuously Catch LED ...

Page 140: ...tBase Vision logo until the latch catches Preparing for operation After changing the ink cartridge PostBase Vision internally prepares the car tridge for operation Please be patient until this process is complete We recommend checking the print quality by performing a Test Imprint see chapter 18 4 ...

Page 141: ...n the drawer Make sure you do not get ink on yourself or stain your clothing and other objects Place the drawer down on a base surface Unlock the drawer Push the drawer latch lever upwards Pull the drawer to the front out of the housing Place the drawer on an underlay The flashing LEDs in the letter entrance area indicate the drawer is missing Remove worn out transport brush The transport brush is...

Page 142: ...ion 1 Push down the brush on the right side until it locks into place beneath the two catches 2 Slide the drawer in to the stop Make sure that the drawer latches correctly on both sides When the drawer is correctly inserted the LEDs in the letter entrance area will go out PostBase Vision is ready to operate again Spline Cut out ...

Page 143: ...start animation Touch and hold your finger in the middle of the display until the calibration procedure starts A red circle the first calibration circle appears in the upper left corner Touch the red circle with the stylus Follow the further instructions on the display Touch each of the displayed calibration circles with the stylus PostBase Vision will continue its start routine The touch screen i...

Page 144: ...ards due to short circuits Be extremely careful when handling fluids If you fill the sealant tank make sure not to dampen any parts connected to electronics If this should happen immediately pull the power plugs Have the PostBase Vision franking system checked by the Customer Support before using it again Switch the franking system off The sealant tank is located under the trans parent flap To ope...

Page 145: ...Maintenance and care 145 Remove sealant tank out of housing Unscrew sealant tank cover Fully empty sealant tank and if necessary clean it Fill the sealant tank with SEALIT sealing fluid ...

Page 146: ...ace sealant tank screw cover and tighten Turn sealant tank upside down in a non dangerous area e g over a sink to check if the cover is well sealed Insert sealant tank into the housing with the cover downward Close the flap ...

Page 147: ...nnected to electronics If this should happen immediately pull the power plugs Have the PostBase Vision franking system checked by the Customer Support before using it again Switch the franking system off Remove sealant tank out of the housing for further information see chapter 18 9 1 on page 144 At the rear of feeder Carefully pull the sealant tray out to the back see page 149 Normal moistening W...

Page 148: ...or moistening the envelope flaps should be cleaned regularly Check the condition of the sponge and replace it if exhausted We recommend always keeping a new sponge in reserve Warning Electrical hazards due to short circuits Be extremely careful when handling the sealant tank and tray to prevent spilling any fluids Make sure not to dampen any parts connected to electronics If this should happen imm...

Page 149: ...nance and care 149 Open the flap by pressing the key Remove sealant tank out of the housing and put it at a safe place At the rear of feeder Carefully pull the sealant tray out to the back Empty sealant tray ...

Page 150: ...y insert the basket with sponge into the tray until basket and tray are flush Mind the position of the cut out Check if the basket is correctly seated It must rest on the extreme left in the tray and close on top in a flushed manner Insert the complete tray into the housing until it clicks into place Check if the sponge is correctly seated It should be directly below the moistening felt and brush ...

Page 151: ...e and care 151 If necessary Fill sealing fluid into sealant tank Check for leakages For further information see chapter 18 9 1 page 144 Insert sealant tank into the housing with the cover downward Close the flap ...

Page 152: ...by pressing on the release button The roller transport moves upward Now you have access to the moistening brush beneath the roller support The brush is provided with pins on both sides that are snapped in clips on the sword Slightly lift the brush and pull it off the sword in the direction of the arrow 3 seconds Sword Brush ...

Page 153: ...he figure The bristles must face down One leg of the leg spring is located in the brush groove and the other leg in the sword slot Put the rear pin into the clip of the sword as indicated by the arrow Then carefully snap the front pin into the clip of the sword Push the roller transport down powerfully until it locks into place Leg spring ...

Page 154: ...ide and pull the sealer away to the left Swing up the rocker with the moistening felt Thoroughly rinse absorption and moistening felts under running water Wipe the housing with a damp cloth You can also use a commercially available dishwashing detergent Fill with sealing fluid see page 155 Dry the sealer Connect the sealer to the franking machine see page 23 Rocker with moistening felt Moistening ...

Page 155: ...harden to the point of becoming prematurely useless Filling with sealing fluid We recommend using the SEALIT sealing fluid This special sealing fluid is available available from FP or an authorised FP dealer Swing the filler hole lid aside Fill the sealer with SEALIT sealing fluid Check the fluid level The fluid level in the sealer should roughly reach to the max mark Swing the filler hole lid bac...

Page 156: ...left side and pull the sealer away to the left Empty the fluid reservoir Removing the rocker with moistening felt Slightly tilt the rocker and pull it off in an obliquely upward direction Removing the absorption felt Grip the absorption felt with pliers or tweez ers and pull it out upwards Rocker with moistening felt Absorption felt ...

Page 157: ...until it reaches the stop in the contour Evenly push the arched absorption felt with your hand into the fluid reservoir Make sure that the felt is correctly seated in par ticular at the edges The stop in the posi tioning contour must fit precisely in the opening of the letter receiving tray As a final measure stroke with your finger over the felt repeatedly to eliminate any irregularities Position...

Page 158: ...ressure push the rocker onto the sealer such that the two clips engage on the bolts Check Check the correct seat The absorption felt must be perpendicu larly suspended in the fluid reservoir Its lower edge should roughly reach the bot tom The gap between rocker and sealer housing must be uniform The rocker must neither jut out nor touch the hous ing Fill with SEALIT sealing fluid see page 155 Conn...

Page 159: ...e displayed diag nostics code You can correct many minor errors and issues occurring during PostBase Vision operation yourself Please contact the Customer Service if you cannot remedy an error by means of the display information and the hints given in this Reference Guide 19 2 Possible causes and remedy This chapter offers tips for troubleshooting grouped by the types of problems when franking pag...

Page 160: ...ce Letter jam On how to clear a letter jam please see chapter 19 3 Letter transport fails to start PostBase Vision does not show the Home screen Return to the Home screen and try again Sensor does not recognise letter Position the letter again DX mail products are missing The optional DX feature has to be enabled to frank mail pieces for dispatch by the private carrier DX For this purpose a DX lic...

Page 161: ...tBase Vision signals a jam although no letters are in the letter path The sensors light barriers are soiled Clean the sensors see chapter 18 2 Printed Postage Impressions PPI are missing In order to print PPIs the optional PPI feature has to be enabled in your PostBase Vision For this purpose a PPI license number is necessary For activation of the PPI feature please contact the FP aftersales servi...

Page 162: ...mail piece Letter transport is still running Wait until letter transport stops The scale operates in the Differential weighing mode The weight is determined upon removing the mail piece from the weighing platform see chapter 5 1 3 2 The weight is too low or the scale is overloaded Use scale for mail pieces of the permitted weight range only see pages 186 and 189 PostBase Vision does not recognise ...

Page 163: ...e LAN con nection not connected not connected correctly Check cable connections see page 25 Check adjust the connectivity settings see chapter 16 13 Turn off PostBase Vision see page 38 Wait one minute Turn PostBase Vision on again During system start PostBase Vision activates the network connection LAN or Wi Fi The menu bar shows the icon of the active connection or for example Internet access of...

Page 164: ... again PostBase Vision has detected the ink cartridge when the LED on the left of the cartridge bracket glows green continuously Wrong ink cartridge inserted Observe the specifications see page 187 Ink cartridge is defective Contact Customer Service Print system cleaning fails to improve the print quality Ink cartridge heavily soiled or dried up Repeat cleaning Function Intensive Cleaning If you c...

Page 165: ...ith sponge and let sponge soak up completely see chapter 18 9 3 Sponge is dirty or worn Clean or replace the sponge see chapter 18 9 3 Brush is dirty or worn Clean or replace the brush see chapter 18 9 4 You have used unsuited envelopes Only use envelopes that are suited for sealing by machine Observe specifications see page 188 Adjust the moistening level see chapter 18 9 2 Use SEALIT sealing flu...

Page 166: ...sport does not start PostBase Vision does not display the Home screen or the Automatic Feeding pop up see chapter 6 3 3 4 Letter transport stops processing is interrupted Jam Carefully read the displayed information On how to clear a letter jam please read chapter 19 3 The batch counter is active After the pre set number of mail pieces have been processed PostBase Vision will automatically stop se...

Page 167: ...r see chapter 18 10 1 Fill SEALIT sealing fluid see chapter 18 10 2 Moistening felt is worn Replace rocker with moistening felt see chapter 18 10 3 Absorption felt is worn Replace absorption felt see chapter 18 10 3 Moistening felt incorrectly seated in the rocker Correct moistening felt position see chapter 19 5 Absorption felt incorrectly seated in the sealer Sur face is curved Check and if nece...

Page 168: ...ou will find an overview on setting the network parameters on page 121 Ethernet cable network cable for the LAN con nection not connected not connected correctly Check cable connections see page 25 Internet access of the network router disrupted Contact the network administrator FP Infrastructure currently not accessible Try again later Error during installation procedure An error message with tro...

Page 169: ... Vision is in standby Touch the display or press the ON OFF button briefly Display fails to react when touched Turn off PostBase Vision Calibrate touch screen see chapter 18 8 page 143 Display shows single coloured background and text System Failure blue screen red screen A system error has occurred Turn off PostBase Vision see page 38 If PostBase Vision does not react to pressing the ON OFF butto...

Page 170: ...int system for franking and returning to the sealed position causes these sounds They are normal operating sounds not errors Printed Text Button New is missing All storage spaces are taken Delete printed texts you no longer need see chapter 13 3 page 101 User PIN not accepted Contact the system administrator Wrong user selected Press BACK to get to the user selection Select user and enter PIN User...

Page 171: ...her objects Place the drawer down on a base surface On the feeder Remove the letter stack from the ramp Press the release button The roller trans port moves upwards On the franking machine Unlock the drawer Push the drawer latch lever upwards Pull the drawer to the front out of the hous ing The flashing LEDs in the letter entrance area indicate the drawer is missing Place the drawer on an underlay...

Page 172: ...eeder Press down firmly on the roller transport until it clicks into place On the franking machine Slide the drawer in to the stop Make sure that the drawer latches correctly on both sides The LEDs in the letter entrance area go out Confirm the error message s ...

Page 173: ...tter guide in the lugs on both sides Lightly bend the front of the letter guide panel down at the sides This eases the process of inserting in the guides Hold the letter guide straight and slide in the direction of the arrow against the resistance from the latching hook As soon as the latching hook snaps into its guide groove the letter guide has been inserted correctly Push the letter guide to th...

Page 174: ...he long moistening felt side fully underneath the clamping strip such that the felt s recesses are perfectly aligned with the rocker stop edge and both moistening felt outer edges uni formly project over the rocker edge by approximately 1 2 mm See illustration Carefully displace the moistening felt in the clamping strip if necessary Reattach the rocker on the sealer see page 158 Rocker with moiste...

Page 175: ...before Wait for at least two hours before connecting and commissioning the PostBase Vision franking machine The franking machine needs this time to adapt to the environmental conditions allowing any condensed moisture to escape Removing the PSD Turn PostBase Vision off PostBase Vision will complete any current actions lowers the display and then switches off Unplug the power plug from the outlet U...

Page 176: ...the white slider Inserting the PSD Push the white slider next to the power out let on the PostBase Vision in the direction of the arrow and hold it The catch allows access to the PSD mounting Insert the PSD as shown in the picture and push it all the way into the mounting You can feel it engage Release the white slider Close the cover of the PSD slot again Reconnect the power cable You can now use...

Page 177: ...ion from the power Turn PostBase Vision off The PostBase Vision will complete any cur rent actions lowers the display and then switches off The display light and button illu mination go out Unplug the power plug from the outlet Remove all cable connections On the back of the franking machine Unplug the power cable from the power connection of the franking machine If necessary remove the ethernet c...

Page 178: ...emove PostBase Vision from feeder To feed mail pieces the hand feed tray or the sealer or the feeder are positioned to the left of the franking machine The housings of the franking machine and the feeding device in use are mechanically coupled via catches on the right side of the feeding device and slots in the franking machine s housing Carefully lift the franking machine at the housing and remov...

Page 179: ... to the exchange position Remove the stylus Place franking machine upright again Move ink cartridge to exchange position Push the white slider next to the power outlet on the PostBase Vision in the direction of the arrow and hold it Insert the stylus in the opening in the back of the franking machine Rotate the stylus counterclockwise to move the ink cartridge to the exchange position When the fla...

Page 180: ...franking system please make sure to always contact the FP aftersales service Caution Run the Withdraw machine function only if you really want to de commission the PostBase Vision Commissioning the franking machine after decommissioning is only possible by calling a service technician at extra costs Make sure PostBase Vision has a network connection Ethernet LAN or Wi Fi Open the MENU Choose WITHD...

Page 181: ...ufacturer declares that the product meets the requirements of all relevant EU directives that require such labelling The manufacturer s EU declaration of conformity for the PostBase Vision franking system is printed on page 191 Nemko certification mark The approval mark indicates that the product complies with the applicable standards as required in the USA and Canada Nemko CCL is a NRTL nationall...

Page 182: ...AN Controller Area Network is a serial bus system Interface for connecting the feeder Symbol for alternating voltage Indicates the type of the input voltage Symbol Wiring symbol for a fuse This symbol always stays along with the details of the fuse used The plate contains important information for the fuse Caution For continued protection against risk of fire replace only with same type and rating...

Page 183: ...the date of posting the postage product price and the franking machine identification as well as a box with Royal Mail product data Additionally the franking imprint can contain custom adverts i e logos or texts Label Special self adhesive label which you can frank and stick onto your mail pieces Necessary for large heavy and thick mail pieces Also use labels to attach on the mail piece when the e...

Page 184: ...ng the touch screen e g when scrolling through long lists This is how it works Touch the area you want to scroll and without letting go move it in the desired direction Test Imprint The Test Imprint generated in the Ink Cartridge menu consists of a series of different patterns Using the Test Imprint you can test the print function and check the print quality Zero test print Franking imprint with t...

Page 185: ...ght 287 mm with weighing platform 327 mm highest display position Weight 9 4 kg franking machine with scale 0 6 kg hand feed tray 0 6 kg sealer 7 8 kg feeder 2 6 kg ramp 1 0 kg catch tray 5 6 kg drop stacker Power connection Franking machine 100 240 V 1 5 A 50 60 Hz Feeder 100 240 V 1 5 A 50 60 Hz Power consumption Franking machine 80 W Energy Star 0 5 W switched off 7 W standby Feeder 80 W Displa...

Page 186: ...Stand alone equipment Desk top Class of Equipment Class I Connection to Supply Pluggable type A Type of Power System TN IT Mobility Moveable equipment Pollution Degree 2 Operating conditions 15 C to 35 C 59 F to 95 F Only use in closed rooms Do not expose to direct sunlight Rel humidity 15 to 80 non condensing Performance Depending on system configuration up to 85 letters min Varies depending on e...

Page 187: ... Vision franking machine with hand feed tray 89 mm 127 mm up to 253 mm 353 mm PostBase Vision with feeder 100 mm 148 mm up to 253 mm 353 mm Thickness Franking without usage of the sealing function Up to 10 mm Using the sealing function PostBase Vision Feeder Up to 7 mm Material Ink absorbent material suitable for ink jet printing No dark paper No glossy coating on the surface to print No bubble fo...

Page 188: ...matic sealing PostBase Vision Feeder Material Envelopes must be suitable for sealing by machine The flap must be at the envelope s long side Sealing area Sufficient closure can only achieved with continuous sealing area Subject to short term modification ...

Page 189: ...Appendix PostBase Vision Product variants and equipment 189 PostBase Vision Product variants and equipment Subject to short term modification ...

Page 190: ... Vision Mailmark franking machine was authorised according to specifications of the Royal Mail following an internationally valid practice To commensurate to this standard the cryptographic keys used by the Security Device have to be updated or exchanged after a specified period of time Please make sure that the franking machine contacts the Server at least once a month e g by loading postage with...

Page 191: ...Appendix Declaration of Conformity 191 Declaration of Conformity ...

Page 192: ...enSSL Project for use in the OpenSSL Toolkit http www openssl org 4 The names OpenSSL Toolkit and OpenSSL Project must not be used to endorse or promote products derived from this software without prior written permission For written permission please contact openssl core openssl org 5 Products derived from this software may not be called OpenSSL nor may OpenSSL appear in their names without prior...

Page 193: ...n binary form must reproduce the above copyright notice this list of conditions and the following disclaimer in the documentation and or other materials provided with the distribution 3 All advertising materials mentioning features or use of this software must display the following acknowledgement This product includes cryptographic software written by Eric Young eay cryptsoft com The word cryptog...

Page 194: ...any data from the user s network which is not relevant for the operation of this equipment United States Patents Following patents and applications for patents designs and trademarks are reserved for the franking machine PostBase Vision U S Patent Numbers 6 615 196 6 629 084 6 733 194 6 739 245 6 953 234 7 103 583 7 346 743 7 606 264 7 694 010 7 793 000 8 131 959 8 682 801 8 933 591 8 972 046 9 07...

Page 195: ... may cause harmful interference to radio communications However there is no guarantee that interference will not occur in a particular installation If this equipment does cause harmful interference to radio or television reception which can be determined by turning the equipment off and on the user is encouraged to try to correct the interference by one or more of the following measures Reorient o...

Page 196: ...116 B Balance 82 See also Postage available Basket 150 check if seated correctly 150 See also Sponge holder Batch counter 77 BMA 61 Brightness adjust 49 Brush 15 change 152 clean 152 Business Mail Advanced 61 C CAN BUS 14 16 182 Catch in the cartridge holder 30 137 139 Catch tray 13 18 adapting to envelope size 51 assembling 21 Clean brush feeder 152 housing 127 print system 131 sealer 154 sensors...

Page 197: ...efault shortcuts 99 restoring 99 Descending print numbers 91 Descending See Postage available DHCP 122 Differential weighing 12 57 Disconnecting from mains 39 discoverFP 11 183 Display angle adjust 48 Disposal 180 Download postage 83 Drawer 13 129 141 cannot be opened 164 insert 129 142 172 latch lever 13 remove 129 141 171 Drop Stacker 12 19 51 adapting to envelope formats 51 assembling 21 instal...

Page 198: ... stopping 76 Feeder plus 12 Felts correct position 174 correct seat 158 replace 156 See also Absorption felt See also Moistening felt Filler hole 155 Filling level feeder 144 ink cartridge 135 sealer 155 Filling with sealing fluid feeder 35 sealer 23 155 Firewall 123 First shortcut Shortcut 1 43 Flap access to print system 13 Flap sealant tank 15 close 37 146 151 open 35 144 149 Fluid level sealer...

Page 199: ...ove transportation protection clip 29 138 Ink level 44 135 Installation 17 Installation site 20 Item counter displaying 81 resetting 81 J Jam remedy 171 K Keyboard 46 Keypad 46 L Label compartment 13 fold in out 50 Label printing 11 Labels 10 190 franking printing 79 insert 50 LAN port 14 Language 114 change 114 Large letters adjusting feeder 73 sealing with sealer 71 Latch lever ramp 15 73 LED 30...

Page 200: ...rder history 126 Ordering 44 125 display delivery address etc 126 display information 126 place an order 125 P Patents USA 194 PC connection 14 Pendulum 15 19 75 mounting 33 using 75 Piece Counter 81 PIN 183 lost 170 set change administrator PIN 111 Pop up window 47 Postage display in the Home screen 43 in the franking imprint 52 set 53 set using a shortcut 53 Postage available 43 82 Postage downl...

Page 201: ...rtcut 53 setting after standby 115 Product calculation 54 Product price 52 Product safety labels 181 Product usage data upload 109 Proxy authentication 123 Proxy server 122 PSD 14 176 184 190 cover flap 14 insert 175 176 remove 175 slider for unlocking 14 See also Security device R Ramp 15 19 adjust inclination 15 73 inserting the letter guide 173 latch lever 15 unlock 73 Rate See Product Rate sel...

Page 202: ... Selection list 45 Sensor for letter detection Feeder 15 128 130 Sensors 128 129 clean 128 overview 128 Service 205 Setting menu 45 Shortcut 11 53 97 available shortcuts 53 creating saving assigning 97 default shortcuts 99 deleting 99 example 97 first shortcut 97 99 first shortcut shortcut 1 43 name 98 new 97 new button missing 97 renaming 98 resetting to default 99 saving assigning 54 selected 43...

Page 203: ... 48 calibrate 143 methods of operation 40 Transmitter Module 195 Transport brush insert 142 remove 141 replace 141 Tray with sealer sponge 16 Troubleshooting See Errors Turning off 13 32 37 38 auto off 116 Turning on 13 38 Type plate 14 16 U Update 108 109 Upload product usage data 109 USB port 14 Users 65 setting up 65 switching 65 V Volume adjust 49 current setting 49 W Weekend mode 118 Weighing...

Page 204: ...PostBase Vision 204 ...

Page 205: ...ctory Should any faults occur with your PostBase Vision franking system in spite of our extensive quality control please contact FP Customer Service Francotyp Postalia Ltd 74 Questor Powder Mill Lane Dartford Kent DA1 1EF Phone 0344 225 2233 Website www fpmailing co uk Customer Portal discoverFP com uk ...

Page 206: ...51 0059 3393 00 Rev 01 2019 12 xxx helbig berlin ...

Reviews: