background image


P| 4 

THE GABLE PERGOLA 

www.ForeverRedwood.com 


CONTENT OF BOXES


Qty.


Description


Drawings


No.


Metal Plaque -A 


16 

Metal Plaque -B 


17 


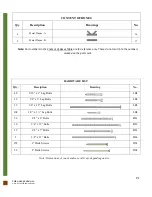
HARDWARE LIST 

Qty. 

Desciption 

Drawing 

No. 

48 

5/16” x 3” Lag Bolts 


LB1 

12 

3/8” x 3” Lag Bolts 


LB2 

12 

3/8” x 12” Lag Bolts 


LB3 

168 

3/8” x 1 ½” Lag Bolts 


LB4 

26 

3/8” x 8” Bolts 


BL1 

10 

3/8” x 12” Bolts 


BL2 

12 

3/8” x 7” Bolts 


BL3 

3/8” x 11” Bolts 


BL4 

274 

3” Deck Screws 


DS1 

32 

4” Deck Screws 


DS2 


Note: 

Part numbers in the Content of Boxes Table are for reference only. These do not match to the numbers 

marked on the parts sent.


Note: Dimensions of your hardware will vary depending on size. 

Summary of Contents for THE GABLE PERGOLA

Page 1: ...GABLE PERGOLA www ForeverRedwood com ASSEMBLY INSTRUCTIONS FOR THE THE GABLE PERGOLA 866 332 2403 TOLL FREE 707 640 29 05 Option 4 Direct Line for the Design Department 7am 7pm Pacific Time Monday Sa...

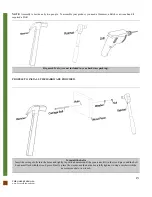
Page 2: ...STALL THE HARDWARE PROVIDED Required Tools Are not included in your hardware packing To install the bolts Insert the carriage bolts into the holes and lightly tap with a hammer until the square neck f...

Page 3: ...hers in their lag bolts After that insert the lag bolts into the holes and carefully tighten it using a ratchet with the necessary socket Use the washers only for the Wood Pieces To install the deck s...

Page 4: ...Single Supports 2 2 Support In Between Blocking 3 4 Main Knee Braces 4 Top In Between Blocking 5 3 Roof Trusses 6 4 Tie Beam 6 1 3 Strus 6 2 6 Secondary Knee Braces 7 1 Ridge Beam 8 4 Rafter Supports...

Page 5: ...12 3 8 x 3 Lag Bolts LB2 12 3 8 x 12 Lag Bolts LB3 168 3 8 x 1 Lag Bolts LB4 26 3 8 x 8 Bolts BL1 10 3 8 x 12 Bolts BL2 12 3 8 x 7 Bolts BL3 2 3 8 x 11 Bolts BL4 274 3 Deck Screws DS1 32 4 Deck Screws...

Page 6: ...upport In Between Blockings 3 Main Knee Braces 4 Top In Between Blocking 5 Roof Trusses 6 Tie Beam 6 1 Struts 6 2 Secondary Knee Braces 7 Ridge Beam 8 Support Rafters 9 Rafters 10 Secondary Rafters 11...

Page 7: ...everRedwood com Note Part numbers in the Drawing are for reference only These do not match to the numbers marked on the parts sent 6 1 1 1 1 6 5 4 4 4 4 3 3 2 2 12 12 10 10 10 10 9 9 8 7 7 6 13 14 14...

Page 8: ...evel Step 1 Install the Anchor Bases 14 Please see the How to anchor your pergola document for all details Set your post 1 in the saddle of the anchor bases Drill a hole in the post prior to anchoring...

Page 9: ...t return to the bolts described in the step 2 and tighten fully Check the marked numbers on each support with in between blocking and place as drawings shown Note put silicone in joints of the support...

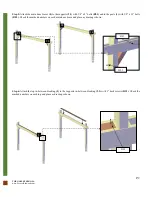
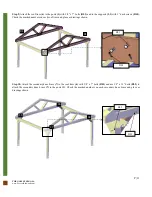
Page 10: ...BL1 and to the posts 1 with 3 8 x 12 bolts BL2 Check the marked numbers on each main knee brace and place as drawings shown Step 6 Attach the top in between blocking 5 to the supports in between block...

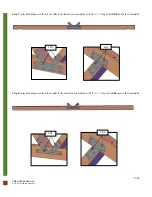
Page 11: ...7 Attach the Plaques in the Flower 16 to the lateral tie beams 6 1 with 3 8 x 1 lag bolts LB4 and to the struts 6 2 Step 8 Attach the Plaques in the Flower 16 to the central tie beam 6 1 with 3 8 x 1...

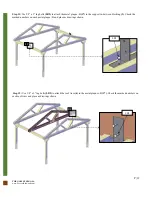
Page 12: ...DS1 Check the marked numbers on each roof truss and place as drawings shown Step 10 Attach the secondary knee brace 7 to the roof truss 6 with 3 8 x 7 bolts BL3 and use 3 8 x 12 bolts BL2 to attach t...

Page 13: ...plaque B 17 to the support in between blocking 3 Check the marked numbers on each metal plaque B and place as drawings shown Step 12 Use 3 8 x 3 lag bolts LB2 to attach the roof truss 6 to the metal...

Page 14: ...ttach support rafter 9 to the support in between blocking 3 Check the marked numbers on each ridge beam and place as drawings shown Step 14 Attach the rafter 10 to the ridge beam 8 with 4 deck screws...

Page 15: ...er 11 to the purlins 12 with 3 bolts DS1 Check the marked numbers on each purlin and place as drawings shown Step 16 Attach the ceiling fan 13 to the roof truss 6 with 3 8 x 11 bolts BL4 Check the mar...

Page 16: ...ith 3 deck screws DS1 Check the marked numbers on each boot and place as drawings shown This completes the Gable Pergola assembly Hope you enjoy your set for many decades If you ever have a problem or...

Reviews: