background image

Automation - Tips and Suggestions

Control 2802 Logic Pro Automation & Control Surface Manual 

27

Automation - Tips and Suggestions

Whether you are writing automation on your DAW or analogue layer, the following tips and suggestions apply.

Automation Modes in Logic

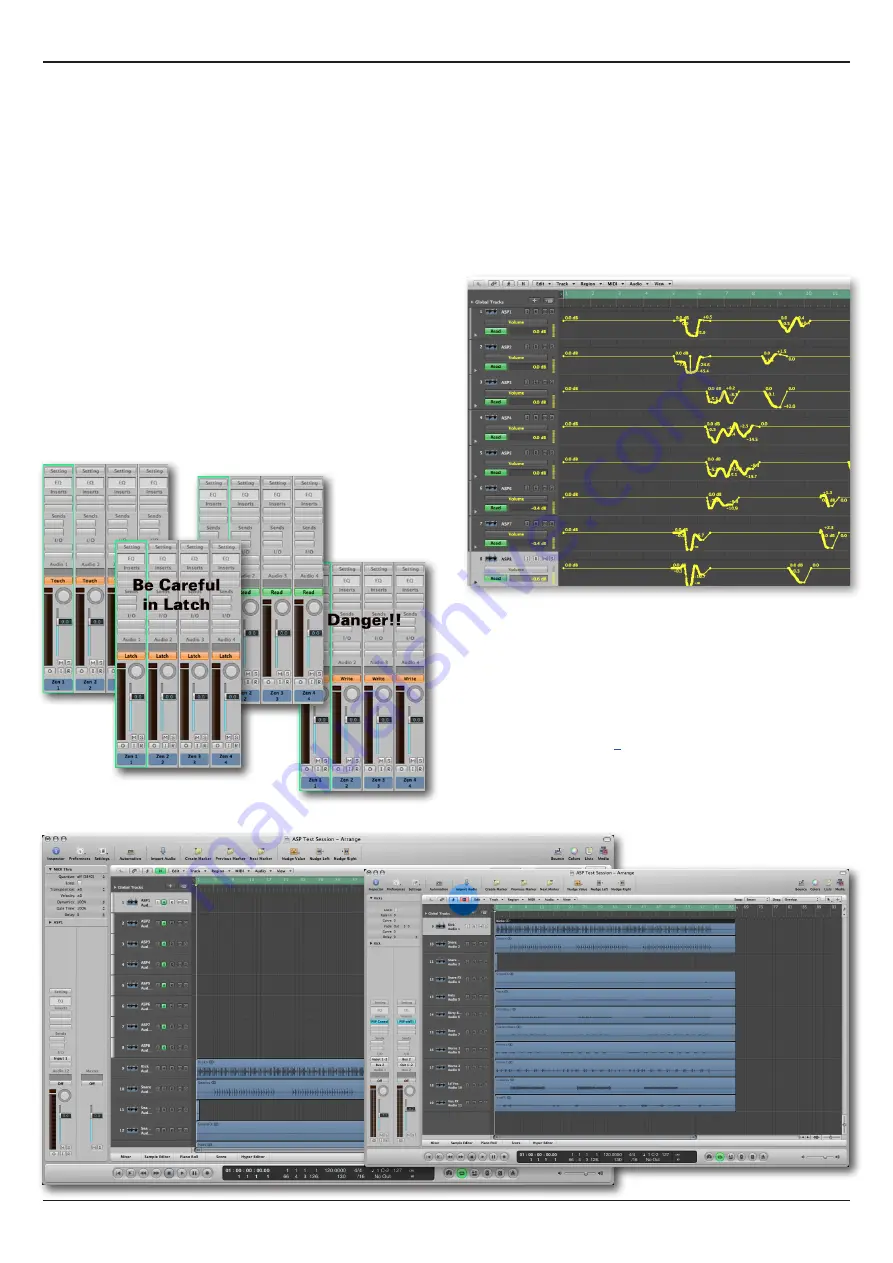
We recommend the use of TouchLatch and Read mode for 

the majority of your work. 
Touch mode provides the most essential workflow, writing 

automation data when a fader is touched or moved, and 

returning to previously recorded automation data when a fader 

is released.
Note that the Control 2802 faders are motorised and touch 

sensitive.
Latch mode is useful, but will write up to the last touched 

fader position unless playback is stopped. Therefore, you may 

overwrite important rides. If so, use the stages of undo in your 

DAW.
Read mode is used to play back automation data.
Be very careful if using Write mode, as Logic may automate 

any paramater touched - plug-ins, EQ bands, everything if 

you’re not careful!

Writing and Viewing Automation in Logic

Fader rides and mutes can be recorded into Logic and 

viewed, edited or manually drawn, as in any other DAW-based 

automation system.
To view your recorded automation press ‘A’ on your computer 

keyboard (this is a standard Logic keyboard shortcut). Or click 

on the automation icon at the top of the screen.

Hiding Tracks in Logic

When running automation on both DAW and analogue fader 

layers, you may find it useful to hide the analogue automation 

tracks (1-8). Hiding the tracks still allows the automation data to 

function but keeps your session tidy.
Note that you can only access this option if you set Channel 

Strip View to Tracks Only during step 2 of the HUI

TM

 controller 

configuration, see page 

9

.

Select the tracks you wish to hide by clicking on the small ‘H’ 

beside each channel. Then, to hide (or show) the tracks, press 

H’ on your computer keyboard. Or click on the small ‘H’ hide 

icon at the top of the ‘Arrange’ window. 

Summary of Contents for Logic Pro

Page 1: ...Logic Pro Automation Control Surface Manual Version 1 4 ...

Page 2: ...dio Engineering Limited This does not include damage caused by post purchase transportation storage or careless handling nor damage caused by misuse A significant proportion of products returned under Warranty which are very few in number compared to numbers sold are found not to exhibit any fault at all Please check that the mains voltage is correctly set for your local supply and that your conne...

Page 3: ...be downloaded from our website at www focusrite com About this Manual Contents Contents About this Manual 3 Control Surface DAW Control Overview 4 Dual Layer Fader Strips 4 Control Surface Panel 4 Analogue Fader Automation Overview 5 Network Connections Setup Mac 6 DAW Ethernet Connection Mac 6 Network Configuration Mac 6 Control Surface Configuration 8 Control Surface Operation 11 Starting the So...

Page 4: ...ing in the DAW layer the console remotely adjusts parameters within the DAW software via an Ethernet connection using the HUITM control surface protocol Any 8 DAW tracks may be adjusted from the console s Fader Strips Each of the 8 channel faders is motorised and both the analogue and DAW layers can be fully automated Control Surface Panel The layer switching and other DAW parameters such as auxes...

Page 5: ... 2802 By running the dummy channels along with the rest of your DAW mix you can replay automation on both the analogue channel levels and DAW tracks simultaneously use the DAW switch on the Control Surface Panel to flip between the analogue and DAW fader layers The diagram below provides an overview of the analogue automation system and the parameters that can be controlled To use either the DAW c...

Page 6: ...nnection If you have a direct Ethernet connection between Control 2802 and your DAW computer first you must set up your DAW IP address Please note that if you have a router then the IP address should not be adjusted and you should skip to Setting up the console with DHCP for use with routers on page 7 To set the DAW IP address Select System Preferences Network Ethernet Location Edit Locations Add ...

Page 7: ...ay have to repeat the power down restart process if you are experiencing difficulties Select the console and click on Connect bottom right Your console is now connected to the DAW computer and ready for HUITM control surface configuration see page 8 Note that if you close the Focusrite Control 2802 window the software continues to run in the background If you wish to quit the application select Qu...

Page 8: ... the Network Connections Setup section see page 6 If your network setup is correct then Control 2802 should be communicating via the Focusrite Control 2802 software And on Control 2802 the SETUP Host Software page should be set to Logic To set up Logic Pro please follow the steps on the next couple of pages Step 1 Boot the Logic software and navigate to Logic Pro Preferences Control Surfaces Setup...

Page 9: ...te HUITM controllers then HUI 1 should be set to Automation and HUI 2 to Control surface as follows Select the first HUITM control surface and set both the Output Port and Input Port to Control 2802 Automation Then select HUI 2 and set both the Output Port and Input Port to Control 2802 Control Surface On the first HUITM control surface assigned to Automation you might also want to lock the Channe...

Page 10: ...mmy audio tracks these will be used to write and replay fader and CUT automation on the 8 analogue channels of Control 2802 We recommend that you de assign any input and output track routing This prevents you from recording audio making it easier to see that these are automation only tracks You can do this by using the Input and Output assign boxes in the New Tracks dialogue window when creating t...

Page 11: ...LED displays You can use the BANK switches to quickly access different blocks of tracks see page 13 Note the 8 tracks assigned to the DAW layer are marked in Logic at all times even if the console is switched to the analogue layer Therefore it is best to use the DAW switch 1 and OLEDs to confirm what the Fader Strips are controlling Note if you are running two HUITM controllers for both Control Su...

Page 12: ...eful DAW functions Some are ONLY active when switched to the DAW layer Others are active in BOTH layers and can be used when the Fader Strips are controlling either the DAW or analogue channel level The functions active in BOTH layers are Transport switches 3 7 and Jog wheel 8 CYCLE toggle on off 9 Track region zoom navigation cursor controls 14 DAW METERS 17 ...

Page 13: ...ned to the rotary encoders 5 8 Switch 16 Press the 5 8 switch 16 to page the 4 rotary encoders to the second set of four tracks The encoders can be used to control pan aux insert and input output assignments for the four active channels See page 17 for details Transport Panel The transport panel provides access to the following functions Rewind 3 Fast Forward 4 Stop 5 Play 6 Record 7 A jog wheel 8...

Page 14: ...tch adds a marker at the current playhead position NUDGE 11 Enable the NUDGE switch and turn the jog wheel 8 to change the DAW tracks in access Track Region Zoom Navigation Cursor Controls 14 When SHIFT 13 is not selected these switches select tracks or regions in your Logic session Up Down select the next track above below Left Right select the next region on the selected track Enable SHIFT 13 an...

Page 15: ...e layer to isolate channels from automation This prevents HUITM controller MIDI automation from adjusting the analogue channel level see page 26 Unity used in the analogue layer to provide a quick way to position the channel fader at unity gain 0dB The channel remains locked at 0dB until you deselect it This function is ideal for returning stem mixes or any application where you want the faders at...

Page 16: ...ed to add or remove tracks to existing Logic groups If you don t have any groups in your Logic session then pressing GRP 22 followed by a Fader Strip SEL switch 18 opens the Groups dialogue box Here you can set parameters for the group using the mouse such as linking Volume Mute Automation Mode etc Please note that after the first group is created creating new groups 1 must be done via the mouse w...

Page 17: ... Operating Manual Adjusting Parameters from the Rotary Encoders When controlling the DAW layer the BANK and 5 8 switches allow you to assign different tracks from your DAW session onto the 4 rotary encoders See page 13 for details Once assigned you can use the encoders and OLED displays to control a number of track parameters The different modes are accessed from the encoder mode switches PAN 27 A...

Page 18: ...rface Operation PAN Mode 27 Select the PAN switch 27 to assign Logic s pan controls for channels 1 4 or 5 8 onto the 4 rotary encoders The OLEDs display the channel pan position with a horizontal slider beneath the channel name PAN mode channels 1 to 4 Logic Mixer window ...

Page 19: ...ents on page 2 When dealing with outputs you may assign onto busses as well as to physical outputs To change an assignment rotate the encoder to the desired input bus or output your selection flashes on the OLED display Press down on the encoder to confirm the assignment Input Assignments channels 1 to 4 Output Assignments channels 1 to 4 For faster session setups try using the Logic I O labelling...

Page 20: ... assigned then you cannot turn up the level Note also that any bus may be assigned to the five send positions either in Logic s Mixer window using the mouse or from the console in AUX ASSIGN mode AUX mode channels 1 to 4 controlling Send 1 Aux Send to Faders Press the AUX switch 28 again it flashes to put the send levels onto the 8 channel faders You can now use the 8 channel faders to adjust the ...

Page 21: ...an be used to assign busses to the first five send positions Snd1 to Snd5 First select the send you wish to assign by using the PAGE keys 26 to scroll through the slot positions S1 to S5 Then rotate the encoder to select the desired bus your selection flashes on the OLED display Press down on the encoder to confirm the assignment Aux Send Assignments channels 1 to 4 Bus Options in Logic ...

Page 22: ...se note that if you select INSERT 29 first and then change your channel selection 18 the OLEDs temporarily display the name of the selected channel 3 Rotate an encoder to select a plug in your selection flashes on the OLED display 4 Press down on the encoder to confirm the assignment At this point the plug in window will open within Logic You can now control the parameters from the rotary encoders...

Page 23: ...oder in our example encoder 1 The plug in window opens in Logic and the first page of parameters map onto the 4 rotary encoders The OLEDs display the parameter names and values Logic Channel EQ 2 Use the PAGE keys 26 to scroll through all the available parameters 3 Turn the encoders to edit parameter values 4 When you have finished editing the plug in tap the INSERT switch to exit edit mode and cl...

Page 24: ...displays will show the first page of the setup menu To change page use the page keys 26 located under the left most encoder Editing Setup Parameters To edit parameters rotate the corresponding rotary encoder to change the value the SETUP LED flashes to indicate the change Press the SETUP switch to confirm and apply the changes The SETUP LED returns to a solid red once changes are confirmed The fir...

Page 25: ...aders can be automated this is ideal for muting analogue channels with inserts during quiet sections of the mix and thereby reducing any unwanted noise from vintage outboard The analogue automation works along side the full DAW control surface layer This means that fader and cut automation can be written and replayed on both the DAW and anaogue fader layers The diagram below provides an overview o...

Page 26: ... the analogue layer to isolate channels from automation it prevents HUITM controller MIDI automation from adjusting the analogue channel level Please note that AUTO SAFE is turned ON across ALL channels by factory default Therefore to automate a channel you must turn AUTO SAFE off The status of AUTO SAFE is then stored if you exit the mode or power down This means that when you re enter AUTO SAFE ...

Page 27: ...rite mode as Logic may automate any paramater touched plug ins EQ bands everything if you re not careful Writing and Viewing Automation in Logic Fader rides and mutes can be recorded into Logic and viewed edited or manually drawn as in any other DAW based automation system To view your recorded automation press A on your computer keyboard this is a standard Logic keyboard shortcut Or click on the ...

Page 28: ...u will need to update the console firmware To do this please visit www focusrite com to obtain the latest firmware from the Control 2802 webpage Then follow the simple instructions provided with the firmware download to flash the upgrade to the console memory If you experience any issues please read the Control 2802 FAQ found online at www focusrite com Thanks from the Focusrite team ...

Page 29: ...Panel Visualisation Control 2802 Logic Pro Automation Control Surface Manual 29 Panel Visualisation ...

Reviews: