background image

6

7


Warning:

 Do not modify any part of this equipment without 

authorization of the manufacturer. Failure of this can lead to 

malfunctioning and will void the warranty. 

Waarschuwing: 

Wijzig geen enkel onderdeel van dit apparaat zonder 

toestemming van de fabrikant. Indien dit toch gedaan wordt, kan dit 

leiden tot onjuist functioneren van het apparaat en het verlies van 

garantie.


Warning:

 In case of a faulty device contact Focal. Do not try to fix it 

yourself. Failure of this will void the warranty. 

Waarschuwing: 

Neem indien het apparaat onjuist functioneert 

direct contact op met Focal. Probeer het niet zelf te repareren. Het 

niet opvolgen van deze waarschuwing kan leiden tot het verlies van 

garantie.


Warning:

 In case of doubt about the safety of the device contact 

Focal Meditech. 

Waarschuwing: 

Neem in geval van twijfel over de veiligheid van het 

apparaat contact op met Focal Meditech.


Warning:

 In case of a serious incident when using the device, 

contact Focal Meditech and the national authority of your country. 

Waarschuwing: 

Bij een ernstig voorval met betrekking tot dit 

apparaat dient contact te worden opgenomen met Focal Meditech 

en de bevoegde autoriteit van de lidstaat.

Switch on Gowing

2

 / Aanzetten Gowing

2

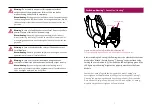
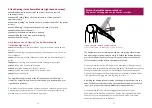
Indication led

On/off switch

Figure 2: Picture of on/off switch with indication LED

Figuur 2: Afbeelding van de aan/uit schakelaar met indicatie LED 

Before switching on Gowing

2

, the Gowing

2

 has to be attached to the Power 

Module (See “Attach / Detach Gowing

2

”). Gowing

2

 can be switched on by 

turning the on/off switch to (I). The indication LED will light up green. If the 

LED lights up red Gowing

2

 might not be properly attached to the Power 

Module.

Voordat de Gowing

2

 ingeschakeld mag worden, moet Gowing

2

 zijn 

bevestigd aan de Power Module (zie “koppelen / ontkoppelen Gowing

2

”). 

Gowing

2

 kan worden ingeschakeld door de aan/uit naar (I) te schakelen. 

De indicatie-LED zal groen oplichten. Als de LED rood oplicht, is Gowing

2


mogelijk niet goed bevestigd aan de Power Module.

Summary of Contents for Gowing2

Page 1: ...ID manual 606103 Revision Revisie 1 0 0 Date Datum 01 02 2020 Quick Start Guide Snelstartgids Gowing2 ...

Page 2: ...d important safety warnings of Gowing2 Please take note of the safety warnings before using Gowing2 Dit is de snelstartkaart voor Gowing2 een dynamische armondersteuning Dit product wordt ontwikkeld geproduceerd en eventueel gedistribueerd door Focal Meditech B V Deze snelstartkaart bevat de basisinformatie over Gowing2 Het doel van deze informatie is te zorgen voor een succesvol veilig en effecti...

Page 3: ...kom blootstelling aan extreme temperaturen Het niet voorkomen hiervan kan leiden tot onjuist functioneren van het apparaat of tot lichamelijke schade Danger During installation ensure there is a fuse of 7 5A between power supply and Gowing2 Failure of this can lead to malfunctioning of the device and bodily harm Gevaar Let er tijdens de installatie op dat er zich tenminste een zekering van 7 5A be...

Page 4: ...h Warning In case of a serious incident when using the device contact Focal Meditech and the national authority of your country Waarschuwing Bij een ernstig voorval met betrekking tot dit apparaat dient contact te worden opgenomen met Focal Meditech en de bevoegde autoriteit van de lidstaat Switch on Gowing2 Aanzetten Gowing2 Indication led On off switch Figure 2 Picture of on off switch with indi...

Page 5: ...the arrow see Figure 4 STEP 7 Tilt the Gowing2 approximately 15 in the direction of the arrow see Figure 5 STEP 8 Move the Gowing2 up in a slanted line until it is free from the Power Module see Figure 6 STEP 9 Store Gowing2 always in its case to prevent the Gowing2 from breaking or being damaged Het ontkoppelen van Gowing2 van de Power Module rechtshandige versie STAP 1 Zet terug naar de standaar...

Page 6: ...nd your right hand on position 2 De procedure voor het afnemen en plaatsen van de linkshandige versie van Gowing2 is gelijk Het enige verschil is dat de linkerhand geplaatst moet worden op positie 1 en de rechterhand op positie 2 Attach Detach the human interface Koppelen ontkoppelen van de human interface Figure 7 Attach detach human interface Figuur 7 Koppelen ontkoppelen human interface The hum...

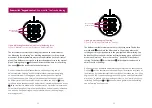
Page 7: ... in afname van de balanskracht De snelheid waarmee de balanskracht aangepast wordt is afhankelijk van de duur van het indrukken van de knop De aanpassing zal sneller plaatsvinden als de knop langer wordt ingedrukt Buttons of the middle column Figure 9 Adjust tilt angle of Gowing2 Figuur 9 Verstelling kantelhoek van Gowing2 The buttons in middle column are used for the tilt function The button mark...

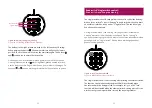
Page 8: ...wing2 allows the user to control the Gowing2 with only one switch To control Gowing2 in single switch mode there must one external switch be configured as Single switch This can be only be done by authorised people De single switch modus van Gowing2 stelt de gebruiker in staat om de Gowing2 met slechts één schakelaar te bedienen Om de Gowing2 in een knops bediening te gebruikten moet er één extern...

Page 9: ...activeerd wanneer de externe schakelaar wordt ingedrukt Vervolgens wisselt de geactiveerde functie tussen de twee aangegeven blauwe LEDs Zie Figuur 12 waar de lift functie zal worden geactiveerd wanneer de externe schakelaar wordt ingedrukt Als de gebruiker gedurende 1 seconde geen input geeft wordt het scannen hervat Contact information Contact informatie Gowing2 is manufactured and sold by Gowin...

Page 10: ...18 ...

Reviews: