8
Applying power to the charger
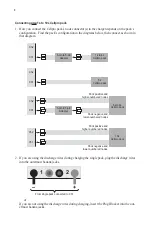
To apply power to the charger:
Connect the charger to a 12V to 15V bench power supply,
field battery or car battery. If your bench power supply is equipped with banana jacks for
output, you can remove the plier clamps from the charger’s input cables and plug the cables
directly into the power supply jacks.
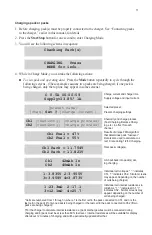
When the charger is powered up, it displays the following screens in sequence:
FMA Cellpro 10s
[firmware version]*
2 Packs Charge
[chem]*
Set @
[charge current]*
SAFE TO CONNECT
Press START
*Information in square brackets varies.
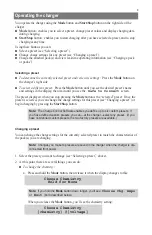
Introduction to presets
As shipped from the factory,
the charger has two presets:
2 Packs Charge, LiPo Set @ 1.0C
1 Pack Charge, LiPo Set @ 1.0C
When power is applied, the charger always initializes to the last preset used for charging. In-
structions in “Selecting a preset,” later in this manual, show how to switch between these presets.
If you altered the charge settings for a preset at the charger (as described in “Changing a preset,”
later in this manual), those changes are retained when the charger is disconnected from power,
and will be reapplied when the charger is powered up again.
“Selecting a preset” and “Changing a preset,” in the next section, provide additional information.
Note:
If you programmed the charger using the Charge Control Software, additional
presets may be available. Also, if you have been using the software, you may have
given the factory presets different names. Bottom line: if you change settings at the
charger, or redefine presets, you probably won’t see the factory presets shown above.
Welcome screen
Last-used preset
Home screen


