


87V MAX
Calibration Information
18
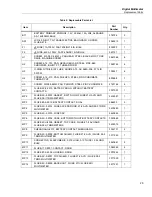
Other Pushbutton Functions
Table 3 list the button on the Meter and describes what the button does when
pressed after the password has been entered and
pressed.
Table 3. Pushbutton Functions During Cal Mode
Button
Cal Mode Description
(yellow)
Press and hold to test the present function. The measurement is not calibrated so it may be
inaccurate. This is normal.
Press and hold to display the required input level.
Press and hold to display the frequency of the input signal.
Press to store the new calibration adjustment value and advance to the next step. This
pushbutton is also used to exit calibration adjustment mode after the calibration adjustment
sequence is complete.
Calibration Adjustment Procedure
In the following procedure, some adjustment steps take longer to execute than
others (10 to 15 Seconds). For some of these steps the Meter gives a double
beep to indicate completion. Not all steps have this feature.
1. Turn the rotary switch of the Meter from
OFF
to
while holding down
at the same time. The Meter should display
.
2. Press
once to see the number of calibrations that have been
completed. Press
again to enable password entry. The Meter should
display "
".
3. Use the keypad pushbuttons to enter the existing password and press
.
The Meter should display
Y
.
4. Apply the value listed in Table 4 for each calibration step, and/or (optional)
press the
to display the required input signal level and press
to
display the required input signal frequency.
Note
After pressing
, wait until the step number advances before
changing the calibrator source or turning the rotary switch of the
Meter. If the reference source input is not within an anticipated range
of the required value, the Meter will emit a double beep and not
allow completion of the step. Set the calibrator to standby prior to
changing the function switch position and or after completing
adjustment of each function. If the calibration adjustment is not
completed correctly, the Meter will not operate correctly.