


Digital Multimeter
Calibration Adjustments
17
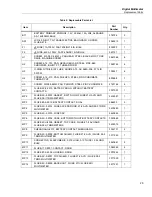
If the revision number is 011 or higher:
4. Apply power to the PCB by clipping on a dc voltage between 3.5 V and 5 V at
the test points marked “+” and “-” at the edge of the board. See Figure 4.
4
3.5 - 5 V
5
6
2X-2- 3001 REV 011
2X-2
- 30
01 RE
V 0
11
gaq102.emf
Figure 4. Revision 011 Board Layout
5. Turn the rotary switch from
OFF
to
while holding down MIN MAX at the
same time. The Meter should display CAL.
6. Short across keypad button S11 on the back of the PCB. See Figure 4. The
Meter should beep.
7. Turn the rotary switch one position counterclockwise, back to the OFF
position.
8. The default password is now restored.
9. Reassemble the Meter before performing adjustments or testing.