background image


Digital Multimeter 


Calibration Adjustments 


15


Changing the Password 

To change the password in the Meter: 
1.  Turn the Meter Rotary Switch from OFF to VAC mode while holding down the 

MINMAX pushbutton at the same time. The Meter will display 

Y




2.  Press the AutoHOLD pushbutton twice. The display should show "



3.  Using the pushbuttons select the old password (do not use AutoHOLD to 

save the password) 

4.  Press the RANGE pushbutton. The Meter should display "_ _ _ _". 
5.  Use the pushbuttons to select a desired new password. 
6.  Press AutoHOLD to save the new password. 


Restoring the Default Password 

If the password has been forgotten, the default password (1234) can be restored 

by performing the following: 
1.  Turn the rotary switch of the Meter to 

OFF

2.  Remove the bottom case and bottom shield of the Meter. 
3.  Check the revision number on the PCB. Board revision location is identified in 

Figures 3 and 4 below. 

Summary of Contents for 87V MAX

Page 1: ...anual for complete operating instructions Contact Information To contact Fluke call one of the following telephone numbers Technical Support USA 1 800 44 FLUKE 1 800 443 5853 Calibration Repair USA 1 888 99 FLUKE 1 888 993 5853 Canada 1 800 36 FLUKE 1 800 363 5853 Europe 31 402 675 200 Japan 81 3 6714 3114 Singapore 65 6799 5566 China 86 400 921 0835 Brazil 55 11 3530 8901 Anywhere in the world 1 ...

Page 2: ... is necessary for the internal function of the equipment itself Class A Equipment is suitable for use in all establishments other than domestic and those directly connected to a low voltage power supply network that supplies buildings used for domestic purposes There may be potential difficulties in ensuring electromagnetic compatibility in other environments due to conducted and radiated disturba...

Page 3: ...ed and valid from 3 to 100 of range Range Resolution Accuracy 45 65 Hz 15 200 Hz 200 440 Hz 440 Hz 1 kHz 1 5 kHz 5 20 kHz 600 0 mV 0 1 mV 0 7 4 1 0 4 1 2 4 2 20 2 6 000 V 0 001 V 60 00 V 0 01 V 0 7 2 2 4 3 Unspecified 600 0 V 0 1 V Unspecified 1000 V 1 V Unspecified Unspecified Low Pass Filter 1 0 4 1 1 0 4 6 0 4 4 Unspecified Unspecified Unspecified 1 Below 30 Hz use smoothing function Below 20 H...

Page 4: ...r maximum 5 W 10 A continuous up to 35 C 20 minutes on 5 minutes off at 35 C to 55 C 10 A to 20 A for 30 seconds maximum 5 minutes off 6 10 A accuracy unspecified DC Current Function Range Resolution Burden Voltage Accuracy μA dc 600 0 μA 0 1 μA 100 μV μA 0 2 4 6000 μA 1 μA 100 μV μA 0 2 2 mA dc 60 00 mA 0 01 mA 1 8 mV mA 0 2 4 400 0 mA 1 0 1 mA 1 8 mV mA 0 2 2 A dc 6 000 A 0 001 A 0 03 V A 0 2 4 ...

Page 5: ...Vdc and mVdc Range Accuracy 0 0 to 99 9 1 Within 0 2 per kHz 0 1 for rise times 1 μs 1 0 5 Hz to 200 kHz pulse width 2 μs Pulse width range is determined by the frequency by the frequency of the signal Input Characteristics Function Overload Protection 1 Input Impedance nominal Common Mode Rejection Ratio 1 kΩ unbalance Normal Mode Rejection 1000 V rms 10 MΩ 100 pF 120 dB at dc 50 Hz or 60 Hz 60 d...

Page 6: ...emove the input signals before you clean the Product Do not operate the Product with covers removed or the case open Hazardous voltage exposure is possible Use only specified replacement parts Have an approved technician repair the Product General Maintenance Periodically wipe the case with a damp cloth and mild detergent Do not use abrasives or solvents Dirt or moisture in the terminals can affec...

Page 7: ...uct enclosure touching or handling any PCBs or components Minimize handling Handle static sensitive parts by non conductive edges Do not slide static sensitive components over any surface When removing plug in assemblies handle only by non conductive edges Never touch open edge connectors except at a static free work station Keep parts in the original containers until ready for use Use static shie...

Page 8: ...Use only specified replacement fuses Touch top half of input contacts Good F1 fuse 00 0 Ω to 00 5 Ω Replace fuse OL Good F2 fuse 0 995 kΩ to 1 005 kΩ Replace fuse OL gaq105 emf Figure 1 Current Fuse Test How to Replace the Batteries Replace the batteries with three AA batteries NEDA 15A IEC LR6 XWWarning To prevent possible electrical shock fire or personal injury Batteries contain hazardous chemi...

Page 9: ...t barrier with battery compartment 6 Secure the door with the six Phillips head screws How to Replace the Fuses Referring to Figure 2 examine or replace the Meter s fuses as follows 1 Turn the rotary switch to OFF and remove the test leads from the terminals 2 Refer to step 2 under the How to Replace the Batteries section above to remove the battery door 3 Remove the fuse compartment seal from the...

Page 10: ...wering the door into the fuse compartment 8 Replace the fuse compartment seal by aligning the tab on the seal with the outline on the case bottom Ensure the seal is properly seated 9 Refer to steps four through six under the Replacing the Batteries section above to reinstall the battery door 1 4 5 6 2 3 gaq10 emf Figure 2 Battery and Fuse Replacement ...

Page 11: ...st calibration adjustment and or repair is indicated In the performance tests the Meter is referred to as the device under test DUT Required Equipment Table 1 lists the equipment required to conduct a performance test on the Meter Table 1 Required Equipment Recommended Equipment Measurement Function Accuracy 5520A Multi product Calibrator or equivalent DC Volts 0 to 1000 V 0 012 DC Current 350 μA ...

Page 12: ...33 25 9 60 V 33 V 20 kHz N A 10 60 V 33 V 5 kHz N A 11 600 V 67 5 V 60 Hz 66 8 to 68 2 12 600 V 330 V 60 Hz 327 5 to 332 5 13 600 V 330 V 2 5 kHz 323 0 to 337 0 14 1000 V 100 V 60 Hz 97 to 103 15 1000 V 1000 V 1 kHz 986 to 1014 16 AC Volts Frequency 600 mV 150 mV 99 95 kHz 99 93 to 99 97 17 600 mV 150 mV 199 50 kHz 199 48 to 199 52 18 Sensitivity 6 V 0 7 V 99 95 kHz 99 93 to 99 97 19 60 V 7 V 99 9...

Page 13: ...2 021 36 AC Amps 6 A 3 0 A 60 Hz 2 968 to 3 032 37 DC Amps 6 A 3 0 A 2 990 to 3 010 38 AC Milliamps 60 mA 33 mA 60 Hz 32 65 to 33 35 39 400 mA 330 mA 60 Hz 326 5 to 333 5 40 DC Milliamp 60 mA 33 mA 32 89 to 33 11 41 400 mA 330 mA 329 1 to 330 9 42 AC Microamps 600 μA 330 μA 60 Hz 326 5 to 333 5 43 6000 μA 3300 μA 60 Hz 3265 to 3335 44 DC Microamps 600 μA 330 μA 328 9 to 331 1 45 6000 μA 3300 μA 32...

Page 14: ...planation of the pushbutton features and requirements to enter the CAL mode Cal Mode Pushbutton Functions The CAL mode will be initiated by holding down the MINMAX pushbutton at power up and entering a four digit password The AutoHOLD pushbutton will act as an ENTER key and will advance through the CAL initiation and adjustment procedure steps The pushbuttons are used to select a four digit passwo...

Page 15: ...sword do not use AutoHOLD to save the password 4 Press the RANGE pushbutton The Meter should display _ _ _ _ 5 Use the pushbuttons to select a desired new password 6 Press AutoHOLD to save the new password Restoring the Default Password If the password has been forgotten the default password 1234 can be restored by performing the following 1 Turn the rotary switch of the Meter to OFF 2 Remove the ...

Page 16: ...P2 TP1 S7 S11 3 5 5 V 6 6 7 8 7 2X 2 3001 REV 010 2X 2 3001 REV 010 gaq101 emf Figure 3 Revision 010 Board Layout 6 While shorting across keypad button S7 turn the rotary switch one position clockwise See Figure 3 7 Short across keypad button S11 See Figure 3 8 Turn the rotary switch one position counterclockwise back to its original position 9 The default password is now restored 10 Reassemble th...

Page 17: ...EV 011 2X 2 3001 REV 0 11 gaq102 emf Figure 4 Revision 011 Board Layout 5 Turn the rotary switch from OFF to while holding down MIN MAX at the same time The Meter should display CAL 6 Short across keypad button S11 on the back of the PCB See Figure 4 The Meter should beep 7 Turn the rotary switch one position counterclockwise back to the OFF position 8 The default password is now restored 9 Reasse...

Page 18: ...ndicate completion Not all steps have this feature 1 Turn the rotary switch of the Meter from OFF to while holding down at the same time The Meter should display 2 Press once to see the number of calibrations that have been completed Press again to enable password entry The Meter should display 3 Use the keypad pushbuttons to enter the existing password and press The Meter should display Y 4 Apply...

Page 19: ...0 kHz C 07 600 0 V 60 Hz C 08 600 0 V 10 kHz DC Volts C 09 6 000 V C 10 60 00 V C 11 600 0 V DC Millivolts C 12 600 0 mV C 13 60 00 mV Ohms C 14 600 0 Ω C 15 6 000 kΩ C 16 60 00 kΩ C 17 600 0 kΩ C 18 6 000 MΩ C 19 0 000 Ω C 20 50 0 MΩ Diode Test C 21 3 000 V Amps C 22 6 000 A 60 Hz C 23 6 000 A dc Amps C 24 60 00 mA 60 Hz C 25 400 0 mA 60 Hz C 26 60 00 mA dc C 27 400 0 mA dc Microamps C 28 600 0 μ...

Page 20: ... shield screw H4 9 Remove the bottom shield MP9 from the Meter 10 Use a Philips screwdriver to remove four PCA input screws H5 11 Use a Philips screwdriver to remove six PCA screws H4 from the board 12 Remove the PCA from the top case 13 Remove the top shield MP13 from the top case 14 Remove the elastomeric MP10 from the top shield 15 Unsnap mask MP15 from the top shield MP13 16 Remove the LCD DS1...

Page 21: ...all six board screws tightened to 6 in lbs torque 4 Bottom case gasket The gasket must be installed so that the gasket does not have any twists bends waves etc The gasket must be completely flat in the bottom case groove This can be accomplished by using a modified top case to push the gasket into position 5 Battery door gasket Place over battery compartment walls and push each corner down as far ...

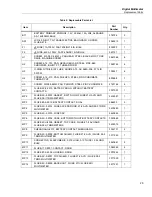
Page 22: ...s Table 5 lists the Meter s replaceable parts identified in Figure 5 MP20 MP19 MP18 MP15 DS1 MP14 MP10 MP9 H4 7 MP7 MP8 2 MP6 MP2 MP3 2 BT1 3 MP1 MP4 H1 6 MP5 H4 7 H5 4 F1 F2 MP13 MP11 MP12 MP16 MP17 H2 6 H3 6 gaq106 emf Figure 5 Exploded View of Meter ...

Page 23: ...MP1 FLUKE 2X 2 2010 BATTERY DOOR WITHOUT BATTERY CONTACTS 3321030 1 MP2 FLUKE 2X II 8007 GASKET BATT DOOR FLUKE 27 II AVG AND FLUKE 28 II TRMS METERS 3439087 1 MP3 FLUKE 89 4 8012 BATTERY CONTACT DUAL 666435 2 MP4 FLUKE 2X 2 2014 FUSE ACCESS DOOR 27 2 AVG AND 28 2 TRMS MULTIMETER 3400480 1 MP5 FLUKE 2X 2 2015 FUSE CAP 3440546 1 MP6 FLUKE 2X 2 2004 CASE BOTTOM WITHOUT BATTERY CONTACTS 3320869 1 MP7...

Page 24: ...8 2 2502 TOP CASE PAD XFER for 28 2 3320857 1 MP20 FLUKE 2X 2 2009 ROTARY KNOB 3320922 1 Not Shown FLUKE 2X 2 2011 HOLSTER w Tilt Stand 3321048 1 Not Shown Alligator Clips variable 1 1 set of 2 Not Shown TEST LEADS variable 1 1 set of 2 Not Shown 80BK A 8001 TYPE K THERMOCOUPLE ASSEMBLY 2747900 1 Not Shown FLUKE 87 5 8009 TILTSTAND 2074040 1 Not Shown Quick Reference Guide 1 5160944 Not Shown Safe...

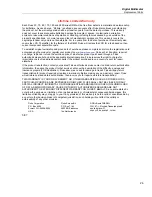
Page 25: ...eplacement parts if the product purchased in one country is sent for repair elsewhere If the product is defective contact your nearest Fluke authorized service center to obtain return authorization information then send the product to that service center with a description of the difficulty postage and insurance prepaid FOB Destination Fluke assumes no risk for damage in transit Fluke will pay ret...

Page 26: ...87V MAX Calibration Information 26 ...

Reviews: