background image

Setup

6

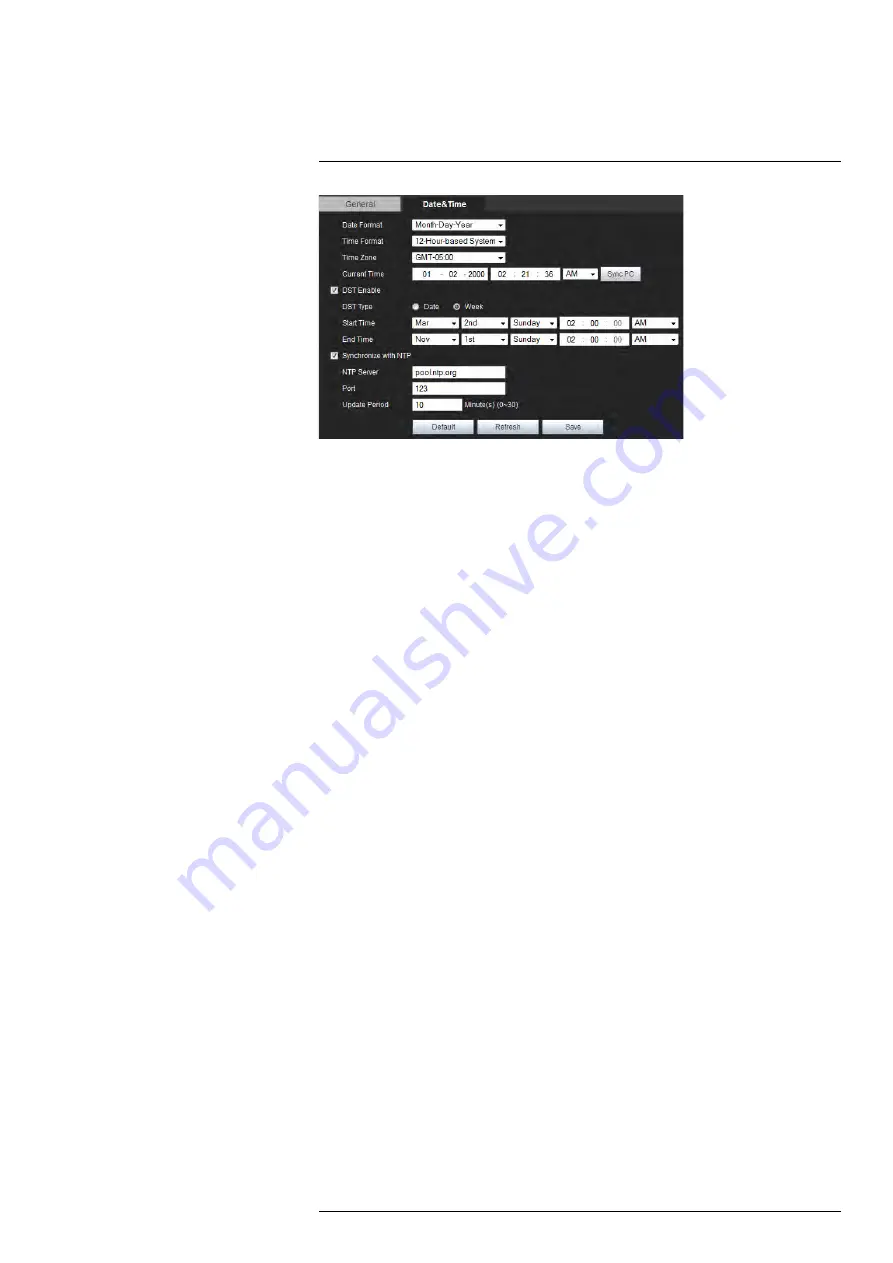
To configure date & time settings:

1. Configure the following:

Date Format:

Select the date format.

Time Format:

Select the time format (12 hour or 24 hour).

Time Zone:

Select your time zone.

Current Time:

Enter the current time or click

Sync PC

to sync your IP camera to

your PC’s clock.

2. If your area uses Daylight Savings Time (DST) check

DST Enable

. If you enable

DST, configure the following:

DST Type:

Select

Date

to select a date for the time change or select

Week

to se-

lect the week and day for the time change.

Start Time

and

End Time:

Enter the start and end times for Daylight Savings.

3. Check

Synchronize with NTP

to synchronize the camera clock with an NTP time

server. A constant Internet connection is required to use NTP. If you enable NTP, con-
figure the following:

NTP Server:

Enter the NTP server address.

Port:

Enter the port for the NTP server.

Update Period:

Enter the interval the camera will use to update the time.

4. Click

Save

.

6.6.3

Account

The Account menu allows you to configure user accounts and user groups. The camera
can support up to 18 user accounts and up to 8 groups. User accounts must be assigned
to a group and inherit permissions from user groups, but an individual user account can
be given less permissions than the group.

The camera includes a unique admin account that cannot be deleted. The admin ac-
count is the only one that can change permissions assigned to user accounts. Accounts
given permission to access the Account menu may change the password for other ac-
counts. Accounts not given permission to access the Account menu may not change any
account passwords, including their own. It is essential to change the password of the ad-
min account from the default to prevent unauthorized access to your camera.

You may also check

Anonymous Login

to allow users to connect to the camera without

entering a user name or password. Users connecting anonymously are given limited ac-
cess to the camera: they may only view live video and the Alarm list.

#LX400062; r.30885/35920; en-US

52

Summary of Contents for TCX series

Page 1: ...Instruction Manual FLIR TCX Thermal Cameras...

Page 2: ......

Page 3: ...Instruction Manual FLIR TCX Thermal Cameras LX400062 r 30885 35920 en US iii...

Page 4: ......

Page 5: ...1 Settings 13 6 1 2 Region of Interest ROI 19 6 1 3 Setting ROI to Match Motion Detection Areas 20 6 1 4 Video 21 6 1 5 Snapshot 22 6 1 6 Overlay 23 6 1 7 Privacy Masking 24 6 1 8 PTZ Speed 25 6 1 9 I...

Page 6: ...ng up Video Files 59 8 Connecting a Camera in MPX Mode 61 8 1 MPX On Screen Display OSD 61 8 1 1 Accessing the OSD Menu 61 8 1 2 OSD Menu Tree 63 9 Connecting to Cameras with FLIR Cloud CMS 67 9 1 Sys...

Page 7: ...to your network Camera on an iPad 108 11 2 3 Live View Interface 109 11 2 4 Controlling PTZ Cameras 111 11 2 5 Using Playback Mode on iPad 112 11 2 6 Using Local Files to View Manual Recordings 113 1...

Page 8: ......

Page 9: ...ge 137 Central Management Software for PC Mac See 9 Connecting to Cameras with FLIR Cloud CMS page 67 Smartphone tablet apps See 11 Smartphone and Tablet Apps page 95 NOTE For physical installation in...

Page 10: ...gy in the portion of the spectrum that the sensor can detect the long wave infrared LWIR Therefore unlike a visible light camera the thermal imaging sensor produces images based on directly radiated r...

Page 11: ...E Actual alarm lead configuration may differ from the configurations shown below Always refer to the alarm lead tag for a full description Mid Bullet Alarm The camera can activate an external alarm wi...

Page 12: ...ay which com pletes the circuit The camera can only operate as a normally open NO switch device 1 ALARMOUT_1 2 ALARMCOM_1 The camera can receive two external alarms with input signals provided by an e...

Page 13: ...e 9 3 Adding a Cam era over the Local Network LAN page 68 for details 2 A notification bar appears asking if you would like to install ActiveX plugins Click Install or Allow to install the plugins 3 E...

Page 14: ...3 Adding a Cam era over the Local Network LAN page 68 for details 2 A notification appears asking if you want to use the MMX plug in Click Allow to use the plug in 3 Enter the camera user name defaul...

Page 15: ...lick the plug in in the downloads bar at the bottom of the browser window 4 Enter the camera user name default admin and password default admin and click Login NOTE If video from the camera does not a...

Page 16: ...ion and if you are viewing the Main Stream or Sub Stream Full Screen Click to view the video in full screen Double click or press ESC to exit full screen mode Width Height Ratio Click to select Origin...

Page 17: ...o your computer hard drive To configure the folder where snapshots are saved see 6 1 13 Path page 28 NOTE Depending on your computer s security settings you may need to run your browser as adminis tra...

Page 18: ...the left to the right and the camera will zoom in and center the enclosed image Drag from the right to the left and the camera will zoom out and center the enclosed image 5 1 2 Scan You can use the Sc...

Page 19: ...dropdown menu under PTZ Function 2 Select the pattern to run from the dropdown menu 3 Click Start to run the pattern 5 1 5 Goto The Goto function allows you to move the camera to a position with speci...

Page 20: ...n from the dropdown menu under PTZ Function 2 Click Start to begin panning 5 1 7 Tour Use tours to have the PTZ camera move automatically to several preset locations in a cycle To start a tour 1 Selec...

Page 21: ...tings menu allows you to configure the image sensor s Automatic Gain Control AGC settings for the camera As you make adjustments the effects will be shown in the video display FLIR Systems has develop...

Page 22: ...t High Contrast Default 2 If needed you can make fine tune adjustments using the Sharpness DDE Gamma ACE and Smart Scene Optimization SSO settings Click Custom to save up to five custom Scene Preset s...

Page 23: ...elow 0 decrease sharpness A value of 0 turns DDE off 3 Under Gamma also known as Active Contrast Enhancement select a Gamma val ue from 8 to 8 Gamma provides a contrast adjustment dependent on the rel...

Page 24: ...p the 256 temper ature groupings to colors Some examples of different LUTs are shown below Addi tional LUTs are sometimes added during the firmware update cycle so you may have LUToptions that are not...

Page 25: ...palette to use the same palette as the White Hot palette except coldest temperatures are blue and the hottest temperatures are red 7 Under Mirror select ON to flip the camera image left and right LX40...

Page 26: ...idor or hallway Mini Bullet Settings Menu NOTE The Mirror and Flip settings are only available on fixed bullet cameras Advanced Thermal Image Settings The AGC plateau equalization algorithm performs a...

Page 27: ...r temperature When the AGC Plateau level value is set to a low value the mapping is more linear For example an image comprised of 60 sky very cold will de vote 60 of the available shades to the sky le...

Page 28: ...to Match Motion Detection Areas After configuring motion detection areas you can set up the ROI to include all motion de tection areas To set ROI to match motion detection areas 1 Set up motion detec...

Page 29: ...s Multiple motion detection areas will result in a single ROI 6 1 4 Video The Video tab allows you to configure the encoding settings for the camera Video set tings are divided into Main Stream and Su...

Page 30: ...Bit Rate Type Select CBR Constant Bit Rate or VBR Variable Bit Rate If you select VBR you can select the Video Quality between 1 lowest and 6 best Reference Bit Rate Recommended bit rate range based o...

Page 31: ...verlay tab Click Save to save changes To configure video overlay 1 Under Channel Title click Enable to show the name of the channel on screen Under Input channel title enter a personalized channel nam...

Page 32: ...how the pan P and tilt T angles of the camera on screen 4 Under Picture Overlay click Upload to select and upload an image Move the green overlay box to the desired location in the video frame Click E...

Page 33: ...ick to delete the currently selected privacy area Click and drag outside of the privacy areas to create a new privacy area Click Save to save changes 6 1 8 PTZ Speed Set the speed for the camera s Pan...

Page 34: ...t setup at least one of the corresponding functions to set it as the idle motion For example you must setup at least one tour to select Tour as the Idle Motion 4 Under Idle Time set the time in minute...

Page 35: ...t least one of the corresponding functions to set it as the power up function For example you must setup at least one tour to select Tour as the power up function 4 Click Save to save your settings 6...

Page 36: ...erent folder Live Record The folder on your hard drive where manual recordings are stored Click Browse to select a different folder Playback Snapshot The folder on your hard drive where playback snaps...

Page 37: ...technical specifications for your camera To configure audio settings 1 Check Enable under Main Stream Sub Stream or both to enable audio 2 Under Encode Mode select an encoding mode from PCM G 711A an...

Page 38: ...he camera ports and maximum connec tions to the camera You must port forward the HTTP default 80 and TCP default 35000 port numbers on your router to enable remote connection to your camera NOTE If yo...

Page 39: ...mith myddns flir com 85 RTSP Port Enter the RTSP Port default 554 The RTSP Port is used for special applications For details on RTSP streaming see 12 RTSP Streaming Advanced page 135 3 Optional To ena...

Page 40: ...der Domain Name enter the Domain Name from the confirmation email you re ceived after registering for DDNS 3 Under Username enter the User Name from the confirmation email 4 Under Password enter the P...

Page 41: ...the camera To filter connections based on IP or MAC addresses 1 Click Add IP MAC 2 Select IP Address or MAC Address and then enter the address of the device you would like to add to the white list 3 C...

Page 42: ...email alerts The system will only send email alerts after this interval has passed Health Mail Check to enable the camera to send health alerts If you enable health alerts enter the interval in secon...

Page 43: ...ber between 1025 and 65529 Use the following URL to retrieve the video rtsp IP Address cam realmonitor channel 1 subtype 0 for main stream or 1 for substream unicast false For example if the camera ha...

Page 44: ...presets To add a tour 1 Under PTZ Function click Tour 2 Click Add beneath the tour list to add a new tour 3 Optional Double click the tour name to enter a personalized name for the tour 4 Click Add be...

Page 45: ...4 Using the PTZ controls move the camera to the leftmost point of the scan pattern you want to set and click Set Left Limit 5 Move the camera to the rightmost point of the scan pattern you want to set...

Page 46: ...To setup auto pan 1 Under PTZ Function click Pan 2 Under Pan Speed click or use the slider to set the panning speed 3 Press the Start button to test the auto pan the Stop to stop the test 6 4 Event 6...

Page 47: ...p to 6 time periods when motion detection will be activated Click Save Repeat the steps above if you would like to apply a different schedule to different days 3 Under Anti dither enter the anti dithe...

Page 48: ...arate Sensitivity and Threshold value Click Save 5 Check Record to record when motion is detected microSD or FTP recording must be configured to use this function 6 Enter the number of seconds the cam...

Page 49: ...ave an alarm output to use this fea ture Enter the number of seconds before the camera will trigger the external de vice under Alarm Delay Check Send Email for the camera to send out an alert email wh...

Page 50: ...d Email to send an email alert when No SD Card errors occur 5 Click Save to save changes To configure Capacity Warnings A Capacity Warning occurs when the recording destination microSD SD card or FTP...

Page 51: ...OTE The SD Card Error warning is only available on cameras that support SD microSD cards Check the technical specifications for your camera To configure SD Card Errors 1 Under Event Type select SD Car...

Page 52: ...out device when Disconnection errors occur Under Alarm Delay enter the number of seconds before the alarm out device will be activated NOTE Relay out is only available if your camera supports alarm o...

Page 53: ...elay out is only available if your camera supports alarm output Check the technical specifications for your camera 6 Check Send Email to send an email alert when IP Conflict errors occur 7 Click Save...

Page 54: ...ccur 5 Click Save to save changes 6 5 Storage The Storage menu allows you to configure recording settings 6 5 1 Record Schedule The Record Schedule determines the schedule for video recording to SD mi...

Page 55: ...ays 3 Configure up to 6 time periods for recording For each period enter a time range and check the recording types you would like to enable during that period Continuous Continuous recording Motion M...

Page 56: ...ays 3 Click Save 6 5 4 Path The Path tab allows you to select if the camera records to microSD or FTP To select the recording destination 1 Under Record or Snapshot check Local to record to the microS...

Page 57: ...p settings for recording to an FTP server To set up FTP settings 1 Check Enable to enable recording to FTP 2 Configure the following Server Address Enter the IP address or DNS address of the FTP serve...

Page 58: ...ge block To set up SMB settings 1 Check Enable to enable recording using SMB 2 Configure the following Server Address Enter the IP address or DNS address of the SMB server Port Enter the SMB server po...

Page 59: ...al to record continuously or select Off to disable recording 4 Under Record Stream select Main Stream to record using the Main Stream set tings or select Substream to record the substream 5 Click Save...

Page 60: ...to update the time 4 Click Save 6 6 3 Account The Account menu allows you to configure user accounts and user groups The camera can support up to 18 user accounts and up to 8 groups User accounts must...

Page 61: ...the user account Re enter the password under Confirm Password 2 3 Group Assign the user account to a group The user account will inherit per missions from the group which will be updated under Authori...

Page 62: ...xt to the account or group you would like to modify 3 Edit the account or group details and then click Save To delete a user account or group 1 Select the User or Group tab 2 Click next to the account...

Page 63: ...Click Import 2 Select the configuration file you would like to backup and then click Open 6 6 6 Auto Maintain The Auto Maintain menu allows you to reboot the camera manually or on a automatic schedule...

Page 64: ...firmware up grades are released they are available for free from www flirsecurity com pro To upgrade the camera firmware 1 Download and extract the firmware from www flirsecurity com pro 2 Click Brows...

Page 65: ...me enter the start time and end time for your search 2 Under Type select the type of log you would like to search for All Setting Data Event Record Account and Clear Log 3 Click Search Optional Click...

Page 66: ...o playback video from the microSD card 1 Use the calendar to select a day to search for video The bar on the bottom populates with video recorded on that day 2 Click in the time bar to start playback...

Page 67: ...bar 7 2 Backing up Video Files You can download video files to your computer hard drive Video files are saved in dav format You can use the video player available from www flirsecurity com pro to play...

Page 68: ...Playback Cameras with microSD only 7 3 Click next to the video file you would like to download to your computer s hard drive LX400062 r 30885 35920 en US 60...

Page 69: ...or a camera in MPX mode 1 Double click on the channel of the MPX camera 2 Right click and click Main Menu 3 Click and select Setting Click Pan Tilt Zoom 4 Configure the following settings Under Channe...

Page 70: ...communication parameters have not been correctly set for your camera See above for details 3 Click the arrow in the PTZ control window to show advanced controls 4 Click The OSD menu appears over the...

Page 71: ...SION LIBRARY VERSION BACK FACTORY DEFAULT Enter Note function is executed immediately RESTART Enter BACK Enter Return to previous OSD Menu CAMERA SETTINGS BRIGHTNESS 50 0 100 SHARPNESS 0 20 100 increm...

Page 72: ...SET SETTING START BACK 1 80 AUTO PAN PAN SPEED START STOP BACK 1 8 AUTO SCAN AUTO SCAN NO SET LEFT LIMIT SET RIGHT LIMIT SCAN SPEED START STOP RETURN 1 5 SET LEFT LIMITalso sets the tilt TOUR TOUR NO...

Page 73: ...8 Ground Horizon Sky Center 25 Center 50 Center 75 Custom SMART SCENE SSO 15 0 100 by 5s COLORIZATION White Hot White Hot Black Hot Rainbow Note Additional options may be available depending on camer...

Page 74: ...ult Default Low Contrast High Contrast RESTORE SETTINGS Restore camera to factory defaults DEVICE INFORMATION View information about the camera SERIAL NUMBER SOFTWARE FIRMWARE LIBRARY VERSION VERSION...

Page 75: ...7 Vista Mac OSX 10 7 and above Memory 2GB Video 512 MB of video memory and above Network LAN 10 100 BaseT Network Network WAN 1 Mbps upstream High speed Internet service is required to re motely conn...

Page 76: ...tware will automatically scan the network for compatible cameras Prerequisites Connect the network camera to a router or switch on the network Install FLIR Cloud Client on a computer in the same netwo...

Page 77: ...up for a free FLIR DDNS address to connect to compatible cameras over the Internet Prerequisites Create a DDNS account at http ddns myddns flir com Input the DDNS address into the network camera loca...

Page 78: ...s Enter the Domain Name URL Request you received in the email when you registered for DDNS followed by myddns flir com NOTE For example if your Domain Name URL Request is tomsmith enter tomsmith myddn...

Page 79: ...loud CMS 9 6 Click and drag Default Group to the display window to open your camera in live view Congratulations You can now connect over the Internet to view and playback video on your computer Resul...

Page 80: ...a tab from the Home Page to open it or click the button at the top of the screen from within any tab to open a new tab 10 2 Live View The Live View tab is where you can view live video from connected...

Page 81: ...ecently recorded video from the camera By default it will play back the last 5 minutes of recorded video from the camera 1 7 Digital zoom Click to enable digital zoom mode Click and drag over the dis...

Page 82: ...ras and systems connected to the client Drag items to the display area to open live video Right click to view additional options 10 2 2 Opening Live View in Multiple Monitors If your computer has mult...

Page 83: ...g PTZ Cameras If you have PTZ cameras not included you can control them using the client NOTE You must ensure the PTZ camera is properly connected to your system and your system is configured to detec...

Page 84: ...iris 6 Advanced Click to access advanced PTZ controls 10 3 1 PTZ Presets Presets will save a camera position for quick retrieval To add presets 1 Click to open the Advanced controls Select Preset 2 Cl...

Page 85: ...r the time in seconds the camera will remain on the selected preset Operation Click to add a preset to the tour Click to delete a preset from the tour 6 Click OK to save changes To run a PTZ tour 1 Se...

Page 86: ...lick to open the Advanced controls Select Scan 2 Move the camera to the desired left position and click 3 Move the camera to the desired right position and click To run scan mode 1 Click 10 3 5 PTZ Pa...

Page 87: ...r system must support alarm devices not included to use this feature 3 Under Stream select Main Stream to search for Main Stream recordings high qual ity or Sub Stream to search for Sub Stream recordi...

Page 88: ...the slider to adjust the playback speed 9 Mute 10 Volume 11 Split screen Select split screen configuration 12 Full screen Click to open playback in full screen Press ESC to exit full screen 13 Timeli...

Page 89: ...nt folder File Format Select Original Format to save to dav format requires the video player Select AVI to save files to avi format can be played in VLC Media Player NOTE The Mac version only supports...

Page 90: ...ck to enable the following Display Link Video Open live video to monitor alarms on a continuous basis Display Overlay Window Show the overlay controls They allow you to enable disable sound alerts and...

Page 91: ...Configure the following Start Time End Time Select the start and end times to search for logs Log Type Select the type of logs to search for Device Name Select the system you would like to view logs...

Page 92: ...File and then select a png bmp or jpg image on your computer to use as the e map Describe optional Enter a text description of the e map 4 Click Save 5 Click Edit to edit the e map 6 Click and drag c...

Page 93: ...re 4 Device list Shows a list of systems connected to the client software and shows which systems are online 5 Add Device Add a remote system using a Device ID or IP DDNS address 6 Delete Delete the s...

Page 94: ...available depend on the model of system you have 10 12 Alarm CFG The Alarm CFG menu allows you to configure alarms for the client software The client software will alert you by popping up live video a...

Page 95: ...you set up the responses to alarms Select the channels that will pop up or alarm out devices not included not all systems support alarm out devi ces that will be triggered by an alarm For each channel...

Page 96: ...On off Click to enable disable alarm 7 Delete Click to delete alarm 8 Edit Click to edit alarm settings 10 13 Tour Task The Tour Task menu is where you can set up custom views for the system You can a...

Page 97: ...0 14 Account The Account menu is where you can set up user accounts and passwords for the client software To simplify management you can group user accounts according to role A role determines the per...

Page 98: ...account User Rights Check the permissions that will apply to the user account If you click on LiveView Playback and PTZ you can select which channels the user ac count can access in the Channel List s...

Page 99: ...a text description of the role Role Rights Check the permissions that will apply to user accounts assigned this role If you click on LiveView Playback and PTZ you can select which channels may be acce...

Page 100: ...to the last view that you had open Auto login application Check for the client to automatically login when it starts up without entering a user name or password Auto Login Windows Not supported Langu...

Page 101: ...s Open Audio Check to enable audio alerts Loop Check to repeat audio alerts until acknowledged Camera Masking Select or preview the sound that will play for camera masking alarms Motion Detect Select...

Page 102: ...nt for PC or Mac 10 the client software visit www flirsecurity com pro search for the model number of your product click on your product in the search results and click on the Downloads tab LX400062 r...

Page 103: ...ou to remotely view your network camera 11 1 1 Prerequisites Port 80 and 35000 or your HTTP and client ports if you have changed them must be port forwarded on your router to your camera s IP address...

Page 104: ...tos to save snapshots and video clips to the local storage on your mobile device 3 In Live View tap then 4 Configure the following 4 1 Register Mode Select IP Domain 4 2 Name Choose a name for your ne...

Page 105: ...channel in full screen Swipe left or right to se lect a different page of channels 3 Pages Shows the number of pages available and highlights the currently selected page 4 Split Select the split scree...

Page 106: ...peakers connected to the camera 6 7 Digital Zoom Tap to activate digital zoom mode for the currently selected camera Pinch the screen inward to zoom out and outward to zoom in 6 8 Color Settings Tap t...

Page 107: ...Goto preset Tap to access preset controls Then use the sliders to select a preset and then tap the check mark to go to the preset NOTE You must set presets for the camera using the system s local men...

Page 108: ...eo files or snapshots 4 Options Tap to delete or export files to your device s local storage NOTE Exported snapshots and video files are saved to the Photos app Video files are saved to MP4 format 11...

Page 109: ...Tablet Apps 11 To use Playback Mode 1 Tap to access the menu and then tap Playback 2 Tap and select a channel to playback 3 Select the date then the start and end times to playback LX400062 r 30885 3...

Page 110: ...video file 4 6 Snapshot Tap to take a snapshot from the selected camera 4 7 Stop All Stop playback on all channels 4 8 Audio Tap to mute un mute audio coming from the camera audio enabled cameras only...

Page 111: ...on Once you have received a push notification you can select it to open live video or a snapshot attachment from the camera that de tected motion NOTE Your cameras must have motion detection activated...

Page 112: ...ations before you can use the Event List To access the Event List Tap to access the menu and then tap Event List Event List Overview 1 Events Shows the details of each motion detection event Tap the e...

Page 113: ...d hold the group Enter the name in the pop up that appears and tap OK 3 To add cameras to the group tap 4 Select the cameras you would like to add to the group Tap to save changes NOTE To delete camer...

Page 114: ...ws you to place cameras over a still image For example you can use the E Map to create a virtual map of your cameras over a floor plan of your home or business To add an E Map 1 Tap to access the menu...

Page 115: ...t on the map Repeat to add additional cameras 5 Tap Choose a name for your E Map and then tap OK To open cameras from an E Map 1 Tap in Live View 2 Select the E Map in the Device List 3 Tap the camera...

Page 116: ...account and have the DDNS settings configured in your network camera The network camera must have Internet access You must have a DDNS address to log in remotely An iTunes account NOTE You will need...

Page 117: ...g tomsmith myddns flir com 6 4 Client Port Enter the Client Port default 35000 6 5 User Name Enter the network camera s User Name default admin 6 6 Password Enter the network camera s password default...

Page 118: ...view to favorites 6 Snapshot Tap to take a snapshot from the currently selected channel NOTE You can view or share snapshots using the Photos app 7 Change display view 8 Microphone Tap to activate th...

Page 119: ...o move the camera Pinch to zoom in out 2 Direction buttons Tap to move the camera 3 Zoom Tap to zoom the camera in out 4 Focus Tap to adjust the focus 5 Iris Tap to adjust the iris 6 PTZ EPTZ Tap to s...

Page 120: ...on mobile devices To use Playback Mode 1 From Live View tap then 2 In Portrait Mode Tap select the start time and end time for your search and select the camera you would like to playback OR In Landsc...

Page 121: ...of time shown in the time bar 6 Time Bar Tap inside the bar to fast forward or rewind NOTE Playback controls are only shown in portrait mode 11 2 6 Using Local Files to View Manual Recordings You can...

Page 122: ...ete and tap 11 2 7 Enabling Push Notifications You can have the app send push notifications to the notifications area on your device when one of your cameras detects motion Once you have received a pu...

Page 123: ...and Tablet Apps 11 NOTE Your cameras must have motion detection activated to receive push notifications To enable Push Notifications 1 From live view tap then 2 Tap Push Config LX400062 r 30885 35920...

Page 124: ...Smartphone and Tablet Apps 11 3 Tap the slider for the system you would like to configure LX400062 r 30885 35920 en US 116...

Page 125: ...a still image of the camera that detected motion 6 Tap OK to save change Whenever the selected cameras detect motion you will re ceive a notification 11 2 8 Using the Event List The Event List menu sh...

Page 126: ...View without having to individually select each camera To create favorites 1 In Live View tap to save the cameras that are currently open as a favorite 2 Enter a name for the favorite and tap OK To o...

Page 127: ...include in the favorite and then tap Save 11 2 10 Using the E Map E Map allows you to place cameras over a still image For example you can use the E Map to create a virtual map of your cameras over a...

Page 128: ...different image file to use for your E Map 4 2 Add Camera Tap to select cameras to add to your E Map Then drag the camera to place it on the E Map 4 3 Delete E Map 5 When you complete editing the E Ma...

Page 129: ...Smartphone and Tablet Apps 11 1 In live view tap on an empty display window and select the E Map LX400062 r 30885 35920 en US 121...

Page 130: ...tems To access Device Manager 1 From live view tap then 2 Tap Device Manager To delete a system 1 Tap the system to select it 2 Tap Tap Yes to confirm To modify a system 1 Tap a system to select 2 Tap...

Page 131: ...n Android 1 Download FLIR Cloud for free from the Google Play Store 2 Tap on the FLIR Cloud icon to start the app 3 In Live View tap then 4 Configure the following 4 1 Register Mode Select IP Domain 4...

Page 132: ...e streaming quality panel 6 4 Alarms Tap to activate an alarm output device connected to the camera cameras with alarm I O only 6 5 Audio Tap to mute un mute audio coming from the camera audio enabled...

Page 133: ...Display Swipe to move the camera Pinch to zoom in out 2 Iris Tap to show iris controls 3 Focus Tap to show focus controls 4 Zoom Tap to show zoom controls 5 Goto preset Tap to access preset controls T...

Page 134: ...delete or export files to your device s local storage NOTE Exported snapshots and video files are saved to the Photos app Video files are saved to MP4 format 11 3 6 Using Playback Mode on Android You...

Page 135: ...Smartphone and Tablet Apps 11 2 Tap and select a channel to playback 3 Select the date then the start and end times to playback LX400062 r 30885 35920 en US 127...

Page 136: ...oming from the camera audio enabled cameras only must have self powered microphone connected to the camera 4 9 Manual Record Tap to start stop recording to your mobile device s local storage 4 10 Fast...

Page 137: ...tions 1 Tap to access the menu and then tap Push Config 2 Tap the system you would like to configure 3 Tap Motion Detect and then check each channel you would like to receive push noti fications from...

Page 138: ...shot 2 Delete All Tap to delete all events in the Event List NOTE To delete a single event press and hold the event in the event list and tap OK in the pop up that appears 11 3 9 Using Favorites Favor...

Page 139: ...dd to the group Tap to save changes NOTE To delete cameras from a group press and hold the camera and tap delete Press and hold a group to rename or delete it To open Favorites in Live View 1 Tap to a...

Page 140: ...ws you to place cameras over a still image For example you can use the E Map to create a virtual map of your cameras over a floor plan of your home or business To add an E Map 1 Tap to access the menu...

Page 141: ...t on the map Repeat to add additional cameras 5 Tap Choose a name for your E Map and then tap OK To open cameras from an E Map 1 Tap in Live View 2 Select the E Map in the Device List 3 Tap the camera...

Page 142: ...e Manager Tap to access the menu and then tap Device Manager To edit a system 1 Tap the system in Device Manager Tap 2 Edit the connection details as needed 3 Tap Connect to save changes and connect t...

Page 143: ...2 Click Media Open Network Stream 3 Enter the RTSP address in the following format rtsp username password IP address port cam realmonitor channel channelNo subtype typeNo username The user name of the...

Page 144: ...it does not connect check the following Check that the syntax on the RTSP address is correct Make sure the system is connected to the network If connecting over the Internet make sure to use the remot...

Page 145: ...work Download a firmware upgrade from http www flir com security support if one is avail able Extract the contents To perform a firmware upgrade over the LAN 1 Download the Config Tool from http www f...

Page 146: ...www flirsecurity com pro 2 Extract the contents into a folder 3 Open the folder and right click ConfigTool exe and Run as administrator 4 Click Login 5 Under IP Address enter the public IP address of...

Page 147: ...Firmware Upgrade Tool 13 9 1 Click System Upgrade 9 2 Click Open and select the firmware file 9 3 Click Upgrade LX400062 r 30885 35920 en US 139...

Page 148: ......

Page 149: ......

Page 150: ...red trademarks or trademarks of FLIR Systems and or its subsidiaries All other trademarks trade names or company names referenced herein are used for identification only and are the property of their...

Reviews: