


7
BZMO6030L | BZMO6030R | BZMO6032L | BZMO6032R
6
BZMO6030L | BZMO6030R | BZMO6032L | BZMO6032R
3
4
6
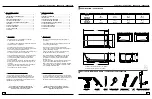
NIVELEZ LA BAIGNOIRE.
/
LEVELING THE BATHTUB.
TESTEZ LE DRAINAGE.
/
TESTING THE DRAINAGE.
3A
3B
3A. La baignoire peut être nivelée en ajustant les pattes.
Vérifiez votre ajustement avec un niveau
.
The bathtub can be leveled by adjusting the feet.
Check your adjustment with a level.
3B. Bloquez la hauteur de la patte en serrant l’écrou.
Lock the adjustment by tighten the hexagon nut.
4. Avant de terminer l’installation, la baignoire doit être
testée; remplir la baignoire jusqu’au trop-plein et véri
-
fier s’il y a des fuites. S’assurer que les raccords des
tuyaux sont bien connectés.
The bathtub must be tested before installation is
completed. Fill the tub to the overflow and inspect it
for leaks. Tighten any loose connections.
5
FIXEZ LA BAIGNOIRE
/
FASTEN THE BATHTUB.
Calez au besoin
Shim if necessary
5. Fixez la baignoire aux montants de mur.
Fasten bathtub to studs framing.
FINITION.
/
FINISHING.
6. Appliquer du scellant de silicone pour sceller les joints entre
la baignoire et le mur fini.
Apply silicone sealant to seal the joints between the bathtub
rim and the finished wall.
Conseils pour une finition étanche d’aspect professionnel.
Tips to achieve a professional looking and watertight finish.
Baignoire
Bathtub
Scellant.
Silicone.
Montant.
Stud.
Ciment pour carreaux de
céramique.
Tile adhesive.
Carreaux de céramique.
Tile.
Panneau de béton.
Cement board.
Espace de 3 ou 4mm.
3 to 4mm gap.
Calez au besoin.
Shim if necessary.


