


Instruction Manual
D104296X012
LCP200 Local Control Panel
August 2018
18
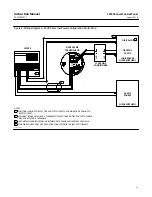
Replacing the LED Assembly with an LED Light Cover
The LED's can be replaced in the field without removing power.
CAUTION
Ensure the LED enclosure does not get contaminated with dust, moisture, or other contaminants during this procedure.
Exposure to dust, moisture, or other contaminants can damage the electronics.
Note
Install the the LED Blanking kit on a flat surface to ensure that the socket cap screws (key 45) can be securely installed.
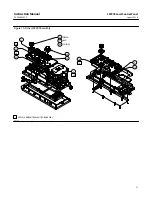
1. Unscrew the four socket cap screws (key 45) holding the LED module (key 32) in place using a 2.5 mm hex key and
remove the LED module and the LED base O-ring (key 46). Also remove the four O-rings (key 47). The LED module
and O-rings can be retained for later use if required.
2. Install the new LED base O-ring (key 46) and LED light cover (key 33). Apply silicone lubricant to the O-ring.
3. Install the four socket cap screws and tighten to a torque of 0.77 N•m (6.8 lbf•in) +/- 10%.
Replacing the Front Panel Assembly
WARNING
Disconnect power and remove the LCP200 from service before replacing the front panel assembly. Person injury or
property damage may result if power is not disconnected.
CAUTION
Ensure the front panel assembly is not exposed to dust, moisture, or other contaminants during this procedure. Exposure
to dust, moisture, or other contaminants can damage the electronics.
1. Disconnect the LCP200 from the digital valve controller and remove power to the LCP200. Move to a safe
environment, such as a maintenance shop or service area.
2. Unscrew the six flat head socket screws (key 14) holding the front panel assembly cover in place using a 2.5 mm hex
key and remove the cover.
3. Remove front panel assembly, including panel O-ring (key 44).
4. Replace with new panel O-ring and front panel assembly. Apply silicone lubricant to the O-ring.
5. Install the six flat head socket screws and tighten to a torque of 2.2 N•m (19.5 lbf•in) +/- 10%.
Before reconnecting to the digital valve controller and placing in service, put the LCP200 into bench mode and verify
the light next to each button is on solid when the button is pressed and the corresponding relay contact changes state
for as long as the button is pressed.