background image


6                                                                                 


E

When the machine is turned on, the flashing 
beacon and time meter are activated. 

If the battery level is at minimum, the board 
intervenes by locking the drive and displaying the 
error through the LED flashing on the dashboard. 

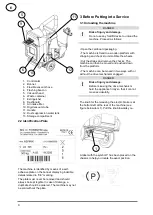
The dashboard is positioned in front of the 
operator and contains the devices for managing 
the vacuum cleaner: 

1.  Switch for raising/lowering the top cover  

2.  Motor protector  

3.  On/off switch for the dust suppression 

water pump 

4.  Green machine-on light 

5.  Emergency button 

6.  Diagnostics LED 

7.  Battery level ind time meter 

8.  Battery charger 220V-24V 14A 

5.2 Driving 

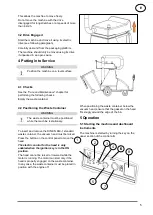
To reverse the machine, press the lever on the 
rear section (1), and to go forward, press the lever 
on the front section (3).  

On top of the control arm is a red crush-prevention 
device (2), which allows the operator to not be 
overwhelmed by the industrial vacuum cleaner; 
when it is pressed, the machine moves forward a 
couple of metres. 


Guide the machine in the desired direction by 
turning the control arm to the left or right while 
remaining always in front of the machine: it is 
advisable to guide the machine with the left hand 
and hold the vacuum tube in the right. 

DANGER 


Do not attempt to pass over fixed 
obstacles higher than 50 mm. 

Maintain a balanced position and avoid 
standing on unstable supports when 


using the appliance. 

Do not point the vacuum towards 
persons or animals. 


5.3 Vacuuming 

During use, empty the waste container or replace it 
with an empty one at regular intervals. 

Remove the vacuum hose from its support and 
hold it by the handle. 

Press the button on the handle to start the vacuum 
flow. When it is released, the vacuum fan ceases 
to operate. 


Replace the vacuum hose in its support after 
vacuuming. 

5.4 Dust Suppression 

The dust suppression function is enabled by the 
switch on the dashboard. The green light indicates 
that the function is enabled.  

Each time the vacuum button is pressed, a nozzle 
inside the vacuum head sprays a small quantity of 
water for about three seconds. The duration of the 
spray is independent from the length of time the 
vacuum button on the vacuum hose handle is 
pressed. 

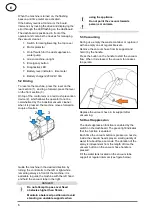
Fill the water tank located on the vacuum tube 
support at regular intervals (see figure below). 


Summary of Contents for ASPIRIK

Page 1: ...ore Putting into Service 4 3 1 Unloading the machine 4 3 2 Drive Engaged 5 4 Putting into Service 5 4 1 Checks 5 4 2 Positioning the Waste Container 5 5 Operation 5 5 1 Starting the machine and dashboard instruments 5 5 2 Driving 6 5 3 Vacuuming 6 5 4 Dust Suppression 6 5 5 Cleaning the Filter 7 5 6 Stopping 7 5 7 Transport 7 5 8 LED Diagnostics 7 6 Care and Maintenance 9 6 1 General Guidelines 9 ...

Page 2: ...otiated with the waste container empty e g truck ascent ramps In any case avoid manoeuvring on gradients steeper than 10 DANGER Risk of tipping over while turning at speed Take bends at reduced speed DANGER Risk of tipping over on unstable ground Only drive the machine on stable paved surfaces DANGER Risk of tipping over due to excessive lateral inclination Do not drive diagonally across gradients...

Page 3: ...m magnesium and zinc can form explosive gases if combined with strongly alkaline and acidic detergents Do not vacuum burning or smouldering objects It is prohibited to stop in hazardous areas It is prohibited to use the machine in potentially explosive environments Keep the machine away from all highly inflammable substances Protect the machine from frost Any other use is considered improper use T...

Page 4: ...e DANGER Risk of injury and damage Do not use any forklift device to unload the machine Proceed as follows Open the cardboard packaging The machine is fixed to a wooden platform with strapping and chocks to immobilise the wheels Cut the straps and remove the chocks The machine can then be moved and pushed down from the platform The machine can be moved in two ways with or without the drive mechani...

Page 5: ... must be positioned while the machine is stationary To insert and remove the DIN EN 840 1 standard waste container the vacuum head must be raised Press the button on the control panel to move the head The electric control for the head is only enabled when the ignition key is in the ON position The head cannot be raised or lowered while the motor is running The motor can start only if the head is p...

Page 6: ...left or right while remaining always in front of the machine it is advisable to guide the machine with the left hand and hold the vacuum tube in the right DANGER Do not attempt to pass over fixed obstacles higher than 50 mm Maintain a balanced position and avoid standing on unstable supports when using the appliance Do not point the vacuum towards persons or animals 5 3 Vacuuming During use empty ...

Page 7: ...ove it Clean the inside and outside of the machine Store it in a sheltered and dry location Disconnect the battery Charge the battery about every 2 months 5 7 Transport DANGER Make allowance for the weight of the machine during transport DANGER For transport on vehicles secure the appliance in accordance with current regulations so that it cannot slide or overturn Ensure that the appliance is immo...

Page 8: ...r command is detected 8 Sensor current failure or abnormal armature current Abnormal current reading on the armature possible field power cable connection error 9 Alarm memory defect Error in the parameter settings in this case the default settings will be restored the next time the machine is switched on 10 Field overcurrent The current in the field exceeds the set limit 11 Lifting overcurrent Th...

Page 9: ...e machine body Clean the filter Weekly maintenance Check that the moving parts move freely Clean the machine Check that the vacuum fan rotates properly Check the tightness of the fan hub Check the running of the electric motors ensuring that there is no hissing and or abnormal noises Maintenance every 100 working hours Check the battery acid level The machine chassis and welding must be free from ...

Page 10: ... not be disposed of as domestic waste but delivered to the proper collection centres Decommissioned machines contain valuable recyclable materials and should be delivered to the proper collection centres Batteries oil and similar substances must not be discarded in the environment You are therefore requested to dispose of decommissioned machines through segregated collection systems 8 Warranty The...

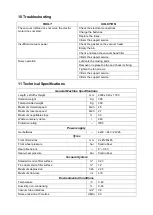
Page 11: ...General Machine Specifications Length x Width x Height mm 2000 x 940 x 1780 Unladen weight Kg 300 Total permitted weight Kg 350 Maximum forward speed Km h 4 5 Maximum reverse speed Km h 2 7 Maximum negotiable slope 30 Waste container volume l 240 Protection rating IPX3 Power supply Gel batteries 4x6V 24V 240Ah Tyres Front dimensions mm 2 x Ø260x85 Front wheel pressure bar Solid rubber Rear dimensi...

Page 12: ...O FIORENTINI S p A Via Piancaldoli 1896 Firenzuola 50033 Frazione Piancaldoli FI Italy Telephone 39 055 81 73 610 Fax 39 055 81 71 44 E mail info ingfiorentini it Website www ingfiorentini it www fiorentinispa com ...

Reviews: