


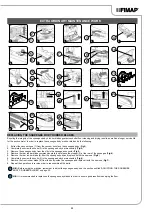


ADJUSTING THE SIDE BRUSH (SWEEPING VERSION)
If the side brush does not channel the dirt efficiently towards the centre of the machine, you must adjust its height in relation to the ground, as
follows:
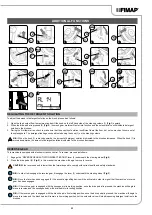
1. Sit on the driver’s seat.
2. Insert the key (1) into the main switch on the control panel. Bring the main switch to its "I" position by turning the key (1) a quarter turn
clockwise (
Fig.1
).
3. Press the side brush head activation - deactivation button (16), on the left side of the steering column (
Fig.18
).
N.B.:
When the side brush is in function, the LED indicator light inside the button (16) will be on.
4. Lower the brush head body by turning the brush head control lever (10) on the rear part of the steering column (
Fig.13
).
5. Press the drive pedal (3) to begin moving the machine (
Fig.3
).
N.B.:
Only after the drive pedal has been pressed does the central brush head body and side brush begin to descend to the working
position.
1. As soon as the central brush head is in the working position, perform the procedure for securing the machine (see the section entitled
2. Go to the right side of the machine.
3. Using the right equipment (not supplied with the machine) loosen the counter nut (17) (
Fig.19
).
4. Using the right equipment (not supplied with the machine) loosen the adjusting screw (18) (
Fig.20
), until the bristles of the brush are
squashed into the ground by about two centimetres.
5.
Once the adjustment is finished, tighten the counter nut and move on to the left side brush.
DISPOSAL
Dispose of the machine in accordance with the waste disposal regulations in force in the country in
which the machine is being used.
9.
Adjust the height of the splashguard in relation to the floor until the splashguard rubber blade is bent outwards, to the same degree along its
entire length, at an angle of around 30° in relation to the floor. (
Fig. 11
).
N.B.:
Both the front and rear of the splashguard need to be at the same height off the floor.
10. Once the adjustment is complete, repeat the operations described above in reverse order to reassemble all the parts.
11. Close the left-hand lateral carter and repeat the operations just carried out on the right-hand side splashguard.
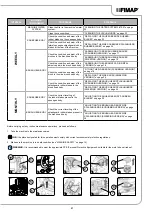
CHOOSING AND USING BRUSHES
POLYPROPYLENE BRUSH (PPL)
Used on all types of floors. Good resistance to wear and tear, and hot water (no greater than 50°C.). PPL is non-hygroscopic and therefore
retains its characteristics even when working in wet conditions.
ABRASIVE BRUSH
The bristles of this type of brush are charged with highly aggressive abrasives. It is used to clean very dirty floors. To avoid floor damage, work
only with the pressure strictly necessary.
BRISTLE THICKNESS
Thicker bristles are more rigid and are therefore used on smooth floors or floors with small joints.
On uneven floors or those with deep joints, it is advisable to use softer bristles which can enter the gaps more easily.
Remember that when the bristles are worn and therefore too short, they will become rigid and are no longer able to penetrate and clean deep
down. In this case, like with over-large bristles, the brush tends to jump.
PAD HOLDER
The pad holder is recommended for cleaning shiny surfaces.
There are two types of pad holder:
•
The traditional pad holder is fitted with a series of anchor points that allow the abrasive floor pad to be held and dragged while working.
• the CENTRE LOCK type pad holder not only has anchor points, but also a snap-type central locking system in plastic that allows the
abrasive floor pad to be perfectly centred and held without any risk of it becoming detached. This type of pad holder is recommended above
all for machines with more than one brush, where the centring of the abrasive discs is difficult.
37