


CLEANING THE BRUSH HEAD BODY SPLASHGUARD RUBBER BLADES (SWEEPING VERSION)
Careful cleaning of the splashguard rubber blades present in the brush head body guarantees better cleaning of the floor; in order to clean the
splashguard rubber blades, proceed as follow:
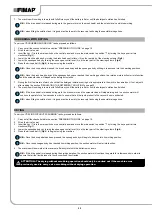
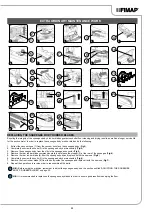
1. Open the machine's left lateral carter (14) (
Fig.17
).
2.
Remove the knobs (30) that fix the left-hand side carter (31) in place by turning anti-clockwise (
Fig.33
).
3. Remove the left lateral carter (
Fig.34
).
4. Clean the splashguard rubber blades with a damp cloth .
N.B.:
Check the condition of the brush head body splashguard rubber blades. If worn, replace these (see “REPLACING THE BRUSH
HEAD SPLASHGUARDS (SWEEPING VERSION)” on page 34.
5. Once the operation is complete, repeat the operations in reverse order to reassemble all the parts.
CLEANING THE SIDE BRUSH (SCRUBBING VERSION)
Careful cleaning of the brush guarantees better cleaning of the floor as well as a longer brush head gearmotor lifespan. To clean the brush,
proceed as follows:
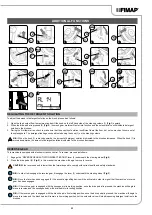
1. Go to the right-hand side of the machine and open the right lateral carter (36) (
Fig.39
).
2. Move the brush release lever downwards (37) (
Fig.40
).
3. Remove the brush from the side brush head (
Fig.41
).
4. Clean the brush under a stream of running water to remove any impurities from its bristles.
N.B.:
Check the wear of the bristles and replace the brush if they are excessively worn (the bristle protrusion must not be less than
10mm; this distance is indicated on the brush by the yellow band). To replace the brush, see “FITTING THE SIDE BRUSH (SCRUBBING
5.
CLEANING THE SIDE BRUSH (SWEEPING VERSION)
Careful cleaning of the brush guarantees better cleaning of the floor as well as a longer brush head gearmotor lifespan. To clean the brush,
proceed as follows:
1. Stand on the right side of the machine.
2.
Remove the knob (38) fixing the side brush to the gear motor by rotating the right brush clockwise and the left brush anti-clockwise (
Fig.42
)..
3. Remove the washer (39) holding the side brush in place (
Fig.43
).
4. Extract the brush and clean it under a stream of running water to remove any impurities from its bristles.
N.B.:
Check the wear of the bristles, and in case of excessive wear, replace the brush. See “REPLACING THE SIDE BRUSH
(SWEEPING VERSION)” on page 34.
5.
Once the operation is complete, refit the brush and move onto the left-hand one.
6. Repeat the operations in the reverse order to reassemble everything
CLEANING THE WATER SYSTEM FILTER
Careful cleaning of the water system filter guarantees better cleaning of the floor, as well as greater environmental and financial savings; in
order to clean the filter, proceed as follows:
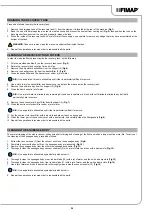
1.
Close the detergent solution flow, and shift the knob (13) on the left-hand side of the steering column (
Fig.16
) downwards.
2. Move to the left-hand side of the machine and open the left lateral carter (14) (
Fig.17
).
3.
Unscrew the detergent solution filter cap (15) (
Fig.18
).
4.
Remove the detergent solution filter and clean it under a jet of running water to remove any impurities present
N.B.:
For the sweeping versions, the detergent solution filter is located on the right side of the machine.
5. Once the operation is complete, repeat the operations in reverse order to reassemble all the parts.
CLEANING THE VACUUM HOSE
Careful cleaning of the vacuum hose guarantees better cleaning of the floor as well as a longer suction motor life. Proceed as follows to clean
the vacuum hose:
1. Extract the vacuum hose (7) from the vacuum nozzle on the squeegee body (
Fig.9
).
2. Remove the vacuum hose (7) via the hole on the back of the recovery tank (
Fig.44
).
3. The vacuum hose from the retainers present inside the recovery tank.
4. Rinse the inside of the vacuum hose with a jet of running water.
5. Once the operation is complete, repeat the operations in reverse order to reassemble all the parts.
32