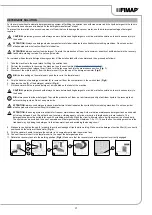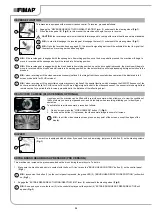
INSERTING WATER SYSTEM FILTER
Before using the machine for the first time the water system filter needs to be reset, for shipping reasons the filter cartridge and the cap have
been removed. To insert the filter cartridge in the water system filter body proceed as follows:
1. Take the machine to the maintenance area.
2. Make sure the machine has been secured (see the section titled “
CAUTION:
users are advised to always wear protective gloves, to avoid the risk of serious injury to hands.
3.
Close the tap's output flow, and shift the knob (1) on the left hand side of the steering column (
Fig.1
) downward.
4.
Move to the front of the machine, insert the filter cartridge (2) in the housing on the cap (3) (
Fig.2
).
N.B.:
The O-ring gasket in the filter cartridge should be inserted into its seat in the cap.
5.
Screw on the cap (3) to the body of the detergent solution filter (4) (
Fig.3
).
2
3
1
1
2
4
3
3
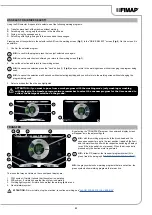
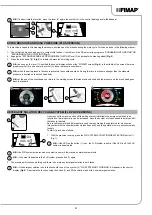
FITTING THE BRUSH HEAD BRUSHES (SINGLE-BRUSH VERSION)
To fit the brush on the brush head body, proceed as follows:
1. Take the machine to the maintenance area.
2. Make sure the machine has been secured (see the section titled “
CAUTION:
these operations must be carried out using protective gloves to avoid any possible contact with the
edges or tips of metal objects.
3. Stand on the left side of the machine.
4. With the brush head in the up position, insert the brush into the brush holder plate. Rotate the brush unit the brush's three buttons on the
brush, grip with the notches in the brush plate.
5. Turn the brush in increments until the button is pushed towards the coupling spring and is locked in place (
Fig.1
).
1
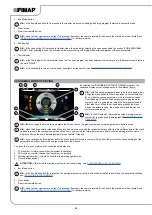
FITTING THE BRUSH HEAD BRUSHES (DUAL-BRUSH VERSION)
To fit the brush on the brush head body, proceed as follows:
1. Take the machine to the maintenance area.
2. Make sure the machine has been secured (see the section titled “
CAUTION:
these operations must be carried out using protective gloves to avoid any possible contact with the edges or tips of metal
objects.
3. Stand on the left side of the machine.
4. Remove the left splash guard (2), unscrew the knobs (3) on the brush head body (
Fig.1
).
5. With the brush head in the up position, insert the brush into the brush holder plate. Rotate the brush unit the brush's three buttons on the
brush, grip with the notches in the brush plate.
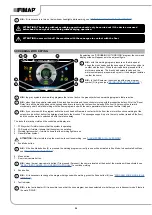
6. Turn the brush in increments until the button is pushed towards the coupling spring and is locked in place (
Fig.2
).
7. Carry out the operations just described for the right-hand front brush as well.
N.B.:
The image in
Fig.2
indicates the direction of rotation for coupling the left brush; the right brush must be turned in the opposite
direction.
1
2
2
1
18


