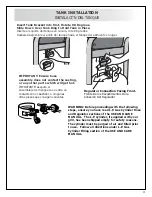
Fiesta ESD45055-BC303 Assembly Manual Download Page 11

11

TANK INSTALLATION

INSTALACI”N DEL TANQUE

Insert Tank Bracket into Slot, Rotate 90 Degrees.  
Slide Down Over Tank Ring to Hold Tank in Place.

Inserte el soporte del tanque en ranura, rote 90 grados. 
Resbale abajo sobre el anillo del tanque hacia el tanque del asimiento en lugar.

IMPORTANT: Ensure hose
assembly does not contact the casting,
or any other parts which will get hot.

IMPORTANTE: asegure el 
ensamblaje de manguera no entra en 
contacto con el bastidor, o ningunas 
otras piezas que consigan calientes. 

Regulator Connection Facing Front. 

Frente De los Revestimientos De la 
Conexión Del Regulador

WARNING: Before proceeding with the following 
steps, ensure you have read L.P. Gas Cylinder Hose 
and Regulator sections of the USE AND CARE 
MANUAL.  The L.P. cylinder, if supplied with your 
grill, has been shipped empty for safety reasons.  
The cylinder must be purged of air and filled prior 
to use.  Follow all directions under L.P. Gas 
Cylinder Filling section of the USE AND CARE 
MANUAL.

Summary of Contents for ESD45055-BC303

Page 1: ...N Some parts may contain sharp edges especially as noted in manual wear protective gloves if necessary Algunas piezas pueden contener los bordes agudos especialmente seg n lo observado en manual guant...

Page 2: ...BLY as Shown and Insert Leg Extensions Turn Assembly Over and Tap Leg Extensions Against a Hard Surface If Necessary Until Fully Seated Instalar las extensiones de la pierna Acomoda el ensamblaje izqu...

Page 3: ...l fondo del extremo izquierdo 1 4 20 X 2 1 2 Carriage Bolt 1 4 20 X 2 1 2 El Cerrojo del coche Cup Washer arandela de la taza 1 4 Wing Nut La Nuez del ala Channel Clamp Installed Abrazadera Del Canal...

Page 4: ...el ala Install Front Panel Instalar el Panel Delantero Install Back Support Instale detr s la ayuda FRONT PANEL AND BACK SUPPORT PANEL DELANTERO Y AYUDA TRASERA Locate hardware in back support bag pac...

Page 5: ...ole to Leg Assembly Instalaci n de la consola al ensamblaje de la pierna CONSOLE AND BASE CONSOLA Y BASE Install Base Casting and Grease Cup Clip Instalar el bastidor bajo y engrase el clip de la taza...

Page 6: ...as shown Encendedor puede no estar exactamente seg n lo demostrado NOTE After wiring main burner bundle wires together and wire tie around them Despu s alambres principales del paquete de la hornilla...

Page 7: ...to Legs Tabs on Underside of Shelf will Snap into Notches as Shown Resbale el estante sobre las piernas Las tabulaciones en el superficie inferior del estante se encajar n a presi n hacia muescas seg...

Page 8: ...si n hacia lugar Instalaci n lateral del estante de la referencia Note Remove regulator and side burner valve from poly bag assembly is factory attached to the rear of the console Nota Quite el regula...

Page 9: ...nd removed freely NOTA Despu s de hornilla de la cara tela el paquete ata con alambre junto y el lazo del alambre a trav s de un agujero en la ayuda del bastidor para asegurar el tanque se puede insta...

Page 10: ...hes in handle tube mate with tab inside handle cap Nota Las muescas en tubo de la manija se acoplan con realzan el casquillo interior de la manija Tighten wing nuts securely Apriete las tuercas de ala...

Page 11: ...egure el ensamblaje de manguera no entra en contacto con el bastidor o ningunas otras piezas que consigan calientes Regulator Connection Facing Front Frente De los Revestimientos De la Conexi n Del Re...

Page 12: ...ntador SP5005 3 SWING RACK estante del oscilaci n SP25 9G SMART BAR barra elegante SM5002 12 H Burner hornilla de h SP32 16 KNURLED NUT con estr as tuerca SP102A 3 CAST IRON COOKING GRID rejilla el co...

Page 13: ...e la consola SM5062 42C L H LADDER ASSEMBLY L H ensamblaje de la escala SP150A 4 HVR SP47 18 THUMB SCREW tornillo de pulgar SM5009A 42C S B BASE s b la base SP10 7 KNOB perilla SP22 6 VALVE BRACKET co...

Reviews: