FZP 6005-E
22
EN
Pole-mounted pruner assembly | Sawchain tensioning
Insert the rear handle into the front part in the direction (A) (see Fig. 4). Make sure the groove
1 (groove 1 on the front pole) snapped into the slot 2 (slot 2 in the connecting handle) (see
Fig. 4).
Insert in the direction (A) the arresting element (7) into the threaded hole (see Fig. 5) and
screw it tight in the direction (B). Make sure the connection is properly tightened.
7. SAWCHAIN TENSIONING
ATTENTION!
Before you start tensioning the saw chain, unplug the power cord from the
mains outlet. Contact of a human body with running chain may result in a serious or fatal
injury.
ATTENTION!
The cutting edges of the saw chain are very sharp. Always wear work gloves
while handling the chain.
ATTENTION!
When cleaning the chain saw
• do not immerse the saw in any solutions
• do not use products containing ammonia, chlorine or abrasive solids
• do not use detergents containing chlorine, tetrachlormetan, kerosene or oil fuel
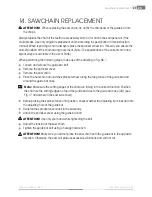
Note:
The saw chain has already been correctly tensioned in the manufacturing plant. New
chain will always stretch. Frequently check the tension of a new chain during the first 2 hours
(always unplug the power cord from power supply first). Allow chain cool down. When
checking the saw chain tension, proceed as specified below.
Disconnect the chainsaw from power supply.
Place the saw on a solid surface so that you can check the chain tension.
Slightly pull the chain at the bottom edge of the guide bar, retract it approx. 8 mm from the
bar body and release it again (see Fig. 6). If the chain returns to its original position, the
tension is correct. Minor slack (approx. 4 mm or less) of the chain from the bottom edge of
the bar is permissible.
8. ADJUSTING SAWCHAIN TENSION
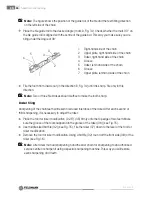
Prior to adjusting saw chain tension, loosen the guide bar bolt (22). (see Fig. 7)
Turn the adjusting bolt (27) on the front side of the chainsaw body in clockwise direction until
the chain is sufficiently tensioned. (see Fig. 8)
Use your hand protected by a work glove and retract the saw chain (20) again.
Carefully adjust the chain to prevent overtensioning. Overtensioning of the chain causes
excessive wear and tear and reduces the lifetime of both the guide bar and the chain.
After tensioning the chain, re-tighten the adjusting bolt of the guide bar (see Fig. 7)
Summary of Contents for FZP 6005-E
Page 1: ...FZP 6005 E...
Page 2: ...FZP 6005 E 2 English 13 e tina 31 Sloven ina 49 Magyarul 69 Polski 89...
Page 3: ...3 1 19 2 3 4 5 6 7 8 9 10 11 12 13 14 15 16 17 18 1 20 21 22 23 24 25 26 27...
Page 4: ...FZP 6005 E 4 3 2 8 A B...
Page 5: ...5 5 4 A 8 A B 2 1...
Page 6: ...FZP 6005 E 6 7 6 22...
Page 7: ...7 9 8 0 15 30 0 0 0 27...
Page 8: ...FZP 6005 E 8 11 10 9 A B A...
Page 9: ...9 13 12 17 28 19 29 30 31 32...
Page 10: ...FZP 6005 E 10 14 15 16 A B 34 38 37 36 35 32 0 6 mm...
Page 11: ...11 17 39 40...
Page 12: ...FZP 6005 E 12...
Page 68: ...FZP 6005 E 68...
Page 88: ...FZP 6005 E 88...
Page 110: ......


