
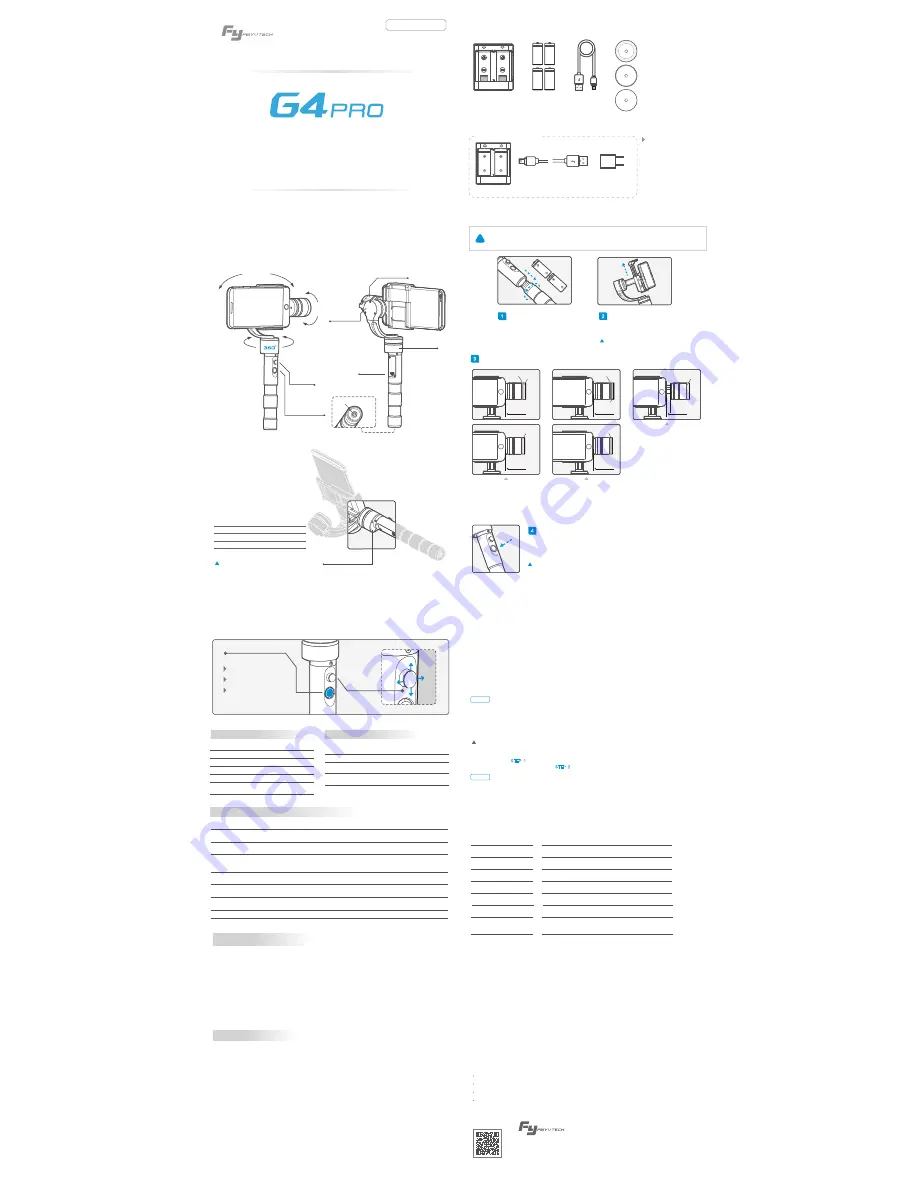
Remove the power switch cap, and
insert two 18350 batteries into the handle.
Attach the iPhone by the quick-release adapter,
and ensure it is secure.
Install the phone
Install the batteries
18350
18350
1
2
Note: Please take off the protective casing of the
phone before installation.
Charger
Rechargeable
Battery
Input: DC 5V
Output: DC 4.2V
Type:18350
Weight:52 g
Weight:6 g
USB Cable
Heavy Counter-Weight
Light Counter-Weight
Weight:8 g
1mm Counter-Weight
USB Cable
Charger
18350
18350
5V USB
Power Adapter
(Equipped by users)
Connect the Mini-USB
port of the USB cable with
the charger, and the USB
port with 5V USB power
adapter.
2. Accessories
3. User Guide
Use the heavy counter-weight,
attach the bottom of the phone to the
motor of tilting axis, as shown in the
picture.
Use the light counter-weight,
attach the bottom of the phone to
the motor of tilting axis.
9 mm
iPhone 5
iPhone 4
Light
0 mm
iPhone 6s
Light
1mm Counter-Weight
1mm Counter-Weight
0 mm
iPhone 6s Plus
Heavy
Adjust the phone position and install the counter-weight
3
How to install iPhone6s / 6
0 mm
iPhone 6
Light
0 mm
iPhone 6 Plus
Heavy
Use the light counter-weight, leave
distances of about 9mm between
the bottom of phone and the motor
of tilting axis, as shown in the picture .
How to install iPhone 5s / 5c / 5 / 4s / 4
How to install iPhone 6s Plus / 6 Plus
Power on / off
Power On: Single tap the function button, the gimbal shall be powered on after 2 seconds.
Power Off: Hold down the function button for three seconds to turn off the gimbal.
4
Attention: Turn the gimbal on after ensuring the phone is secure.
Attention !
!
(1) Please install the iPhone before powering on the gimbal.
(2) Please turn off the power when not in use.
How to Charge
3-Axis Handheld Gimbal for iPhone
iPhone 6s Plus / 6s / 6 Plus / 6
iPhone 5s / 5C / 5 / 4s / 4
Instruction Manual
1. Product Overview
LED indicator light
Joystick
Tilting
Rolling
Panning
Function Button
( On/Off )
(Indicator light)
Function
Interface
Rolling Axis
Tilting Axis
Panning Axis
1/4 inch Screw Hole
When the red LED indicator light flashes
in use, it means the gimbal is out-of-order
LED status
Explanation
Blue light flashes for three times
Blue light flashes twice
Blue light flashes once
Blue light keeps flashing
Full Power
Enough Power
Low Power
No Power
Weight
315g(not including batteries, phone, or counter-weight)
Heavy Counter-weight 52g Light Counter-weight 6g
Panning Increments
3°/s ~ 150°/s
Adaption
iPhone 6s Plus / 6s / 6 Plus / 6 / 5c / 5s / 5 / 4s / 4
Usage time
4 Hours
Titling Increments
2°/s ~ 75°/s
Horizontal Panning Angle
360°
Vertical Titling Angle
Rolls Angle
320°
100°
G4 Pro 3-Axial handheld gimbal for iPhone is an excellent camera stabilizer, lightweight and portable.
Prohibit any user for any illegal purpose. Users will be responsible for all behaviors of purchase and use products.
The Company assumes no liability for any risks related to or resulting from the debug and use of this product
(including the direct, indirect or third-party losses).
For any unknown sources of using, we will not be at any services.
Feiyu Tech reserves the right to amend this manual and the terms and conditions of use the gimbal at any time.
D I S C L A I M E R
Attention
Please correctly assemble the gimbal in accordance with the diagram.
Please install the camera before powering on the gimbal.
Please charge the battery with the standard charger.
When the gimbal is not in use or placed on the table, please ensure it is powered off.
Please visit the official website of Feiyu Tech
to get related information: www.feiyu-tech.com
Scan and keep
an eye on FY
Tap button for six times for roll angle adjustment, the tilt and roll angle restore to the horizontal status. Under the roll
angle adjustment state, move the joystick to the left or to the right to adjust the roll angle, single tap again to save the
setting and exit after adjusting.
Rolling angle adjustment
After finished the , the rolling angle still not parallel to the horizontal surface, you can use the joystick
to adjust the rolling angle according to .
Adjusting steps:
5. Gimbal Horizontal Angle Adjustment
6. Parameters
Support email: [email protected]
( 1 ) After powering the gimbal on, hold down the function button for one second to enter standby mode, and the LED
indicator shall flash for three times;
( 2 ) Consecutively tap the function button for three times, LED indicator shall be always on, place the gimbal on a flat
surface and keep it stationary;
( 3 ) When the initialization is completed, the LED indicator will flash for three times.
When the initialization failed, the LED indicator will flash quickly, repeat step (2) & (3) to reinitialize.
Initialize the gimbal
STEP 1
STEP 2
STEP 2
STEP 1
The horizontal angle needs to be adjusted whenever the following situations happen to the gimbal, user can
adjust the horizontal angle by gimbal initialization and joystick.
(1)The tilt angle is not leveled with the horizontal surface.
(2)The roll angle is not parallel to the horizontal surface.
(3)Under lock mode, the panning angle drifts.
The phone stays in its current orientation. All panning, tilting and rolls are restricted.
Working Modes
Three working modes can be switches under inversion mode. After entering into the inversion mode, the
gimbal automatically switches to the panning mode.
Invert the gimbal, put the camera face down to capture the wonderful moments.
The gimbal can restore to the boot-up state by consecutively pressing the function button for three times
under inversion mode.
Inversion Mode
After the gimbal being powered on for eight seconds, pull the tilting axis to the desired angle under non
panning and tilting mode and wait for 0.5 second until the gimbal registers the new angle.
Manual Pulling Locking
Panning Mode
Reset the tilting axis of the gimbal to initial orientation and initial mode.
Reset
In standby model, keep the gimbal in power-up state, the motor stops working, the indicator light flashes
for three times, and single tap again to wake the gimbal.
Standby
The phone is allowed to pan left or right. Vertical tilts or rolls are restricted.
Panning and Tilting Mode
The phone is allowed to pan left or right and tilt up and down. Rolls are restricted.
Lock Mode
Other Functions
Reset the tilting axis of the gimbal to initial
orientation and initial mode.
Operation
Double tap
Single tap
LED status
Mode / Status
Single flash
Double flashes
Function
Explanation
Panning Mode / Lock Mode
Panning and Tilting Mode
Panning mode
Panning and Tilting mode
Lock mode / Initialize the gimbal
Triple tap
Single tap to switch between panning mode and
lock mode
Under panning and tilting mode, single tap to switch
to lock mode
Always on
Inversion Mode
It is possible to switch to other modes under
inversion mode, triple tap again to exit inversion
mode and reset
Long press for 3 seconds
Power off
Quadruple tap
Flash quickly
Rolling angle adjustment /
Initialization failure / Malfunction
Reset
Tap button for six times
Please refer to“Gimbal Horizontal Angle Adjustment”
for operations
Single tap again to awake the gimbal, or triple tap
to initialize the gimbal
Rolling angle adjustment
Long press for 1 second
Standby
Three flashes
Standby
Mode
Panning mode
Panning and
Tilting mode
Lock mode
Controllable
angle of joystick
Tilting angle
Uncontrollable
Tilting and
panning angle
Movement
of joystick
Up, Down
Uncontrollable
Up, Down, Left, Right
Operating Instructions of Function Button
Explanation of LED indicator status
Explanation of joystick control
4. Operating
Realize other functions
Switch the working mode
Power on / Power off
Identify the current mode of the
gimbal by the indicator lights
Function Button
( Indicator Light )
Joystick
for
Direction
Control