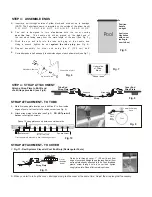
STEP 2: TUBE ASSEMBLY
Note: THIS STEP REQUIRES A TOTAL OF 12 SELF-DRILLING
SCREWS
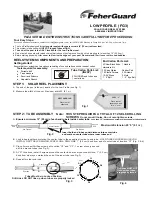
End Carton Parts List:
Fig. 4
STEP 1: SOLAR REEL PLACEMENT:
LOW PROFILE (FG3)
SOLAR COVER REEL SYSTEM
ASSEMBLY INSTRUCTIONS
PLEASE READ ENTIRE INSTRUCTIONS CAREFULLY BEFORE PROCEEDING
REEL SYSTEMS COMPONENTS AND PREPARATION:
Getting started:
Ensure that your system has two cartons consisting of one end carton and one tube set carton.
Tools required for assembly:
·
Portable drill
·
Tape measure
·
Pencil and Scissors
A.
B.
The end of the pool is the only location for the Low Profile (see Fig. 1)
.
Measure the width of the pool. Maximum width 20’ (6.1 m).
Insert both end tubes equal distance into center tube
and mark on center tube where inner tubes end
Fig. 2
Fig. 1
B.
Lock tubes together by rotating the center tube in the opposite direction to end tube. HOLD TUBES LOCKED WHILE YOU
INSTALL FIRST SELF-DRILLING SCREW ON A DRILL LINE, 1“ (2.5 cm) back from end of center tube at location ”C1” (Fig. 3 & 4).
Place 2 more self-drilling screws at Location “C2” and ”C3” - 1 screw at every second
drill line around tubes (see Fig. 3).
At “D” Locations, install 3 screws around the center tube at every second drill line, 1“ (2.5 cm)
back from where you marked the end of the inner tube (see Fig. 3).
Repeat for other end tube.
C.
D.
E.
C3
D3
C2
D2
End tube
D1
D1
End tube
Center tube
C
D
C1
C1
Fig. 3
Drill lines MUST NOT
line up when tubes
are properly locked
A.
Do not pre-drill holes. Do not over-tighten screws.
RECTANGULAR
Place reel at
either end
LAZY “L”
Place reel at
square end and
fold “L” over
End Tube 90“
End Tube 90“
Center Tube 90“
Maximum Extension 20’ 6” (6.1 m)
The Low Profile is designed for
rectangular pools with square corners (6“ (15 cm) radius or less
).
This system is to be used with
IG20P - Plugged Tubeset ONLY.
The end of the pool is the ONLY location for the Low Profile model.
Do not install on pools with raised coping that reduces the clearance from deck to diving board to less than 10“ (25.4 cm).
Before starting assembly,
trim cover to clear inside edges of your pool Recommend 12 mil cover with round bubbles.
·
·
·
·
Tube Carton Parts List:
(IG20P)
2 PLUGGED end tubes and
1 center tube.
2 Pillow Block Ends 1 Handle
Hardware Kit:
10-26” Sraps
20 Strap Plates
10 Plastic Screws 25 Screws
2 Nuts
1 - 5“ Eye Bolt
1 - 5“ Bolt
Rubber Pad
Plugged
End
Plugged
End
Tubes Must be in Locked Position
Drill Lines DO NOT line up when tubes are properly locked
Plugged tube end
Adjustable Wrench
·
Four Easy Steps:
If you need additional assistance, contact us at [email protected] or call 905-876-4766 Monday to Friday 8:30 a.m. to 5:00 p.m. Eastern Time.
Ensure a minimum 12” (30 cm) of each end tube is inside center tube.
Less than 12” insert causes screws to loosen and/or tubes to split.
·


