20
• Installation Overview
ZMA-330, Ver.6
PosiDRIVE Security Gate
Installation Overview
The installation procedures described in this section are broken into the following tasks:
1.
“Installing the Enclosure” on page 20
2.
“Wiring the Gate” on page 23
3.
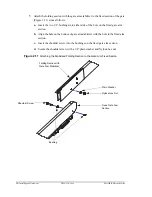
“Installing the Gate Arm” on page 25
4.
“Setting the Mainsprings” on page 38
5.
“Disabling the Locked-Down Feature (Optional)” on page 40
6.
“Setting the DIP Switches” on page 42
Installing the Enclosure
This section explains how to install the PosiDRIVE Security Gate enclosure.
Note:
The base flange of the PosiDRIVE includes a series of holes designed to support
retrofitting the PosiDRIVE gate into a previous Federal APD gate installation,
such as the G-89, CG-90, G-90, or 500 Industrial Gate. It may be possible to use
as many as three of the existing mounting bolts. Because the base of the
PosiDRIVE is deeper than the previous gate, it is not possible to use all four
existing bolts. Use three of the existing holes and drill new holes in the front
two mounting holes.
If the PosiDRIVE is being installed into an existing 500 Industrial Gate
installation, you may need to position the gate closer to the curb to
accommodate any existing conduit stub-ups. In this case, drill four fresh
mounting holes.
To install the gate on a concrete curb:
1.
Carefully remove the unit from the shipping crate without damaging the finish.
Leave the enclosure bolted to the bottom pallet until you are ready for installation.
2.
Open the gate enclosure door.
Moving parts can cause serious bodily injury, and hazardous voltage
can shock, burn, or cause death. Turn off the power to the gate and
disconnect the battery before performing any maintenance or repairs.
Install the enclosure so that the end portion of the gate arm is more
than 2 feet (62 cm) from any rigid object, such as a wall, when fully
extended in the down position. If the distance is less than 2 feet (62
cm), a person may get trapped between the end of the gate arm and the
rigid object, causing bodily injury to the individual.
Summary of Contents for PosiDRIVE
Page 1: ...PosiDRIVE Security Gate Installation Operation and Maintenance Manual ...
Page 2: ......
Page 26: ...18 Removing the Enclosure Cap ZMA 330 Ver 6 PosiDRIVE Security Gate ...
Page 64: ...56 Aligning the Drive Mechanism ZMA 330 Ver 6 PosiDRIVE Security Gate ...
Page 68: ...60 Accessing the Distributor Resource Center ZMA 330 Ver 6 PosiDRIVE Security Gate ...
Page 90: ...82 Requesting a Repair ZMA 330 Ver 6 PosiDRIVE Security Gate ...
Page 94: ...86 Index ZMA 330 Ver 6 PosiDRIVE Security Gate ...
Page 95: ......


