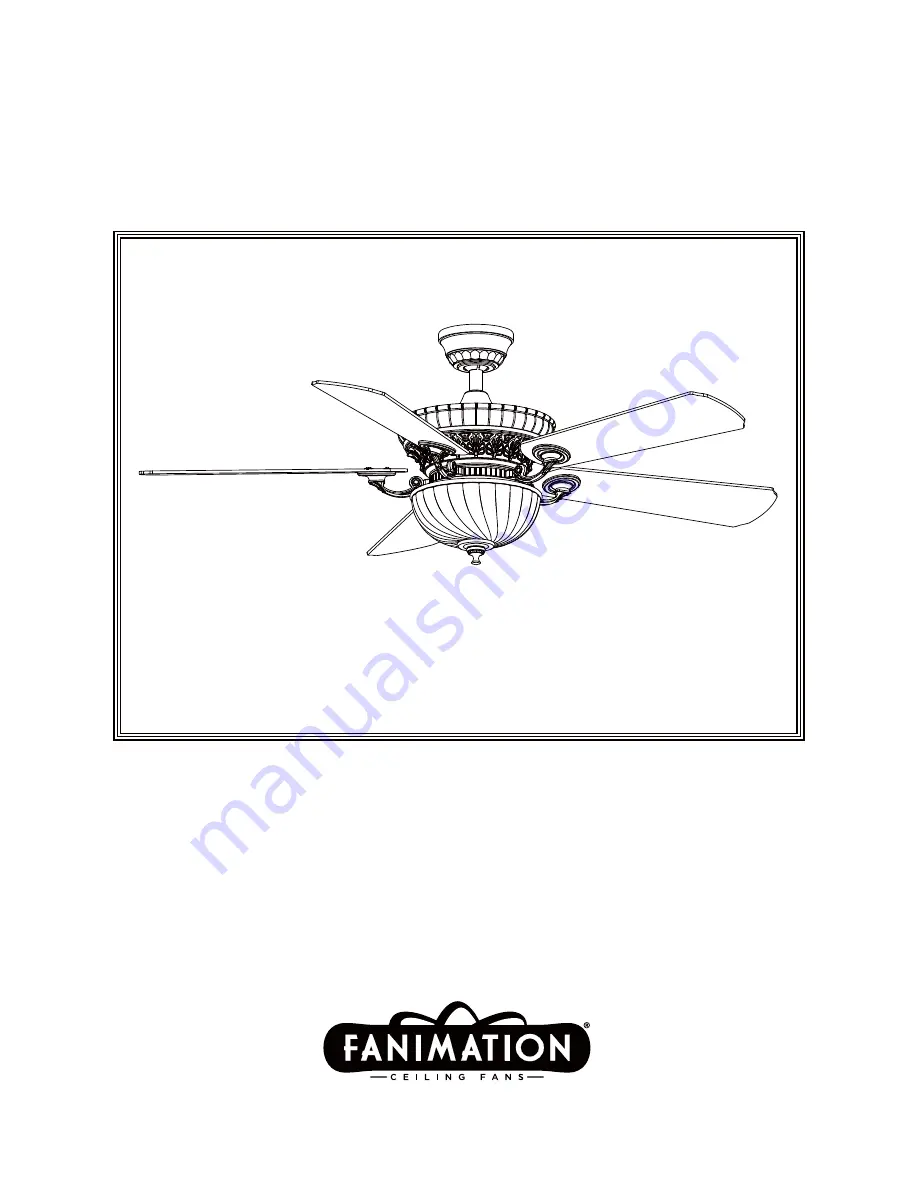
Model No. FP8032DZ
OWNER'S MANUAL
READ AND SAVE THESE INSTRUCTIONS
The Ventana
™
Ceiling Fan
Net Weight 11.1 kg. (24.48 lbs.)
Page 1: ...Model No FP8032DZ OWNER S MANUAL READ AND SAVE THESE INSTRUCTIONS The Ventana Ceiling Fan Net Weight 11 1 kg 24 48 lbs...
Page 2: ...nd shipping of the product for repairs or replacement 2 ONE YEAR MOTOR LABOR WARRANTY If your fan motor fails at any time within one year from the original purchase due to defects in materials or work...
Page 3: ...out of or in conjunction with product use or performance except as may otherwise be accorded by law This warranty gives you special legal rights and you may also have other rights that vary from stat...
Page 4: ...not designated for use with this product by Fanimation could result in personal injury or property damage WARNING WARNING One wire stripper One 1 4 blade screwdriver Materials Wiring outlet box and bo...
Page 5: ...gentle updraft which forces warm air near the ceiling down into the occupied space Remember to adjust your thermostat when using your ceiling fan additional energy and dollar savings could be realize...
Page 6: ...een two joists and takes the place of wooden blocking To avoid fire or shock follow all wiring instructions carefully Any electrical work not described in these instructions should be done or approved...
Page 7: ...Reinstall the hanger ball on the downrod as follows Route the three 80 inch wires through the hanger ball Position the pin through the two holes in the downrod and align the hanger ball so the pin is...
Page 8: ...ise as it must be grounded for safe operation The outlet box must be securely anchored Hanger bracket must seat firmly against outlet box If the outlet box is recessed remove wall board until bracket...
Page 9: ...lide code switches to the same positions as set on your transmitter Figure 3 3 Slide the receiver unit into the open end of the hanger bracket Figure 4 4 Connect green wires from hanger bracket and ha...
Page 10: ...de of the outlet box Figure 6 CANOPY SHOULDER SCREWS 2 Figure 1 CANOPY COVER Figure 2 1 Remove one of the two shoulder screws in the hanger bracket Loosen the second shoulder screw without fully remov...
Page 11: ...t g n i s u on the bottom of the motor support Figure 2 NOTE Periodically check blade holder hardware and resecure if necessary 3 Remove one of the three screws in the support bracket at the bottom o...
Page 12: ...7 7 Remove finial nut glass support nut and rubber washer from threaded post on socket plate Postion glass onto Socket Plate Post and secure with rubber washer and glass support nut Assemble finial nu...
Page 13: ...of motor assembly to the opposite position and turn fan on again Figure 5 Reverse Switch Information Season Rotation Direction Switch Position Summer Counter Clockwise Left Winter Clockwise Right 3 To...
Page 14: ...are not required and should be avoided to prevent damage to finish Do not use water when cleaning your ceiling fan It could damage the motor or the finish and create the possibility of electrical sho...
Page 15: ...ontrols are not recommended choose an alternative control method 6 Tighten screws securely 7 Tighten set screw securely 1 Blades not attached to fan 2 Loose screws in motor housing 3 Screws securing f...
Page 16: ...Set 10 AP803212DZ AP803206CYDWA Blade Set 11 TR24WH Hand Held Remote 12 RECAN65 Receiver Unit 13 HDWFP8032DZ 15 14 Washer Head Screw 3 16 24 16 4 Phillips Head Screw Driver Pan Head Screw 1 4 20 w Loc...
Page 17: ...17 2 3 4 7 6 8 9 12 10 5 15 11 8 REF 8 REF 8 REF 14 1 13 NOTE The illustration shown is not to scale or its actual configurations may vary The Ventana FP8032DZ Exploded View Illustration...
Page 18: ...Copyright 2015 2015 07 V 01 10983 Bennett Parkway Zionsville IN 46077 Toll Free 888 567 2055 FAX 866 482 5215 Outside U S call 317 733 4113 Visit Our Fanimation Website www fanimation com...
Page 19: ...The Ventana Peso neto 24 48 lb 11 1 kg Ventilador de techo Modelo N FP8032DZ MANUAL DEL PROPIETARIO LEA Y GUARDE ESTAS INSTRUCCIONES...
Page 20: ...riginal Todos los gastos de remoci n y reinstalaci n del ventilador son responsabilidad exclusiva del propietario y no de la tienda que 6 vendi el ventilador ni de Fanimation Fanimation se reserva el...
Page 21: ...por da os accidentales resultantes o especiales derivados del uso o el rendimiento del producto o en conjunci n con ste excepto en los casos en los que la ley as lo disponga Esta garant a le otorga de...
Page 22: ...l cydigo local El cable m s peque o debe ser un cable de tres conductores de dos conductores con conexiyn a tierra del siguiente tama o NOTA coloque las piezas de las bolsas de piezas individuales en...
Page 23: ...tinuaci nlepresentamosalgunassugerencias para asegurar un rendimiento eficiente del producto Selecci n del lugar de montaje adecuado Los ventiladores de techo se deben instalar en el centro de la habi...
Page 24: ...rgas el ctricas aseg rese de que la electricidad est desconectada en la caja de fusibles principal antes de realizar la instalaci n el ctrica Toda instalaci n el ctrica debe cumplir con los c digos na...
Page 25: ...uelva a colocar la semiesfera en el barral como se indica a continuaci n Pase los tres cables de 2 03 m 80 a trav s de la semiesfera Pase el pasador a trav s de los dos orificios en el barral y alinee...
Page 26: ...desde las aspas hasta el piso Figura 2 La caja de salida debe estar bien asegurada La abrazadera para colgar debe estar bien asentada contra la caja de salida Si la caja de salida est empotrada retire...
Page 27: ...suministro de electricidad utilizando el conector de cables suministrado Conecte el cable blanco desde la unidad del receptor marcado TO MOTOR N al cable blanco del ventilador utilizando el conector...
Page 28: ...i n a tierra No opere el ventilador hasta que las aspas est n instaladas Podr a ocasionar ruidos y da os al motor ADVERTENCIA x 3 Aditamentos utilizados Conectores de cable C mo instalar la carcasa de...
Page 29: ...balancear las aspas o limpiar el ventilador No coloque objetos extra os entre las aspas del ventilador en funcionamiento ADVERTENCIA 2 Fije los soportes de aspas al soporte del motor mediante los torn...
Page 30: ...la tuerca final en el eje roscado Figura 7 Placa del z calo Unidad del Placa del luz 5 Extraiga uno de los tres tornillos de la unidad de la placa Afloje levemente los otros dos tornillos Instale la...
Page 31: ...humedad Figura 3 Figura 2 Figura 1 MANDO A DISTANCIA DE 5 BOTONES Figura 4 MANDO A DISTANCIA Figura 3 PRINCIPAL CAJA DE FUSIBLES 3V CR2032 bater a de dos piezas 5 Si se desea que el flujo del aire va...
Page 32: ...antenimiento 1 El nico mantenimiento necesario para el ventilador de techo es una limpieza peri dica Al llevar a cabo la limpieza use s lo un cepillo suave o un pa o sin pelusas para evitar rayar el a...
Page 33: ...de que el suministro principal de electricidad est desconectado 5 Algunos motores de ventilador son sensibles a las se ales de los controles de velocidad de estado s lido variables Los controles de es...
Page 34: ...cabeza troncoc nica de 1 4 20 11 Destornillador Phillips de 4 kit de balanceo Modelos N FP8032DZ Lista de piezas N de Ref Descripci n Pieza N Antes de desechar los materiales de embalaje aseg rese de...
Page 35: ...35 2 3 4 7 6 8 9 12 10 5 15 11 8 REF 8 REF 8 REF 14 1 13 NOTA la ilustraci n que se muestra no est hecha a esFDOD VX FRQ JXUDFLyQ UHDO SXHGH YDULDU The Ventana FP8032DZ Ilustraci n del despiece...
Page 36: ...t Parkway Zionsville IN 46077 Llame sin cargo al 888 567 2055 FAX 866 482 5215 Desde fuera de los EE UU llame al 317 733 4113 Visite nuestro sitio Web en www fanimation com Copyright 2015 Fanimation 2...