


English
27
burning appliances in the same room, more ventilation may
be required.
Location of Cooker
The cooker may be installed in a kitchen/kitchen diner but
NOT in a room containing a bath or shower.
NOTE:
An appliance for use on Liquid Petroleum Gas must not be
installed in a room or internal space below ground level e.g.
in a basement.
You will need the following equipment to complete the
cooker installation satisfactorily
Restraining Device
A restraining device should be fitted when the cooker is con-
nected to a flexible gas supply. The cooker manufacture does
not supply these. Any restraining device should be secured to
the fabric of the building and should be able to be released
so that the cooker can be pulled out for cleaning and mainte-
nance.
Gas Pressure Tester
Flexible Gas Hose
Must be in accordance with the relevant standards.
Multimeter
(for electrical checks)
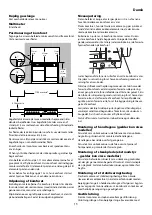
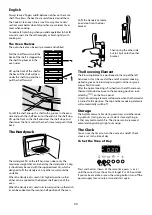
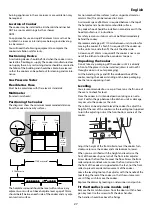
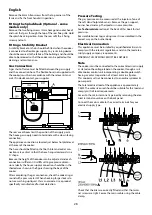
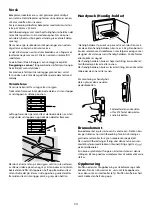
Positioning the Cooker
The diagrams show the minimum recommended distance
from the cooker to nearby surfaces.
ArtNo.110-0004 - 110 Cooker min spacings
75 mm
min
75 mm
min
650 mm
min
898 mm
min
925 mm
max
ArtNo.110-0003 - Min positions above cooker
410 mm min
1100 mm min*
**
The hotplate surround should be level with, or above, any
adjacent work surface. Above hotplate level a gap of 75mm
should be left between each side of the cooker and any adja-
cent vertical surface.
For non-combustible surfaces (such as unpainted metal or
ceramic tiles) this can be reduced to 25mm.
A minimum space of 650mm is required between the top of
the hotplate and a horizontal combustible surface.
Any cooker hood should be installed in accordance with the
hood manufacturer’s instructions.
For safety reasons curtains must not be fitted immediately
behind the cooker.
We recommend a gap of 1110mm between units to allow for
moving the cooker. If a flush fit is required, fit the cooker up
to the unit at one side then fit the unit the other side.
A clearance of 130mm is required if the cooker is near a cor-
ner of the kitchen to allow the oven doors to open.
Unpacking the Cooker
Do not take any packaging off the cooker until it is directly
in front of the place it is to be installed (unless it will not fit
through a door in its outer packaging).
Cut the banding straps and lift the cardboard box off the
cooker, leaving the cooker standing on the base packaging.
See the loose unpacking sheet.
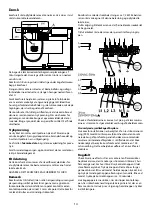
Levelling
You are recommended to use a spirit level on a shelf in one of
the ovens to check for level.
Place the cooker in its intended position taking care not to
twist it within the gap between the kitchen units as damage
may occur to the cooker or the units.
The rollers can be adjusted to level the cooker. To adjust the
height of the rear of the cooker use the levelling tool supplied
to turn the adjusting nuts at the front bottom corners of the
cooker.
Adjust the height of the front roller to level the cooker. Turn
clockwise to raise the cooker and anticlockwise to lower.
When you are satisfied with the height and level raise the
front of the cooker by one turn of the front roller adjuster.
Screw down the front feet to meet the floor. Screw the front
roller adjuster anticlockwise to raise the front roller so that
the front of the cooker is supported on the feet, not the front
roller, to prevent accidental movement of the cooker.
Leave the levelling tool on the adjuster with the handle of the
tool facing the rear of the cooker, so that the customer can
use it if they wish to move the cooker.
Replace the drawer by locating on side runners and push in.
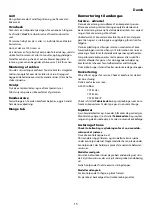
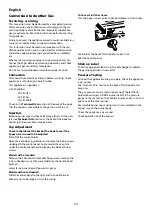
Fit the Handles (some models only)
Remove the 4mm Allen screws from the doors with the hexa-
gon key tool. Use the screws to fit the door handles.
The handles should be above the fixings.
Summary of Contents for Classic 110 Dual Fuel
Page 2: ...2 ...
Page 3: ...3 Dansk English Norsk Tekniske Data Technical Data Tekniske Data DK GB NO IE ...
Page 17: ...Dansk 17 ...
Page 31: ...English 31 ...
Page 50: ...50 ...
Page 51: ...51 ...