


English
24
lowered). If the cooker is not level arrange for your supplier to
level it for you.
Oven not coming on when turned on manually
Is the power on? Is the clock illuminated? If not there may be
something wrong with the power supply. Is the cooker supply
on at the isolator switch? Is the clock flashing 0.00? If so set
it to the correct time of day. Has the Timer been set to AUTO
by mistake? If AUTO is showing on the clock display, press the
‘cook period’ button and reduce any set cooking time show-
ing to 0.00, with the (+) and (-) buttons. Press the ( ) button
twice. If this does not solve the problem contact a service
person.
Is the key symbol ( ) showing in the display? See the Clock
section of the instructions for more information on the key
lock feature of the clock.
Oven not coming on when automatic cooking
Timer set correctly but oven knob left OFF by mistake?
Is the key symbol ( ) showing in the display? See the Clock
section of the instructions for more information on the key
lock feature of the clock.
Oven temperature getting hotter as the cooker gets older
If turning the knob down has not worked or only worked for a
short time then you may need a new thermostat. This should
be fitted by a service person.
Grill not cooking properly
Are you using the pan and trivet supplied with the cooker? Is
the pan being used on the runners, not the floor of the com-
partment? Is the grill tray pushed fully back to stop?
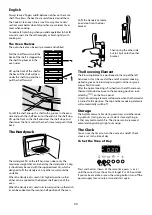
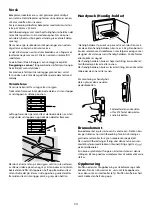
The oven light is not working
The bulb has probably blown. You can buy a replacement
bulb (which is not covered under the guarantee) from a good
electrical shop. Ask for an Edison screw fitting 15w 240v lamp,
FOR OVENS. It must be a special bulb, heat resistant to 300°C.
Open the oven door and remove the Handyrack (if fitted) and
oven shelves.
Turn off the power supply.
Unscrew the bulb cover by turning anticlockwise. Unscrew
the old bulb. Screw in the new bulb. Screw on the bulb cover.
Turn on the electricity supply and check that the bulb now
lights.
A crack has appeared in the Warmer plate’s surface
Disconnect the cooker immediately from the power supply
and arrange for its repair. Don’t use the cooker until after the
repair. Contact a service person.
Hotplate ignition or hotplate burners faulty
Is the power on? Is the clock illuminated? If not there maybe
something wrong with the power supply.
Are the sparker (ignition electrode) or burner slots blocked by
debris?
Is the burner trim correctly located?
Are the burner caps correctly located?
See the section entitled ‘
Cleaning your cooker
’
Check that there is not a problem with your gas supply. You
can do this by making sure that other gas appliances you may
have are working.
Do the burners spark when you push the button? If not check
the power is on - is the clock illuminated?
Power failure
In the event of a failure in the electrical supply the hotplate
may be lit using a match.
General Safety Instructions
This appliance must be installed by a competent person in
accordance with the installation instructions. The installation
must comply with the relevant regulations and also the local
electricity supply company requirements
If You Smell Gas
Don’t turn electric switches on or off.
Don’t smoke
Don’t use naked flames
Do turn off the gas at the meter or cylinder
Do open doors and windows to get rid of the gas
Call your gas supplier.
This appliance is designed for domestic cooking only. Use
for any other purpose could invalidate any warranty or
liability claim.
The use of a gas cooking appliance results in the production
of heat and moisture in the room in which it is installed. En-
sure that the kitchen is well ventilated: keep natural ventila-
tion holes open or install a mechanical ventilation device,
(mechanical extractor hood).
Prolonged intensive use of the appliance may call for ad-
ditional ventilation, for example opening a window, or more
effective ventilation, for example increasing the level of
mechanical ventilation where present.
The cooker must be installed by a qualified electrician in
accordance with the installation instructions. It should be
serviced by a qualified service engineer and only approved
spare parts used. Have the installer show you the location of
the cooker control switch. Mark it for easy reference. Always
allow the cooker to cool and then switch off at the mains and
before cleaning or carrying out any maintenance work, unless
specified otherwise in this guide.
All parts of the cooker become hot with use and will retain
heat even after you have stopped cooking.
Take care when touching cooker. To minimize the possibility
of burns, always check that the controls are in the OFF posi-
tion and that it is cool before attempting to clean the cooker.
Use dry oven gloves when applicable - using damp gloves
might result in steam burns when you touch a hot surface.
Never operate the cooker with wet hands.
Do not use a towel or other bulky cloth in place of a glove.
They might catch fire if they touch a hot surface.
Clean with caution. If a wet sponge or cloth is used to wipe
spills on a hot surface, be careful to avoid steam burns. Some
cleansers can produce noxious fumes if applied to a hot
surface.
Do not use unstable saucepans and position the handles
away from the edge of the hotplate.
Babies, toddlers and young children should not be allowed
near the cooker at any time. They should never be allowed to
Summary of Contents for Classic 110 Dual Fuel
Page 2: ...2 ...
Page 3: ...3 Dansk English Norsk Tekniske Data Technical Data Tekniske Data DK GB NO IE ...
Page 17: ...Dansk 17 ...
Page 31: ...English 31 ...
Page 50: ...50 ...
Page 51: ...51 ...