background image

FOX3-2G/3G/4G/-4G-PROMOTION-KIT Getting Started 

Version 1.0.7


This confidential document is a property of FALCOM GmbH and may not be copied or circulated without previous permission.  

Page 11 of 25 


3.1.4


Installing the FALCOM Workbench software and start evaluation 

System requirements for Workbench software 

(a)


PC with 700 megahertz or higher processor Intel Pentium II or compatible processor recommended, 

(b)


512 megabytes (MB) of RAM or higher recommended (512MB minimum supported; may limit 

performance and some features), 

(c)


90 megabytes (MB) of available hard disk space (recommended 2 gigabytes), 

(d)


Keyboard and Mouse. 

To be able to test your device with factory preloaded configuration or to change this configuration, you 

need to install the 

Workbench

  evaluation software. Go to the link below and download it: 

http://www.falcom.de/support/software-tools/falcom-workbench/.


An install shield will guide you through the installation. An integrated online help can be found after the 

installation completes. 


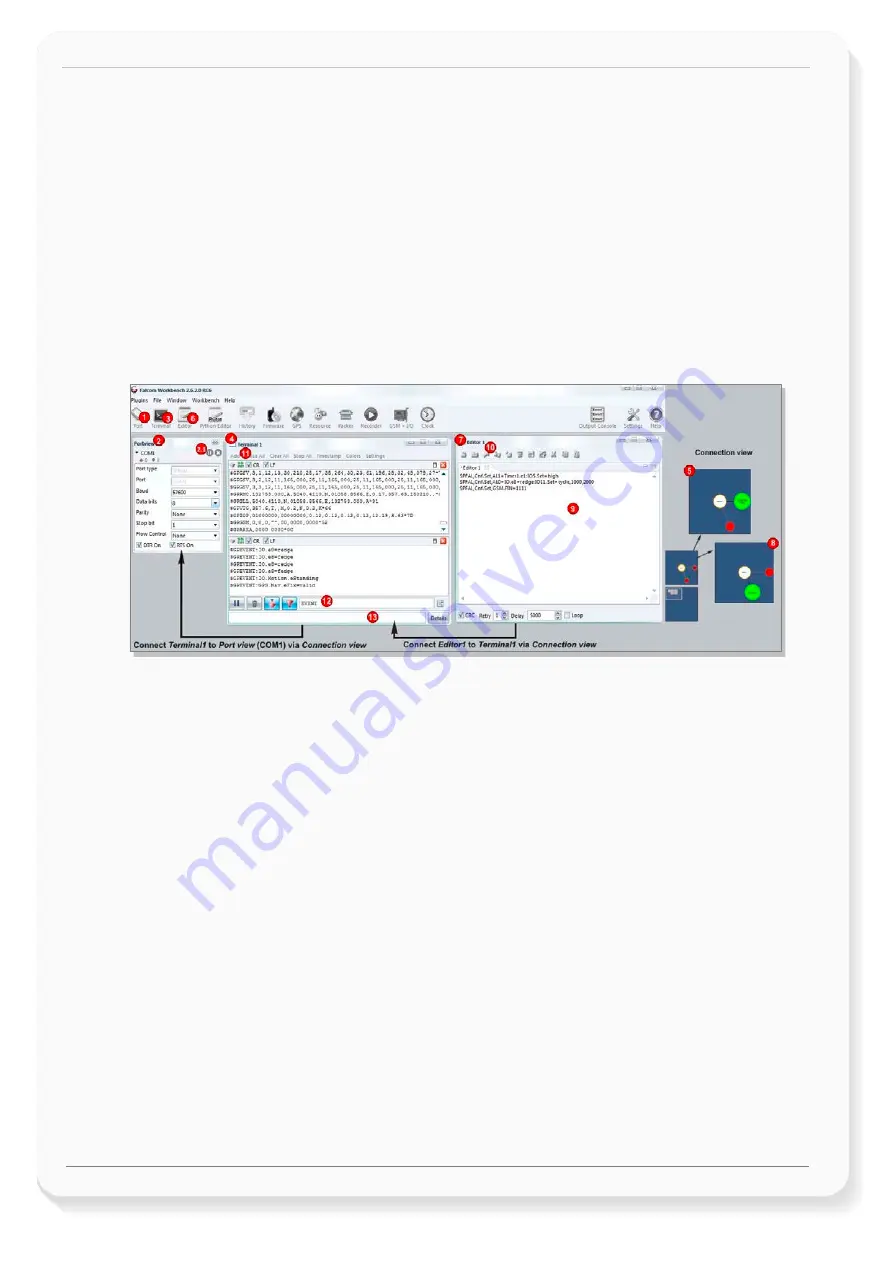
Figure 9:


FALCOM Workbench software. 

1.


After completing the installation, start the 

Workbench.exe

 by double-clicking on it. Open a new 

COM 

Port 

from the Toolbar 

(1)

, on the 

COM Port view 

(2) 

choose the Port where FOX3-2G/3G/4G  is 

connected (go to Device Manager > Ports > USB Serial Port (COMxx), where 

xx

 is the COM port to use), 

define the port settings (

115200

 bps, 

Data bits, 

No 

Parity bit, 

1

 Stop bit, 

None 

Flow control) and 

finally, click the connect (play) icon 

(2.1)

 to open that COM Port. You can also get an online help in 

HTML format if you click "

Help

" button on the upper-right corner.  

2.


Open a new 

Console

 from the Toolbar 

(3)

, click on the 

Console1 

(4)

, then go to 

Connection view

 and 

click on 

COMPort 

(5).


3.


Open a  new 

Editor

 from the Toolbar 

(6)

, click on the 

Editor1 

(7)

, then go to 

Connection view

 and click 

on 

Console1 

(8).


4.


To send commands to the FOX3-2G/3G/4G device, type them on the 

Editor 

(9)


and then click on

 Start 

sending configuration 

(10)


or double click with left mouse each configuration line on the

 Editor 

(9)


individually.  

5.


To see all events generated by the FOX3-2G/3G/4G device, either open a new console “Console2” or 

on the Console1 

(4)

,  click “Add” 

(11)

, type the text “GPEVENT” on input field 

(12)

, finally click the 

button 

(13 )

“Filter incoming”. A description how to operate with the Control-Box is given in chapter 4. 


Summary of Contents for FOX3-2G Series

Page 1: ...THIS DOCUMENT IS AVAILABLE AT HTTP WWW FALCOM DE Version 1 0 7 Modified Wednesday May 09 2018 PROMOTION KIT Getting started For FOX3 2G 3G 4G 4G Series only...

Page 2: ...FOX3 2G 3G 4G to the control box 9 3 1 3 Charge the internal battery and power up the device 9 3 1 4 Installing the FALCOM Workbench software and start evaluation 11 3 1 5 Accessing online documentati...

Page 3: ...hapter 5 Extended the contents of promotion kit added CA27 CA76 and CA123 12 21 2017 1 0 5 F Beqiri Added new items in the PROMOTION KIT 1 USB to serial converter with extension cable 2 External anten...

Page 4: ...vendor General information about FALCOM and its range of products are available at the following Internet address http www falcom de Trademarks Some mentioned products are registered trademarks of the...

Page 5: ...organized This guide consists of following chapters Chapter 2 Overview gives an overview of the PROMOTION KIT and describes its contents Chapter 3 Getting started provides installation instructions of...

Page 6: ...preloaded device configuration You don t need anything else to get started with PROMOTION KIT Only an internet enabled computer PC client with a pre installed standard web browser is required After y...

Page 7: ...ation purposes Support 8 hours free technical support FOX3 2G 3G 4G CONTROL BOX Control Box 1 To test the functions of the FOX3 2G 3G 4G device and allows connection to your PC for evaluation purposes...

Page 8: ...VL devices 7 AppNotes_INDEXED_HISTORY pdf Contains information about the indexed history on FALCOM AVL devices 8 AppNotes_Transform_history_data pdf Contains information about the conversation of the...

Page 9: ...the control box PC and apply power 3 Charge the internal battery of the FOX3 2G 3G 4G and power up the device 4 Install the FALCOM Workbench software and start the evaluation of the FOX3 2G 3G 4G devi...

Page 10: ...electric mains to access British American wall socket use the included UK US adaptor accordingly 5 Even the FOX3 2G 3G 4G series devices provide two serial ports except LITE models which have only one...

Page 11: ...of the cable into a free USB port on your PC 3 This cable is used for communication between the FOX3 2G 3G 4G and Workbench software for sending and receiving data as well as to change the configurat...

Page 12: ...eting the installation start the Workbench exe by double clicking on it Open a new COM Port from the Toolbar 1 on the COM Port view 2 choose the Port where FOX3 2G 3G 4G is connected go to Device Mana...

Page 13: ...se interface from where you can remotely monitor and view the location of the FALCOM AVL devices in real time D2Sphere also allows to view the device history device generated event view reports manage...

Page 14: ...N IN switch This two way switch enables or disables power to the connected FOX3 2G 3G 4G unit To enable power to the device the Current switch must be set to ON IGN switch This two way switch wakes up...

Page 15: ...g PFAL CNF Set AL31 Sys Timer e0 IO s0 6 0 IO6 Set high to switch on an LED e g IO 3 when the voltage on the IO 3 is higher than e g 5 0 V To test it perform the steps below 6 Send the configuration P...

Page 16: ...e RMC GPS protocol and the user text sfal event text shutdown telling the server D2Sphere its current location with the text event shutdown PFAL CNF Set AL9 Sys Timer e0 GPS Nav Position s1 50 GPS Nav...

Page 17: ...c 200 200 AL4 When the external main power drops and the FOX3 runs on its internal backup battery the red LED IO13 starts flashing 200msON 200ms OFF PFAL CNF Set AL5 SYS Power eDetected IO13 Set high...

Page 18: ...RECT on 5 0 58 50 10 50 Enables filtering of GPS auto correction to calculate a valid GPS fix using maximal allowed PDO of 5 0 maximal speed limit of 58 m s maximal allowed distance error of 50 drop c...

Page 19: ...ofile returned in the Activate PDP Context Accept message PFAL CNF Set GPRS TIMEOUT 1 600000 Detaches the device from GPRS network if no TCP communication available within the timeout PFAL CNF Set GSM...

Page 20: ...uring of FOX3 series devices The user has the possibility of personalizing this configuration and with the help of PFAL Sys Device FactoryReset command it is possible to overwrite the User Settings wi...

Page 21: ...ation you want to develop Events are triggered automatically at system run time and manually when the inputs change A part of events triggered at system run time can be Geo fence violations in out Cha...

Page 22: ...port of one of the FOX3 2G 3G 4G series device your PC Laptop COM port and to the cigarette lighter socket of a vehicle to apply power to the device To re configure the device install the Workben soft...

Page 23: ...d Reference 0 V PURPLE RxA_1 Input Serial Port 1 Receive data V24 12 V BLACK TxA_1 Output Serial Port 1 Transmit data V24 12 V YELLOW SCL Output I2C bus interface Serial Clock line GREEN SDA Input Out...

Page 24: ...orkbench Editor see Fig 8 to the FOX3 2G 3G 4G SETUP PFAL Cnf Set GPRS APN internet t d1 de enter your provider s APN PFAL Cnf Set GPRS QOS 3 4 3 0 0 PFAL Cnf Set GPRS QOSMIN 0 0 0 0 0 PFAL Cnf Set PP...

Page 25: ...rLogin data is automatically sent to your remote server For more details refer to the Related Documents 1 MSG Info ServerLogin DeviceName FOX3 Security 0 Software avl_2 13 0 BxBGT1gzIHJldjowMy1OVUNIAg...

Reviews: