Measuring and calibration cycles (M)
145
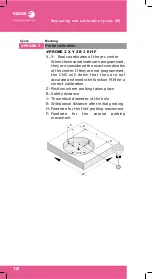
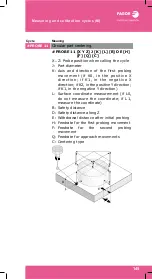
#PROBE 11
Circular part centering.
#PROBE 11 [X Y Z] J [K] [L] [B] D E [H]
[F] [Q] [C]
X..Z: Probe position when calling the cycle
J: Part diameter
K: Axis and direction of the first probing
movement (if K0, in the positive X
direction; if K1, in the negative X
direction; if K2, in the positive Y direction;
if K1, in the negative Y direction)
L: Surface coordinate measurement (if L0,
do not measure the coordinate; if L1,
measure the coordinate)
B: Safety distance
D: Safety distance along Z
E: Withdrawal distance after initial probing
H: Feedrate for the first probing movement
F: Feedrate for the second probing
movement
Q: Feedrate for approach movements
C: Centering type
Cycle
Meaning
D
B
E
Summary of Contents for CNC 8060
Page 1: ...CNC 8060 65 User quick reference Ref 1906...
Page 44: ...Work modes 44...
Page 64: ...ISO language 64...
Page 102: ...ISO canned cycles T 102...
Page 128: ...Conversational cycles M 128...
Page 136: ...Conversational cycles T 136...
Page 150: ...Measuring and calibration cycles T 150...
Page 169: ......

