XMP 240 C AT • DSP Configurator Software
32
Compressor
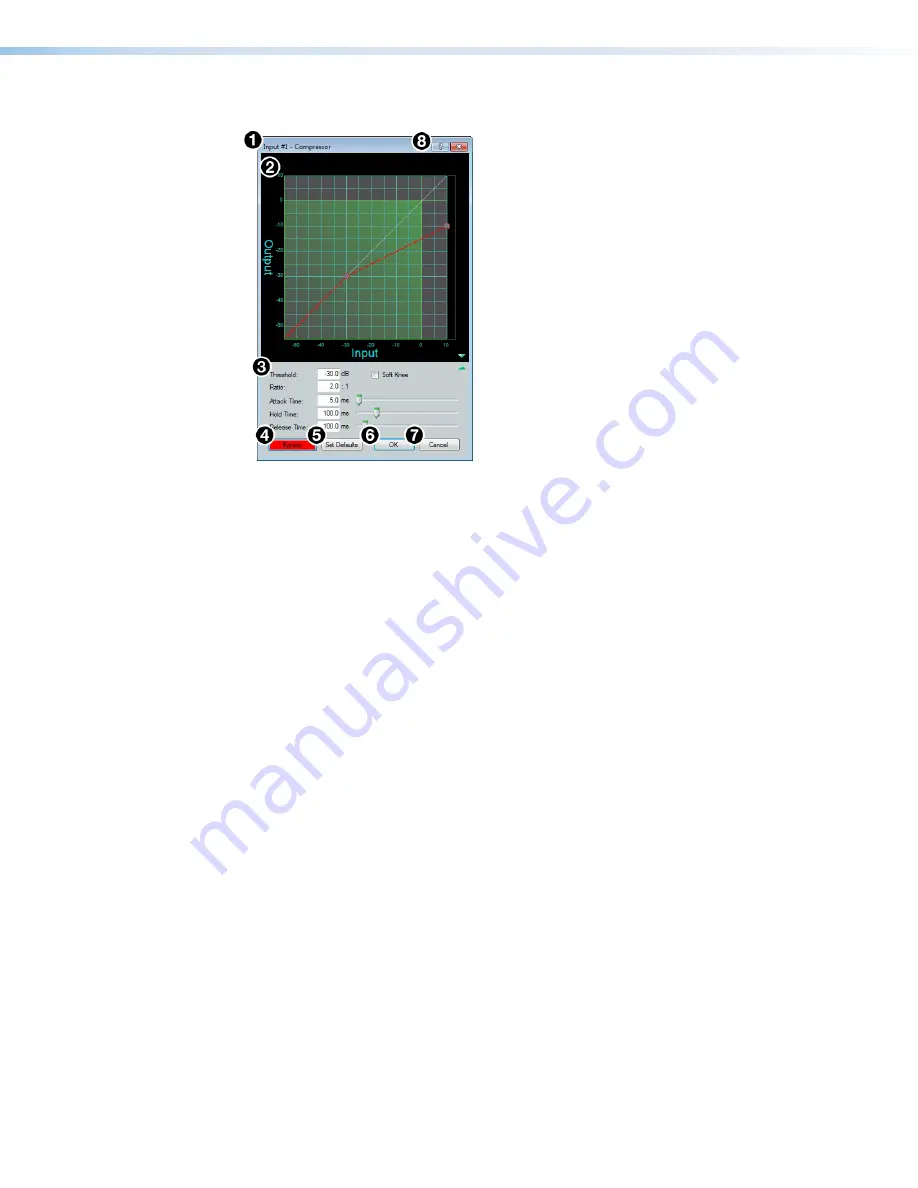
Figure 50.
Compressor Dialog Box
1
Compressor Channel Name
—
This name changes to match the default or user
defined input name.
2
Compressor Graph
—
Graphically displays compressor parameter settings.
Parameters can also be adjusted using this graph. Click and drag the dot within the
green area of the graph to adjust the compressor
Threshold
. Click and drag the dot
outside the green box to adjust the compressor
Ratio
.
3
Compressor Parameter List and Control
— Lists all configurable parameters for
the compressor. Text fields are available to adjust
Threshold
,
Ratio
,
Attack Time
,
Hold Time
, and
Release Time
. Click and drag sliders to adjust
Attack Time
,
Hold Time
,
and
Release Time
. Click a slider once and use the <
Left Arrow
> and <
Right Arrow
>
keys to adjust the respective parameter in 1 ms steps. Select the
Soft Knee
checkbox
to provide a more natural implementation of compression when the signal reaches the
threshold.
4
Bypass Button
— Bypasses the compressor. When the button is red, bypass is
enabled.
5
Set Defaults Button
— Resets all compressor parameters to their default values. To
view individual parameter default values, see the
DSP Configurator Help
file by clicking
the
Dynamics Help
button (
8
) to open the
About Dynamics
topic.
6
OK Button
— Confirms changes made to the contained parameters and closes the
Compressor
dialog box.
7
Cancel Button
— Reverts any changes made to the contained parameters back to
their states when the current instance of the
Compressor
dialog box was opened and
closes the dialog box.
8
Dynamics Help Button
— Opens the
Dynamics Operation
topic of the
DSP Configurator Help
file for further assistance in operating dynamics processors.
1
Compressor Channel Name
2
Compressor Graph
3
Compressor Parameter List and Control
4
Bypass Button
5
Set Defaults Button
6
OK Button
7
Cancel Button
8
Dynamics Help Button


