Additional Information...
Initial Setup
12V DC
REG
COM 1
COM 2
IN
OUT
PERIPH
PC
OUT
DVI-I
IN
DVI-I
I
II
6A MAX
ES3401
www.electrosonic.com
DIGITAL
AUDIO
MAINS
SUPPLY
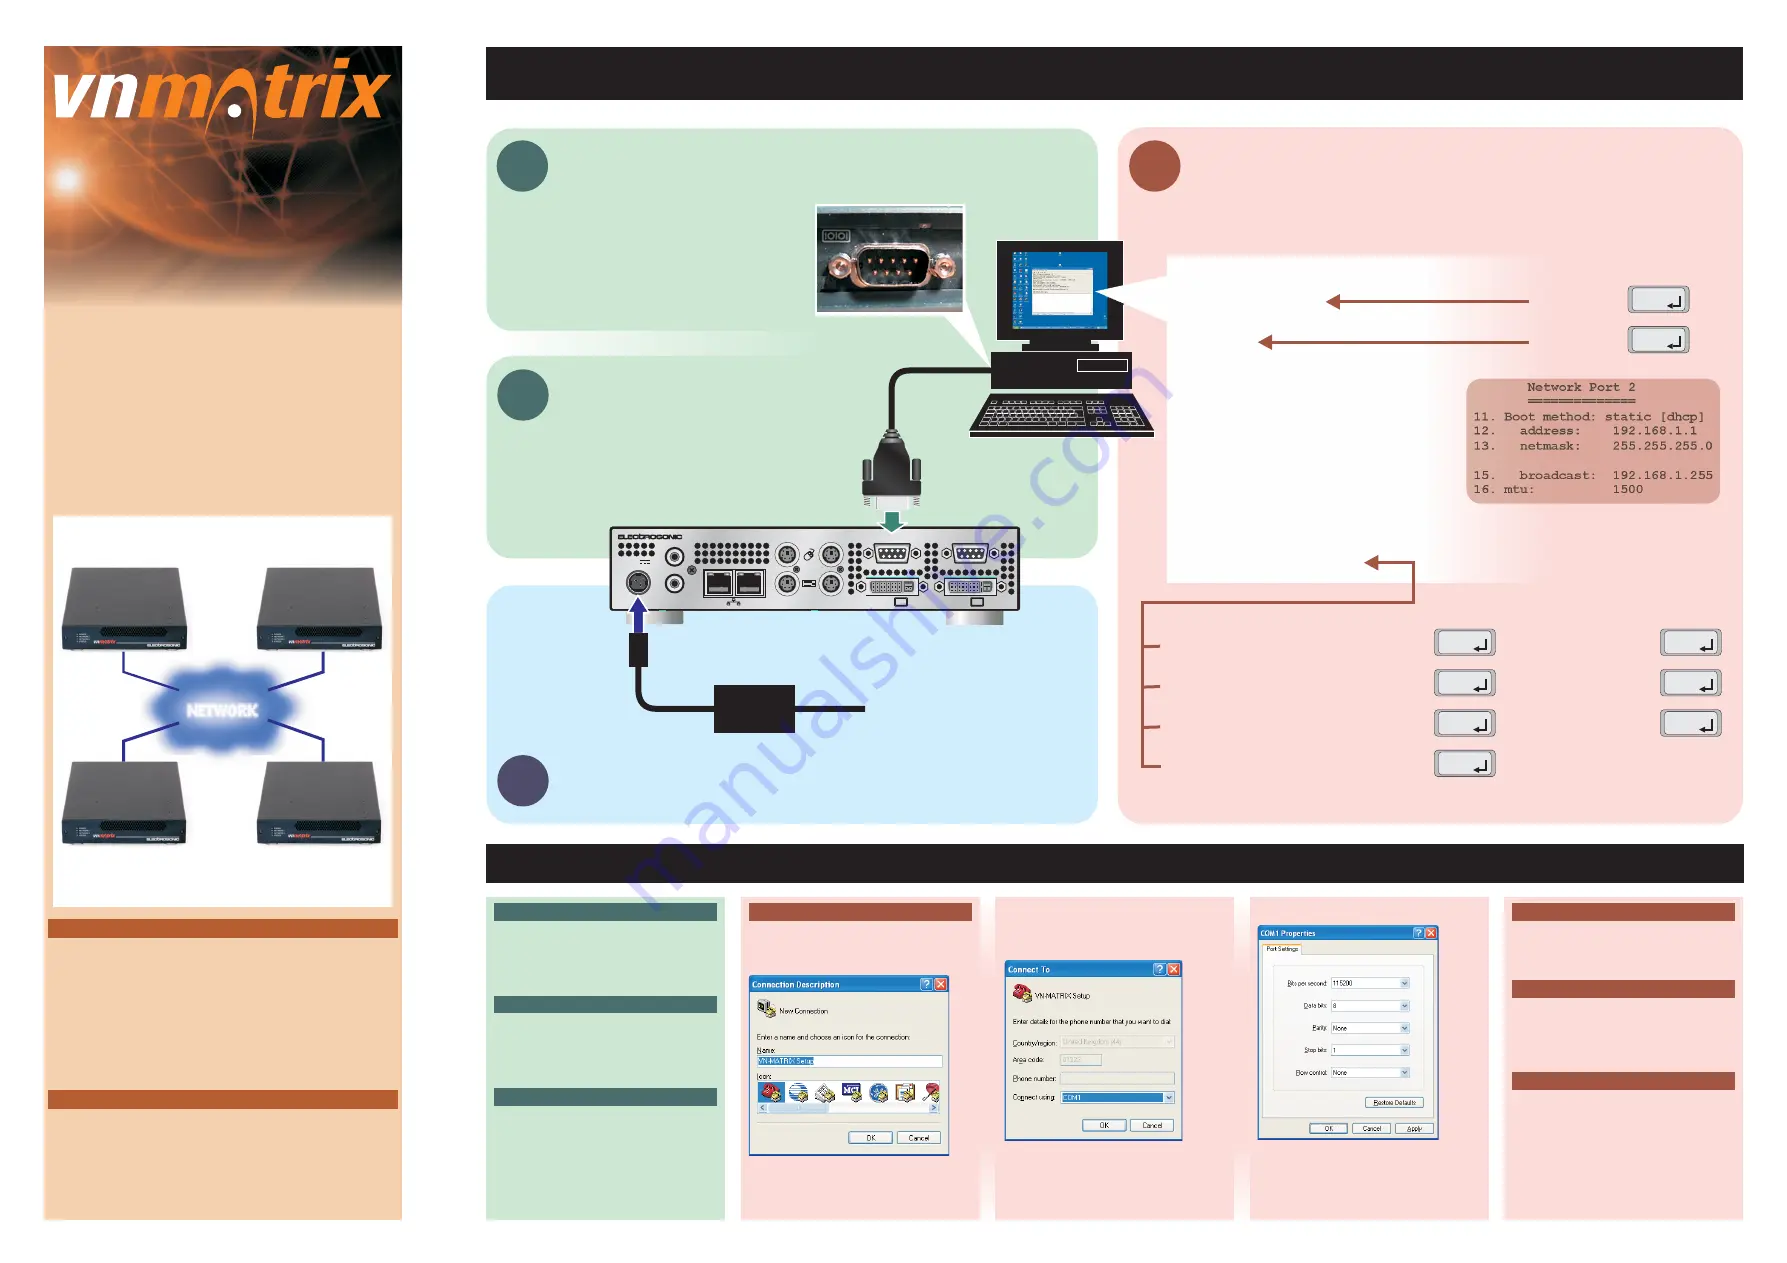
Connect VN-MATRIX to a PC/Laptop
Configure VN-MATRIX Network Settings
In the Hyperterminal Window...
Set the IP Address...
Set the Subnet Mask...
Set the Controller IP Address...
Save all settings and reboot...
Connect the VN-MATRIX Power Supply
1
4
3
Run HyperTerminal™
on the PC/Laptop
Serial / RS-232 Port
(9-pin D-type male)
2
PSU
VN Matrix(R) Maintenance Console: ver3.3c
192.168.0.1 login:
Password:
Network Port 1
Network Port 2
==============
==============
1. Boot method: static [dhcp]
11. Boot method: static [dhcp]
2.
address:
192.168.0.1
12.
address:
192.168.1.1
3.
netmask:
255.255.255.0
13.
netmask:
255.255.255.0
4.
gateway:
192.168.0.1
5.
broadcast:
192.168.0.255
15.
broadcast:
192.168.1.255
6. mtu:
1500
16. mtu:
1500
7. controller ip:
192.168.0.1
8. controller port: 5432
18. webserver port: 80
9. Exit
Please select an option:
config
192.168.0.101
enter
enter
config
enter
enter
2
255.255.255.0
enter
enter
3
192.168.0.101
enter
enter
7
enter
9
Set the
value to show which
serial port on your PC/Laptop is connected
to VN-MATRIX (
COM1):
Click
.
Connect using
OK
e.g.
Change the
as shown below:
Click
. HyperTerminal will now ‘connect’
to VN-MATRIX. When VN-MATRIX powers
up, boot-up data will start to appear in the
Port Settings
OK
HyperTerminal Window.
PC Serial/RS-232 (COM) Port
Serial Cable
Accessing HyperTerminal
(in Windows )
™
This may be designated as either COM1 or
COM2. If no serial port is available but you
have a USB port it will be necessary to use a
USB to Serial adapter.
Belkin F3B207b10)
A suitable cable (
is
supplied with VN-MATRIX. This has a 9-pin
female D-type connector at each end and is
known as a Laplink or Null Modem cable.
Click
.
If this application was not installed with
Windows, either run your Windows
Setup/Installation Disc, or download
Hyperterminal from the Internet.
e.g.
Start - All Programs - Accessories -
Commnunications - Hyperterminal
Configuring HyperTerminal
When you start HyperTerminal the new
connection wizard should open. If not, choose
from the
menu:
Type in a
(
. VN-MATRIX Setup) and
click
.
New Connection
File
Name
OK
e.g
QUICK START GUIDE
NETWORK
IP Address
Subnet Mask
Controller IP
192.168.0.101
255.255.255.0
192.168.0.101
IP Address
Subnet Mask
Controller IP
192.168.0.103
255.255.255.0
192.168.0.101
IP Address
Subnet Mask
Controller IP
192.168.0.102
255.255.255.0
192.168.0.101
IP Address
Subnet Mask
Controller IP
192.168.0.104
255.255.255.0
192.168.0.101
BEFORE connecting each VN-MATRIX to a network you must
change its default network settings.
On an existing network, check with the network administrator
for a range of suitable IP Addresses.
On a ‘closed’ network, used exclusively by VN-MATRIX, we
recommend that you use addresses in the range 192.168.0.1
to 192.168.0.254 with a subnet mask of 255.255.255.0.
The following diagram shows an example addressing scheme
for a simple system comprising four VN-MATRIX units:
+
+
VN-MATRIX Controller
Setup Procedure
One VN-MATRIX device in a group must be designated as the
‘controller’. All system configuration is achieved via a web
interface that is ‘served up’ by the controller.
In the above example, the unit at address 192.168.0.101 is
designated the controller for this group of VN-MATRIX devices.
Note that the
value on each device is set to this
address.
Follow the step-by-step
section for each
VN-MATRIX, then follow the
section (overleaf) to create a simple VN-MATRIX system.
For more detailed information and advanced setup procedures
refer to the full User Guide on the VN-MATRIX System Disc.
Controller IP
Initial Setup
System Connections & Setup
© 2008 Electrosonic Ltd.
Part No. I459GB iss.5
Login Prompt
IP Addresses Format
Controller IP Address
The login prompt should appear once the
boot-up data ends. If it fails to appear as
show above, try pressing the
key.
When typing IP addresses, remember to
include the ‘dots’ between each number, but
do not add any leading zeros. For example,
type
not
The
(option ) must point to the
network address of the VN-MATRIX
‘controller’ device. In the above example
the controller is at 192.168.0.101.
enter
192.168.0.18
192.168.000.018
controller ip
7
PORT 2 IS NOT USED


