Maintenance
g294197
Figure 67
1.
Height of cut plate
3.
Washer
2.
Hairpin cotter
7.
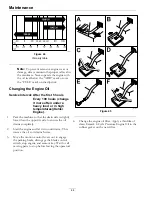
Rotate the height of cut plate to a different hole
so that it supports the weight of the mower deck
after the plate is installed (see Figure 68).
g294195
Figure 68
8.
Install the washer and hairpin cotter (Figure 68).
9.
Repeat steps 6 through 8 for the other side of the
machine.
10.
Check the side-to-side level again; repeat this
procedure until the measurements are correct.
11.
Check the side-to-side adjustments again. Repeat
this procedure until the measurements are correct.
12.
Continue leveling the deck by checking the
front-to-rear blade slope; refer to
Adjusting the
Front-to-Rear Blade Slope
section.
Adjusting the Front-to-Rear Blade
Slope
Check the front-to-rear blade level any time you install
the mower. If the front of the mower is more than
5/16 inch (7.9 mm) lower than the rear of the mower,
adjust the blade level using the following instructions:
1.
Park machine on level ground, move the motion
control levers out to engage the parking brake,
disengage the blade control switch, stop engine,
and remove key and wait for all moving parts to
stop before leaving the operating position.
2.
Set the height of cut lever to middle position.
Note:
Check and adjust the side-to-side blade
level if you have not checked the setting; refer to
Side-to-Side Leveling
.
3.
Carefully rotate the blades so they are facing front
to rear (Figure 69 and Figure 70).
g009658
Figure 69
Mower Deck with 2 Blades
1.
Blades front to rear
2.
Measure from the tip of the blade to the flat surface here
55
Summary of Contents for QUEST 346
Page 1: ...QUEST For Serial Nos 408 644 346 Higher Part No 4505 333 Rev A ...
Page 65: ...Schematics Schematics Electrical Logic Schematic g330623 65 ...
Page 67: ...Notes 67 ...
Page 68: ...Notes 68 ...
Page 69: ...Service Record Date Description of Work Done Service Done By 69 ...
Page 70: ...70 ...

