3.3 Control box
3.3.1 Installation of control box
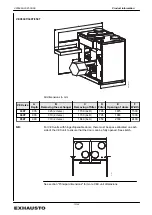
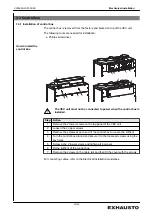
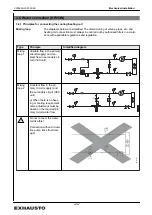
The control box is removed from the factory and placed on top of the VEX unit.
The following tools are needed for installation:
● Phillips screwdriver
How to install the
control box
R
D
14094-01
1
1
2
2
3
3
R
D
14095-01
5
5
5
5
6
7
The VEX unit must not be connected to power when the control box is
installed.
Step Action
1
Remove the 2 lower screws on the top panel of the VEX unit
2
Loosen the 2 upper screws
3
Remove the screws at each end of the control box to loosen the lid/front
4
Turn the control box around and secure it to the loosened screws using the
key holes
5
Screw in the 2 lower screws and tighten all 4 screws
6
Fit the lid/front of the control box
7
Remove the screws on the cable rail and then fit the cover with the screws
For connecting cables, refer to the Electrical Installation Guidelines.
3005993-2021-03-09
Mechanical installation
23/44
Summary of Contents for VEX300 Series
Page 44: ......


