Evolution 026-0007 Original Instructions Manual Download Page 14

14

www.evolutionpowertools.com

WARNING: It is potentially dangerous to install, and try to use 
the Edge Guide with the arm passing through only one (1) of the 
machined rectangular sole plate slots.
Adjust the edge guide so that it is at the required distance from 
the blade and tighten the adjusting screw. 
Check that the edge guide is parallel to the saw blade.

(12) 

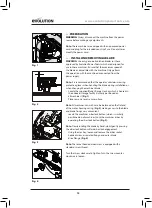
CUTTING DEPTH ADJUSTMENT 

Note:

 All CCS machines share the same general depth 

adjustment fixtures/fittings and employ the same basic 
technique for setting the blade depth.
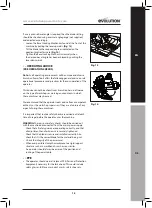
•    Loosen the Depth Adjustment Locking Mechanism by pulling 

the operating lever upwards. (Fig. 10) (CCSL shown. 

  All other models are similar).
•  Adjust/re-position the sole plate to give the required cutting 

depth (the amount by which the blade protrudes through the 
sole plate). 

Note: A depth scale can be found on the depth adjustment 
quadrant, with a corresponding index mark incorporated into 
the adjacent area of the machines upper blade guard. (Fig. 11) 
Using these features can aid rapid setting.

Note: Although the depth scale and index mark are very useful, 
enabling rapid depth setting, using them should always be 
regarded as a guide to the setting achieved. 
If a very precise depth of cut is required, then the blade setting 
should be checked with an engineers precision ruler (not 
supplied) or similar and adjusted accordingly.
•  In most cases the cutting depth should be set at the thickness 

of the material to be cut plus the depth of half of a saw tooth 
(tip of the tooth to the tooth root). (Fig.12) 

•  Tighten the Depth Adjustment Locking Mechanism by 

pushing the operating lever downwards to securely to lock in 
the machine in the required position. 

(13) 

CUTTING ANGLE (BEVEL) ADJUSTMENT

The F165CCSL circular saw has the facility to tilt the blade 
through (up to) 45

0

 to the left hand side.  Bevel cuts are therefore 

possible.


Note: The blade is at the vertical position when the protractor 
scale reads 0

0

.

Note:  A protractor scale (0

0

- 45

0

) is incorporated on the Bevel 

Locking quadrant found at the front of the soleplate. Using this 
will aid rapid bevel angle setting but should be regarded as a 
guide only.

Fig. 9

Fig. 11

Fig. 10

Fig. 12

Summary of Contents for 026-0007

Page 1: ...Original written in UK English Date Published 15 08 2018 Original Instructions bersetzung der Originalbetriebsanleitung Model drawings may differ to item supplied GB2438285 026 0007 026 0008 F165...

Page 2: ...nal Safety Instructions for circular saws Page 10 GETTING STARTED Unpacking Page 10 Items Supplied Page 10 Machine Overview Page 11 Preparation Page 12 Installing Removing a blade Page 12 Parallel Edg...

Page 3: ...organization but Technical help is also available from your supplier 1 3 CONTACT Web www evolutionpowertools com Email customer services evolutionpowertools com 1 4 WARRANTY Congratulations on your pu...

Page 4: ...mm Max Cutting Thickness 90 53mm Max Cutting Thickness 45 34mm BLADE SPECIFICATIONS F165 CCSL Blade Diameter 165mm Number of Teeth 14 Bore Diameter 20mm Kerf 1 7mm SPECIFICATIONS NOISE VIBRATION DATA...

Page 5: ...tion level during operation e g the work surfaces condition and orientation and the type and condition of the machine being used Before each use such factors should be assessed and where possible appr...

Page 6: ...t is a Hand Operated Circular Saw and must only be used as such It must not be modified in any way or used to power any other equipment or drive any other accessories other than those mentioned in thi...

Page 7: ...ols to rain or wet conditions Water entering a power tool will increase the risk of electric shock d Do not abuse the cord Never use the cord for carrying pulling or unplugging the power tool Keep cor...

Page 8: ...use Many accidents are caused by poorly maintained power tools f Keep cutting tools sharp and clean Properly maintained cutting tools with sharp cutting edges are less likely to bind and are easier t...

Page 9: ...igned saw blade causing an uncontrolled saw to lift up and out of the workpiece toward the operator When the blade is pinched or jammed tightly by the kerf closing down the blade stalls and the motor...

Page 10: ...spect the machine and the blade before each use Do not use deformed cracked worn or otherwise damaged blades c Never use the saw without the original guard protection system Do not lock the moving gua...

Page 11: ...OWER BLADE GUARD 5 PARALLEL EDGE GUIDE 6 ERGONOMIC FRONT HANDLE 7 CARBON BRUSHES 8 ALLEN KEY BLADE CHANGE 9 DEPTH ADJUSTMENT LOCKING LEVER 10 DEPTH SCALE 11 REAR HANDLE INCORPORATING SAFETY START ON O...

Page 12: ...hen changing the machines blade Locate the supplied Blade Change Hex Key which is housed in the onboard storage facility similarly positioned on all machines Fig 1 Place saw on a level secure surface...

Page 13: ...ecially machined bore which incorporates two opposed flats Fig 7 These flats engage with two complimentary flats machined into the machines arbor shaft Re engage the arbor lock and tighten the arbor s...

Page 14: ...11 Using these features can aid rapid setting Note Although the depth scale and index mark are very useful enabling rapid depth setting using them should always be regarded as a guide to the setting a...

Page 15: ...which these machines may be used We recommend that the operator seeks advice from a competent authority or the workshop supervisor if they are at unsure of any aspect of using these machines It is im...

Page 16: ...nt authorities and seek additional guidance if Asbestos contamination is suspected 16 ON OFF TRIGGER SWITCH Note All the CCS family of circular saws are equipped with a safety start trigger switch to...

Page 17: ...e that the operators hand or fingers do not touch any part of the machines blade When a cut has been completed Release the ON OFF Trigger switch Allow the blade to come to a complete stop Remove the m...

Page 18: ...bed in fully 20 GENERAL MAINTENANCE CLEANING Note All maintenance must be carried out with the machine switched off and disconnected from the power supply Check that all safety features and guards are...

Page 19: ...RoHS Directive 2012 19 EU The Waste Electrical and Electronic Equipment WEEE Directive And is in conformity with the applicable requirements of the following documents EN 62841 1 2015 EN62841 2 5 2015...

Page 20: ...k Industrial Estate Sheffield S20 3FR 44 0 114 251 1022 US Evolution Power Tools LLC 8363 Research Drive Davenport Iowa 52806 1 866 EVO TOOL EU Evolution Power Tools SAS 61 Avenue Lafontaine 33560 Car...

Reviews: