background image

  Introduction to the VoIP²ALL Gateway 


VoIP²ALL 8 - 16 - 24 Channel Gateway User Guide 
www.eurotech-communication.com


SIM Server

 - A VoIP²ALL series unit with a SIM Server program containing SIM cards and no 

cellular cards. 


Internal SIM Server

 - A SIM Server program that runs on a Gateway, allowing access to SIM cards 

in the Gateway. 


External SIM Server

 - A SIM Server program that runs on an external SIM Server, or another 

Gateway, allowing access to SIM cards in the external SIM Server. 


Master card 

- A card that controls the operation of the VoIP²ALL, containing a DSP processor with 

a Linux based operating system. 


Port (ch)

- A port is single channel that can send call(s).  


Cellular Card (Slave card)

 - A card with cellular ports (modules). 


SIM Server Card

 - A SIM Server card that has 32 SIM sockets, which is located in a SIM Server or 

Gateway. 


VoIP 

- A protocol for transmitting voice calls on Ethernet networks. 


SIP 

- A protocol for registering VoIP clients and making VoIP calls. 


SIP Server

 - A virtual PBX that can register and connect SIP phones. 


SIP Account

 - A user name and password which is given to register a SIP phone. 


SIP Registration

 - The process of the initial connection of the SIP account to the SIP Server. 


Authorization

 - SIP registration with username and password 


SIP Client

 - A SIP phone that is registered in a SIP Server. 


Internal SIP Server

 - The SIP Server that is built into the Gateway. 


SIM Registration

 - The activation of the SIM in a cellular network. The SIM must be registered to 

make calls. 


Local SIM

 - A SIM on a cellular card. 


Virtual SIM

 - A SIM from a SIM Server. 


Summary of Contents for VOIP ALL SERIES

Page 1: ...VOIP ALL SERIES 8 16 24 Channel Gateway User Guide Version 5 36z ...

Page 2: ...er 16 3 1 6 Basic System Test 16 3 1 7 What s Next 17 4 ADVANCED CONFIGURATION 19 4 1 Advanced SIM Configurations 19 4 1 1 Registering the Local SIM in the Cellular Network Automatically 21 4 1 2 Assigning a Local SIM to Work by Time Table 21 4 1 3 Assigning a Local SIM to Work for a Limited Calling Time 22 4 2 Configuring the Internal SIP Server 24 4 3 Users List 25 4 4 Call Handling 26 4 4 1 Han...

Page 3: ... the Password 53 4 8 6 Resetting the Gateway 54 4 9 Configuring Special Features 54 4 9 1 Network Announcement Message Detection 54 4 9 2 Port Test Calls 55 4 9 3 Source Routing 55 4 9 4 IVR 56 4 9 5 Callback 58 4 9 6 DISA Direct Inward Access System 58 4 9 7 BCCH Configuration 59 4 9 8 Sending and Receiving SMS 61 5 MONITORING CALLS 63 5 1 Port Monitor 63 5 2 Call Monitor 64 5 3 CDR Call Detail R...

Page 4: ...ts and personal service for all of our customers 1 1 THE VOIP ALL GATEWAY SOLUTION OVERVIEW The 8 16 24 Channel 1U VoIP ALL Gateway or VoIP ALL for short can connect VoIP calls to cellular networks CDMA GSM UMTS The VoIP ALL contains a SIP Server that can register up to 32 VoIP clients and connect each of these VoIP clients to the cellular network directly therefore completely bypassing the local ...

Page 5: ...ny of the SIMs in the SIM Servers at any given time 1 2 ABOUT THIS MANUAL This manual is for use with the VoIP ALL 8 16 24 channel Gateway Our VoIP stand alone unit product range is 2ch For SOHO and SMB S 4ch corporate 8ch enterprise 16ch 24 32ch Enterprise and heavy duty traffic All of the above units are compatible for use in our SIM Server System 1 3 TERMINOLOGY The following is a list of impor...

Page 6: ...Slave card A card with cellular ports modules SIM Server Card A SIM Server card that has 32 SIM sockets which is located in a SIM Server or Gateway VoIP A protocol for transmitting voice calls on Ethernet networks SIP A protocol for registering VoIP clients and making VoIP calls SIP Server A virtual PBX that can register and connect SIP phones SIP Account A user name and password which is given to...

Page 7: ...tion using the CD provided see Software Installation on page 10 5 Power up the Gateway 6 Perform basic setup see Basic System Setup on page 12 7 Make basic system configurations see Basic Configuration on page 14 8 Test the Gateway Basic System Test on page 16 9 Optional Make advanced system configurations see Advanced Configuration on page 19 2 2 CHECK THE PACKAGE ITEMS Make sure that your packag...

Page 8: ...r ports Each port has one Local SIM Each card has one antenna connection for all 4 ports SIM Server Card In units with an internal SIM Server optional there are two additional cards on the right side of the cellular cards Each card contains 32 SIM sockets All the SIM Server cards are hot swappable Front Panel Back Panel 2 3 2 SIMINSTALLATION The following sections describe how to install and remov...

Page 9: ...the SIM until you hear a click 3 Pull the SIM from the socket completely Important Do not leave the SIM half way in or out This will disable the port from loading SIMs from the SIM Server 2 3 2 3 INSTALLING SIMS IN THE INTERNAL SIM SERVER OPTIONAL Each SIM Server card has 32 SIM chambers which are marked from 1 to 32 To install a SIM in the internal SIM Server 1 Extract the SIM Server card by hold...

Page 10: ...way LAN cable The LAN cable is used to connect the system to the internet network For 8 and 16 channel Connect the LAN cable to the RJ 45 marked LAN of ST1 For 24 channel Connect both LAN cables to the RJ 45s marked LAN of ST1 and ST2 Antennas Connect antenna cable for each cellular card Position the antennas at least 40 centimeters apart and more than 1 5 meters from the Gateway Power Supply Cabl...

Page 11: ...te to the installation CD drive 3 Double click setup exe 4 Click Next The Destination Folder appears 5 Select the destination folder by clicking Change and navigating to the destination 6 Click Next 7 Click Install The VoIP ALL Management application begins installation You will be prompted when the installation is complete 8 Click Finish and remove the CD Note If the VoIP ALL icon appears on the ...

Page 12: ...onnecting to the Gateway on page 12 Setting the Clock on page 13 Changing the Gateway s IP Address on page 14 3 1 1 CONNECTINGTOTHEGATEWAY To connect to the Gateway 1 On the Main Toolbar click Connect The Selected Connection window appears 2 In Host address enter the IP Address of the VoIP ALL Gateway The default 10 16 2 245 Note If you can t remember the IP Address of the Gateway see Appendix A W...

Page 13: ...ck System and select the Setting tab The following window appears 2 In Date define the required date 3 In Time define the local time 4 In Date Format select the format in which the date is displayed e g Day Month Year or Year Month Day 5 Optional Click Automatically Set the Gateway Time on Connection to synchronize time with the PC on connection 6 Optional Click Keep Alive the Gateway Connection t...

Page 14: ... is restarted 4 On the Main Toolbar click System and select the Setting tab 5 Click Reset system to restart the Gateway 6 After 30 seconds you can reconnect with the new IP address 3 1 4 BASICCONFIGURATION This section includes the following basic configurations SIM Configuration on page 14 SIP Configuration on page 15 Prefix Configuration Call Handling on page 15 LAN Configuration on page 16 3 1 ...

Page 15: ...be a VoIP phone External SIP Server IP PBX Soft switch By default the internal SIP Server works without authentication You can register without a password and choose any user name The user name must be a number To configure YOUR SIP to send calls to the Gateway without registration 1 Open YOUR SIP Configuration in the external SIP Server or IP PBX 2 Configure your SIP to send calls to the Gateway ...

Page 16: ...move from the beginning of the dialed number Add Prefix Enter the digits to be added at the beginning of the number 2 Click Save 3 1 4 4 LAN CONFIGURATION When the Gateway is working behind NAT or a Firewall you must make sure that the ports of the Gateway are accessible from the public IP to the Gateway local IP The following ports need to be forwarded to the Gateway Port 2007 to make connection ...

Page 17: ...e is no audio Check that the ports are forwarded to the Gateway specifically port 5060 to 6066 Check the audio directly with a SIP phone by bypassing the IP PBX Testing a port with a VoIP phone Perform the following test to ensure that your audio is functional by bypassing the public IP To register a VoIP phone in the Gateway 1 Open the VoIP phone configuration 2 Configure the VoIP phone according...

Page 18: ...Channel Gateway User Guide www eurotech communication com 18 Advanced Configuration on page 19 Configuring the SIM Server on page 31 Modifying System Settings on page 50 Configuring Special Features on page 54 Monitoring Calls on page 63 ...

Page 19: ...ANCED SIM CONFIGURATIONS For each cellular port there is a Local SIM Each port s SIM can work only with that cellular port There are two basic modes of working with the Local SIM Active by Default The Local SIM will register in the cellular network automatically when inserted Work by Time Table The Local SIM will register in the cellular network only when preset in the Time Table For details see A...

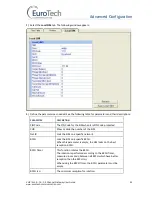
Page 20: ...SIM when it is PIN Code protected CLIR Show or Hide the number of the SIM Net ID Lock the SIM on a specific network BCCH Lock the SIM on a specific BCCH When this parameter is empty the SIM locks on the best reception BCCH BCCH Timer This function rotates the BCCH The rotation is performed according to the BCCH Timer measured in seconds between all BCCH which have better reception than the BCCH rs...

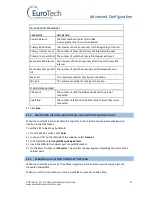
Page 21: ...n STATISTICS READ ONLY Call Count The number of calls the SIM made the last time it was connected Call failed The number of failed calls the SIM made the last time it was connected 5 Click Save 4 1 1 REGISTERINGTHE LOCALSIMINTHECELLULARNETWORKAUTOMATICALLY When the Local SIM is active by default it registers in the cellular network automatically when inserted in the SIM socket To set the SIM to be...

Page 22: ... next SIM on the list Manual This gives you the option of manually connecting a SIM immediately This is recommended for temporary use only generally by support in the debug process 8 In the Time Table define the hour and day for the Local SIM to register In the time slot you can see the information of the SIM in this format L1 9 Click Save 10 Insert the SIMs to the cellular ports Local SIM sockets...

Page 23: ...nt definition Therefore the charge calculation is 2 intervals of 2 units per interval 4 units The remainder of the call takes 3 intervals of the Secondary Bill Interval for 59 secs Therefore the charge calculation is 3 intervals of 1 unit per interval 3 units The total amount of units for this call will be 4 3 7 units Current Balance The Current Balance is the number of units the SIM has left to u...

Page 24: ... External SIP Server IP PBX Softswitch The internal SIP Server can work with or without authentication When working with authentication the SIP account must be entered into the Users list To configure the SIP Server 1 On the Main Toolbar click VoIP 2 Select the SIP tab 3 In the Internal SIP Settings section of the window define the following parameters SIP Port The TCP port of the SIP Server The d...

Page 25: ... 6 At the bottom of the window enter account details in the following fields First and Last Name the chosen name for this user VoIP Num the chosen extension number for this user Secret the chosen authentication password for this user ID must be a unique number The remaining parameters are not relevant and should be set to 0 7 Open the configuration page of your SIP phone 8 Configure the registrati...

Page 26: ...a user 1 On the Main Toolbar click Users 2 Locate the user on the User details list 3 Click Delete at the end of the user row in the list 4 Click Yes to confirm the deletion To find a user in the list 1 On the Main Toolbar click Users 2 In Search Field select the value type to search by 3 In Search enter the value to search by 4 Click Search The list displays all the users that match the search cr...

Page 27: ...tes a prefix group of these ports and divides calls with this prefix amongst the group Note To connect properly with the FXO port to the PSTN you must first configure the Tone Settings to match the PSTN network you are using See Tone Settings on page 51 To manage call prefixes 1 From the Main Toolbar click Ports 2 Select a port from the list on the left 3 Select the Prefixes tab A prefix table for...

Page 28: ...fault From Alerting the called party Early From Ringing of the called party Normal From Connect of the called party 1 Press Save 4 4 2 HANDLINGINCOMINGCALLS To handle incoming calls 1 From the Main Toolbar click Ports 2 Select a port from the list on the left 3 Select the Prefixes tab A prefix table for the selected port is displayed 4 In Incoming Calls Handle select the operation mode for each po...

Page 29: ... IP PBX or SIP Server see SIP Configuration on page 15 Receiving calls from a SIP phone that is registered in the internal SIP Server see Configuring the Internal SIP Server on page 24 4 5 1 IPRESTRICTIONS You can define the range of SIP IP addresses which the Gateway is allowed to receive calls from When the IP address is restricted all the messages from that IP will be blocked You will not be ab...

Page 30: ...st first define a Host in the Gateway A Host is the SIP account which the Gateway sends the call to To add a Host 1 Receive a SIP account from the external SIP Server 2 On the Main Toolbar click VoIP 3 Select the SIP tab 4 In the External SIP Registration section of the window enter the following details in the Hosts table Name define a name for this host connection IP Address the SIP Server IP ad...

Page 31: ... Configuration on page 14 you send calls to that SIP phone Each SIP phone remains registered in the internal SIP Server for one hour The following is an example of how to call a SIP phone 1 On the Main Toolbar click Ports 2 From the ports list select the VoIP The VoIP prefixes appear in the table The default prefix is 9 In the Remove Prefix the default is 1 3 Define the prefix according to your ne...

Page 32: ...ttings on page 34 Assigning a SIM to Work in the Gateway on page 37 Blocking SIMs on page 42 Checking SIM balance on page 43 Monitoring the Balance of SIM on page 45 Recharging SIM balance on page 45 Configuring Test Call Profile on page 48 Configuring Test SMS on page 49 4 7 1 CONNECTINGTHEGUI MANAGEMENT To connect the GUI Management to a SIM Server 1 On the Main Toolbar click Virtual Sim 2 Selec...

Page 33: ...e www eurotech communication com 33 6 Click Synchronization In the SIM Servers Setting list all of the SIMs from the SIM Servers are displayed 4 7 2 DEFININGTHEGENERALSETTINGS In the General section at the top of the list the general settings of the SIM server appear ...

Page 34: ...en The default is 0 Initial Current Balance The Current Balance of a new SIM is set to this amount VPN IP Address Currently not in use VPN Enable Currently not in use 3 Click Save Setting 4 7 3 DEFINING SIMSETTINGS The SIM Servers Setting list displays all of the SIMs in the SIM Server The list is arranged according SIM Server cards and the SIMs from 1 to 32 according to their location on the card...

Page 35: ...s SIM made last time he was connected Call failed The amount of consecutive failed calls this SIM made last time he was connected Last Recharge Day Currently not in use Last Recharge Month Currently not in use Last Recharge GW Currently not in use Call Count The total number of calls executed Call Fail The number of calls that failed Blocked Cause Indicates if the SIM is blocked and what is the bl...

Page 36: ... Toolbar click Virtual SIM 2 Select the Profile tab 3 In Server Profiles Selection select a profile from the list 0 9 4 Define the following parameters PARAMETER DESCRIPTION Index The number of the profile view only Name The name of the profile MCC This locks the country code of the SIM cellular network The default is 0 which disables the lock MNC This locks the network code of the SIM cellular ne...

Page 37: ...5 In the Profile parameter select a number from the profile list you want to assign to this SIM 6 Click Save Setting 7 Click Save 4 7 4 ASSIGNINGASIMTOWORKINTHEGATEWAY After configuring the SIM parameters define when and in which port the SIM will work There are two methods for determining when the SIM will work Time Table The SIM is replaced at the end of its defined time in the Time Table In thi...

Page 38: ...ed when they end their defined calling minutes In this mode you define a list of SIMs in the table For each SIM in the list you define the amount of calling units to be used Each SIM will work for the defined calling minutes and then be replaced with the next SIM on the list Manual This gives you the option of manually connecting a SIM immediately This is recommended for temporary use only general...

Page 39: ...in the figure above At the beginning of the call the Gateway counts the units according to the Primary bill interval The number of units for each interval are defined in Primary Cost per billing interval This Primary bill interval is repeated according to the number of times defined in Primary Interval Count The rest of the call uses the Secondary Bill Interval For example For a call of 1 minute a...

Page 40: ...culation 7 Click next to Billing 8 Define the following parameters Primary Bill Interval Primary Interval Count Primary Cost per Bill Int Secondary Bill Interval Secondary Cost per Bill Int 9 Click Save 10 Assign the profile to a SIM See Assigning a Profile to a SIM on page 37 11 Define the Current Balance 12 Click Save Card 13 Define the Call Duration list To define the Call Duration SIM list 1 O...

Page 41: ... SIMS in Call Duration every few calls In Call Duration mode you can define the port to swap the SIM every few calls before reaching the daily limit Each time the SIM is activated the Gateway selects a random number within the range defined in the Max and Min Call Count parameters This is the amount of calls the SIM makes during its activation time before being replaced by the next SIM on the list...

Page 42: ...5 BLOCKINGSIMS The VoIP ALL has a SIM blocking feature to decrease the number of unsuccessful calls from a SIM When the SIM is marked Blocked in the SIM Server it is unregistered from the port in the Gateway and cannot be used until you manually unblock the SIM This improves the ASR by blocking SIMs that have a low call success rate Note This feature is only available when using Call Duration mode...

Page 43: ...k Save To block a SIM manually 1 On the Main Toolbar click Virtual SIM 2 Select SIM Servers tab 3 Click Synchronization 4 Click the next to the Card 5 In Block Options click Block 6 Click Save Card The SIM is blocked when it is finished working i e either at the end of a defined Time Table or when the port is reset To unblock a SIM 1 On the Main Toolbar click Virtual SIM 2 Select SIM Servers tab 3...

Page 44: ...lude USSD SMS DTMF SC Number The number to send the balance request Not relevant with USSD Message The balance request message Activation Type Automatically send the balance request There are three options SIM Activation The balance request is sent one time after the SIM has registered in the cellular network Calls The balance request is sent every time the number of calls that is defined in Activ...

Page 45: ...e Synchronize multiplier The answer is multiplied by the number defined in this parameter The Current Balance is updated with the multiplied answer This converts the currency amounts to defined unit amounts For example If 1 5 billing intervals and 1 billing intervals 1 unit define the multiplier as 5 then an answer of 2 will equal 10 units 1 Click Save 4 7 7 MONITORINGTHEBALANCEOFSIM When the SIM ...

Page 46: ...ameters in the following table PARAMETER DESCRIPTION Type The method of sending the recharge request Options include USSD SMS DTMF SC Number The number to send the balance request Not relevant with USSD Message The recharge request message The recharge message is in this format msg s msg the recharge message s the place to insert the voucher number See below The Gateway takes the first unused vouc...

Page 47: ... defined for each cellular network Each voucher contains the recharge key code and the status of the voucher Key Code The recharge key for this voucher is usually printed on the voucher card Status The current status of the voucher 0 Not used 1 Currently in use 2 Used successfully 3 Used unsuccessfully The following is an example of a DTMF voucher number 0123456 p01234 P In this example the rechar...

Page 48: ... MNC field select the network code of the profile In the list at the left the current vouchers for this cellular network are displayed 5 Click Load From File 6 Select the txt file you created The number of vouchers in the file appears in Count to Load In the Vouchers list on the left the vouchers are listed as New Card 7 Click Save 4 7 9 CONFIGURINGTESTCALLPROFILE Test Call is a function to random...

Page 49: ...t Start time the port that uses this SIM will send SMS randomly to one of the numbers in the Test SMS profile using one of predefined messages To configure Test SMS profile 1 On the Main Toolbar click Virtual SIM 2 Select SIM Servers tab 3 Click Synchronization 4 Select the Test SMS tab 5 In the Server field select an index profile 6 Click Add Number In the Test SMS Profile list Destination not Sa...

Page 50: ...efine the following parameters IP Address The IP address of the Gateway By default it is 10 16 2 245 Default Gateway This parameter must be configured when working behind NAT so that the Gateway can access the WAN Subnet Mask This parameter must be configured when working behind NAT Port IP port of the VoIP ALL This is used for connecting to the PC management software Default setting it is 2007 DN...

Page 51: ...annel Last Digit Timeout The time in seconds the VoIP ALL waits to call the number after the last digit dialed No Reply Timeout The number of seconds without an answer that the Gateway waits before determining no answer DISA The number of seconds each DISA number stays in the memory Restart Call When enabled consecutive VoIP calls are allowed Before the end of a call from the cellular to VoIP pres...

Page 52: ...e list 5 Click to the left of Dial Tone to open the Dial Tone settings of the country 6 For each parameter enter the country s PSTN settings 7 Repeat step 5 and 6 for Disconnect Tone and Ringing Tone 8 Press Save To change the current country 1 In the Tone Settings tab in Current Country select a country from the list 2 Press Save Note You must restart the Gateway to activate the settings To remov...

Page 53: ... each GSM click the blank area on the right side of the tone bar in the grey area A slider appears 4 Adjust the slider to the desired level from 30dbm to 30 dbm 5 Repeat these steps for each port you require 6 Click Save 4 8 5 CHANGINGTHE PASSWORD A password is required to connect the Gateway to the PC software By default the password is admin To change the password 1 From the Main Toolbar click S...

Page 54: ... advanced feature is designed to block cellular network messages The cellular network answers a call with a message faster than a mobile phone When enabled if the Gateway detects that the call was answered below the Connection Time it disconnects the call After a number of consecutive detections defined in Number of detection it blocks the SIM See Blocking SIMs on page 42 Note This feature works o...

Page 55: ...is range Start Time The time to start the calls End Time The time to stop the calls 7 Click Save Settings 8 Click Active to start the Test Calls 9 To stop Test Calls click Stop 4 9 3 SOURCE ROUTING Using the Source Routing feature you can direct calls according to their calling number or IP address from where the call originated rather than the destination of the calls i e the prefix of the dialed...

Page 56: ...range for the routed calls 5 Select the ports to route the calls by clicking the check boxes in the row 6 Click the Active check box to enable the routing 7 Click Save 4 9 4 IVR Using the IVR feature you can record voice messages and direct calls by the dialed digits DTMF according to a defined list When calling the SIM of a GSM port that is in IVR mode you will hear the IVR message followed with ...

Page 57: ... recording b Type select either Quick Call hear the IVR message only Choose Call hear the IVR message and choose the extension with DTMF from the list a Default Number The default extension number when the requested extension does not exist b Record Number The number to dial to record the IVR message c Test Number The number to dial to hear the IVR message 1 In IVR Values list the digits to be dia...

Page 58: ...e user you want to work in Callback mode 3 In the Capabilities parameter for the selected user enter 8 to enable the Callback Note The Gateway makes a callback to the user s cellular number Verify that the prefix of this number is defined in the prefix table and the Remove Prefix box is 0 4 Click Update To use Callback 1 Call the Gateway from the user s cellular number The Gateway recognizes the c...

Page 59: ...llular number of the user When the call is made the Gateway starts counting the DISA timer 2 During the active time of the DISA timer the user can directly access the SIP extension by dialing 4 9 7 BCCHCONFIGURATION Using the BCCH feature you can lock a SIM to use a specific BCCH or rotate the BCCH the SIM is using You can configure the BCCH lock for Local SIM SIM Server To monitor the BCCH cells ...

Page 60: ... the BCCH with the highest reception level BCCH timer When defined the BCCH is rotated according to this amount of time BCCH rssi When rotating the BCCH the port randomly chooses only BCCH with a higher reception level than the rssi definition Note If the BCCH rssi is defined below 100 db the SIM may not be able to register 5 Click Save Local SIM 6 To apply the changes reset the port To configure ...

Page 61: ...The Port Control window appears 3 Click Send SMS USSD tab The following window appears 4 In Format select the format of the SMS 5 When writing in a language from right to left click the Right to Left box 6 In Message enter the SMS message 7 Click Font to select a different font 8 Click Save to save the SMS 9 In Phone Number enter the number to send the message The SMSC Number of the SIM appears au...

Page 62: ...the cellular network an envelope icon appears in the monitor To see the messages 1 In the Port Control window select the SMS USSD Inbox tab 2 Click Delete to delete the messages 3 Click Font to select a different font 4 To save the messages click Save to file Note SMS messages are only saved while the PC software is connected to the Gateway ...

Page 63: ...g to the type of the Gateway The following shows a 2 channel Gateway The following information appears SIM indicator the color indicates the status of the SIM Net indicator the color indicates the status of the SIM registration in the cellular network The Net and SIM color indicators Red indicates there is no connection Yellow indicates there is a connection but no data transfer Green indicates tr...

Page 64: ...formation appears Status of the port The IMSI number of the SIM that is registered in the port The IMEI number of the port 5 2 CALL MONITOR When you are calling from or to a SIP the call appears in the Call Monitor window You can see all the information on this call and have the option of disconnecting it To View active VoIP calls 1 On the Main Toolbar click Ports 2 Select the Call Monitor tab The...

Page 65: ... Called The number that was called User Name Port The User name IP address and port of the VoIP RTP Port The port that the Gateway sends the RTP packets to Codec The voice CODEC the call is made with 1 Optional Disconnect a call by clicking Disconnect in the call s row 5 3 CDR CALL DETAIL REPORTING The Gateway records the call information of the last 100 calls The call records CDR in short are kep...

Page 66: ... the records from the Gateway and clears them from the Gateway memory The Call Report window displays the following information Start Time The time the call was initiated Connect Time The time the call was connected End Time The time the call was disconnected Orig Port The port that initiated the call Dest Port The port that the call went to Rel Cause The disconnection code Calling Number The numb...

Page 67: ...the format Day Month Year Hour Minutes Seconds 1 Optional Click Clear to clear the CDR window To manually export the CDR records to file 1 In Export to select the desired export format by clicking Access CSV or XML 2 Define the location to save the file 3 Click Save To automatically save and clear the records to files 1 In Path select the location you want the CDR files to be saved 2 In Format sel...

Page 68: ...t LAN Access on page 72 6 1 APPENDIX A WORKING WITH COM PORT The Com Port connection gives you direct access to the Gateway processor The primary use is to see the IP address in the Gateway This can help when the user has forgotten the address Com Port is generally used for debugging and support related issues To connect the COM USB Port 1 Connect the Com Cable from the Gateway to the PC RS232 COM...

Page 69: ...8 16 24 Channel Gateway User Guide www eurotech communication com 69 5 In the Connect To tab click Configure The Port Setting should be 6 Click OK 7 Select the Settings tab 8 Click ASCII Setup The ASCII settings should be ...

Page 70: ... command ifconfig and click Enter The following window appears The IP Address of the Gateway is marked in a red circle 6 2 APPENDIX B SENDING USSD UNSTRUCTURED SUPPLEMENTARY SERVICE DATA COMMANDS IN THE DEBUG SCREEN The VoIP ALL allows you to send and receive USSD commands from the Debug screen This option is used to check and recharge balances with USSD commands To send USSD commands from the Deb...

Page 71: ...3 13 Port11 33 Port4 14 Port12 34 Port5 21 Port13 41 Port6 22 Port14 42 Port7 23 Port15 43 Port8 24 Port16 44 1 Click Send The reply from the network appears in the Debug screen The reply format is A_USDXY Z COMMAND Message X The number of the cellular card from 1 to 4 Y The number of the module in the card from 1 to 4 Z The number of the SIM 1 is Local SIM 2 is SIM Server SIM COMMAND is the USSD ...

Page 72: ... Subnet you must define an IP in the same Subnet which enables you to connect to the Gateway with the PC software and define the permanent IP There are two options to connect to the Gateway Connecting directly with a TCP IP Cross Cable Connecting through an IP Switch To connect using a TCP IP Cross Cable 1 Connect a TCP IP Cross Cable from the Gateway LAN to the PC Net Card 2 In Windows click Star...

Page 73: ...Appendices VoIP ALL 8 16 24 Channel Gateway User Guide www eurotech communication com 73 6 Select Internet Protocol TCP IP and click Properties ...

Page 74: ...wing IP Address 8 In the IP Address field enter 10 16 2 244 This is the new IP address of the PC The Subnet Mask is filed automatically 9 Click OK 10 Close the Local Area Connection window To connect through an IP Switch 1 Connect a net cable from the Gateway LAN to the PC Net Card 2 In Windows click Start and select Settings 3 Select Network Connections 4 Select the network card in which the PC i...

Page 75: ...Appendices VoIP ALL 8 16 24 Channel Gateway User Guide www eurotech communication com 75 6 Select Internet Protocol TCP IP and click Properties ...

Page 76: ...Appendices VoIP ALL 8 16 24 Channel Gateway User Guide www eurotech communication com 76 Here you see the IP settings in which the Gateway is connected to the Local network ...

Page 77: ...om 77 7 Click Advanced 8 In IP Addresses click Add 9 In the window that appears enter 10 16 2 244 This adds a new IP address to the PC The Subnet Mask is filed automatically 10 Click Add 11 Click OK 12 In the Internet Protocols window click OK 13 Close the Local Area Connection window ...

Reviews: