background image

www.euroboor.com 

16 


3. Preparation & adjustment


3.1 Assembly 


WARNING:


To reduce the risk of injury, turn machine off and disconnect from power source 

before installing and removing accessories, before adjusting or changing set- ups or when 

making repairs. An accidental start-up can cause injury. 


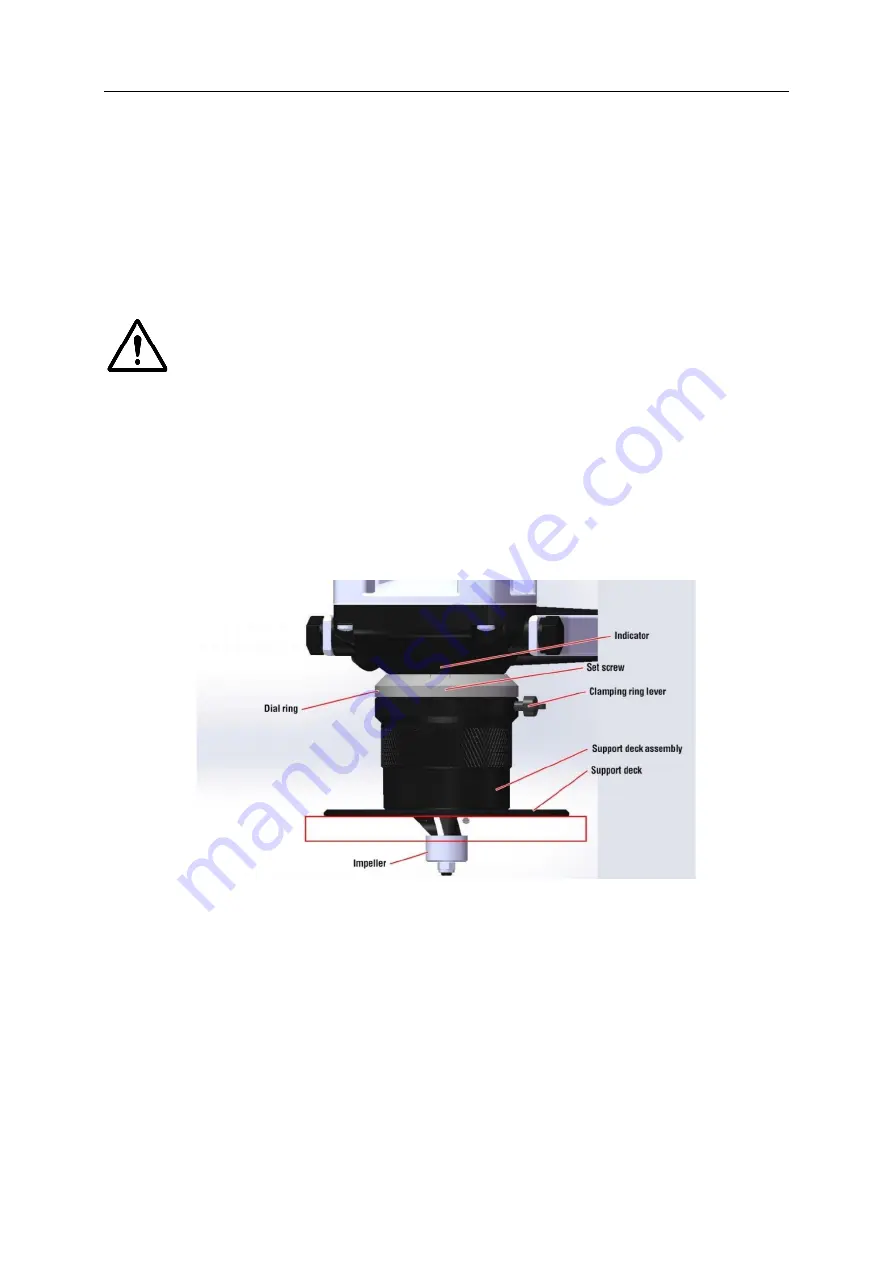
Setting bevel depth at zero position  

The machine’

s bevel depth is set and delivered at position zero. If the setting is disturbed, the zero 

position has to be set again. 


[image 2-1] 


1.


Loosen the clamping ring lever. 

2.


Loosen the support deck assembly until the inserts are below flush level. Keep a steel ruler 
square on both the impeller and the support deck. 

3.


Slowly adjust the support deck until it touches the cutting plate. This is the zero position. 

4.


Lock the clamping ring lever. 

5.


Untighten the set screw in the dial ring. 

6.


Rotate the dial ring until the zero matches the indicator on the machine. 

7.


Retighten the set screw in the dial ring. 


Summary of Contents for B45S

Page 1: ...User manual V1 3 EN January 2022 Beveling machine B45S ...

Page 2: ...ve portable tools that add value for our customers and facilitate them in their daily work We never lose sight of sustainability time savings and cost savings Enjoy your new machine Before operating your Beveling machine please read all instructions first These include the Operators Manual and warning label on the unit itself With proper use car and maintenance your model will provide you with yea...

Page 3: ...tment 16 3 1 Assembly 16 3 2 Prior to use 18 4 Using the machine 19 4 1 Starting and stopping 19 4 2 Working with the machine 21 5 Maintenance 22 5 1 Changing or replacing the milling head 24 5 2 Rotating and replacing cutting plates 25 5 3 Replacing the impeller 26 5 4 Replacing carbon brushes 27 6 Exploded view spare part list 28 6 1 Exploded view 28 6 2 Spare part list 29 7 Troubleshooting 31 8...

Page 4: ...electric shock fire and or serious injury SAVE ALL WARNINGS AND INSTRUCTIONS FOR FUTURE REFERENCE The term power tool in the warnings refers to your mains operated corded power tool Please also observe the relevant national industrial safety regulations Non observance of the safety instructions in the said documentation can lead to an electric shock burns and or severe injuries This Operator s Man...

Page 5: ...shock 2 Avoid body contact with grounded surfaces such as pipes radiators ranges and refrigerators There is an increased risk of electric shock if your body is earthed or grounded 3 Do not expose power tools to rain or wet conditions Water entering a power tool will increase the risk of electric shock 4 Do not abuse the cord Never use the cord to carry the power tool or pull the plug from an outle...

Page 6: ...Keep your hair clothing and gloves away from moving parts Loose clothes jewellery or long hair can be caught in moving parts 7 If devices are provided for the connection of dust extraction and collection facilities ensure these are connected and properly used 8 Never place hands fingers gloves or clothing near cutting area or rotating machine parts POWER TOOL USE AND CARE 1 Do not force the power ...

Page 7: ...ctric shock or injury 1 2 Specific safety information 1 ELECTRICAL SAFETY DANGER Electrical voltage Risk of fatal injury due to electrical shock a Grounded tools must be plugged into an outlet properly installed and grounded in accordance with all codes and ordinances Never remove the grounding prong or modify the plug in any way Do not use adaptor plugs Check with a qualified electrician if you a...

Page 8: ...o hold and operate the machine WARNING Dust created by bevelling may harm your health h Some types of dust such as dust from lead based paint is known to cause cancer birth defects or other reproductive harm Risk varies on exposure and should always be reduced by working in a well ventilated area and by making use of approved safety equipment such as dust masks specifically designed to filter out ...

Page 9: ... a stable platform Holding the work by your hand or against the body leaves it unstable and may lead to loss of control 4 RESIDUAL RISKS In spite of the application of the relevant safety regulations and the implementation of safety devices certain residual risks cannot be avoided These are Impairment of hearing Risk of personal injury from flying particles Risk of burns due to accessories becomin...

Page 10: ... depth adjustable deck It comes standard with a 45 milling head including cutting plates Optionally available are 30 and R2 5 milling heads as well as corresponding cutting plates WARNING The machine should not be used in any other way than described in this manual The machine should also not be converted or modified for any other form of use other than described in this manual The user is liable ...

Page 11: ...ain handle 9 Clamping ring 2 Auxiliary front handle 10 Milling head 3 Motor housing 11 Impeller 4 Motor cover 12 On off trigger switch 5 Gear casing 13 Lock pin 6 Power cord 14 Speed adjustment wheel 7 Guiding plate support deck 15 Carbon brush holder 8 Dial ring ...

Page 12: ...d 1 750 5 250 rpm Max bevel depth 6 mm 45 1 4 45 Min diameter for inside bevels 20 mm 13 16 Spindle thread M12 x 1 75 Length 458 mm 18 Width 137 mm 5 3 8 Height 300 mm 11 13 16 Weight 4 8 kg 10 6 lbs Motor power 1250 W 11 4 A Voltage 110 120 V 60 Hz 220 240 V 50 60 Hz ...

Page 13: ... preliminary assessment of exposure 2 5 2 Vibration Main Handle 2 738m s2 Auxiliary handle 2 572m s2 Uncertainty K 1 5m s2 WARNING The vibration emission during actual use of the Beveling machine can differ from the declared total value depending on the ways in which the machine is used There is the need to identify safety measures to protect the user that are bases on an estimation of exposure in...

Page 14: ...symbol Confirms the conformity of the beveling machine with the directives of the European Community Class of protection II Product with double insulation and exposed touchable conductive parts additionally connected to the protective earth conductor mm Millimeter Unit of measurement for length width height or depth kg Kilogram Unit of measurement for the mass V Volt Unit of measurement for the el...

Page 15: ...d products and packaging allows materials to be recycled and used again Re use of recycled materials helps prevent environmental pollution and reduces the demand for raw materials Local regulations may provide for separate collection of electrical products from the household at municipal waste sites or by the retailer when you purchase a new product ...

Page 16: ...delivered at position zero If the setting is disturbed the zero position has to be set again image 2 1 1 Loosen the clamping ring lever 2 Loosen the support deck assembly until the inserts are below flush level Keep a steel ruler square on both the impeller and the support deck 3 Slowly adjust the support deck until it touches the cutting plate This is the zero position 4 Lock the clamping ring le...

Page 17: ...se the dial ring as indication for the depth adjustment Each complete rotation corresponds to a bevel depth of 1 5 mm 1 16 this is indicated on the scale The bevel depth in mm is calculated as follows with example value on scale value on dial ring bevel depth 1 5 0 7 2 2 mm 3 Tighten the clamping ring lever image 2 2 ...

Page 18: ...o contact with the machine Supervision is required when inexperienced operators use this machine WARNING Make sure the machine is always in a stable position before and during use Do not operate the machine above your head Never touch the milling head while the machine is running Always operate the machine away from your body Work is performed with two hand operation for all machine positions When...

Page 19: ... the machine off and disconnect the machine from power source before making any adjustments or removing installing attachments or accessories 4 1 Starting and stopping WARNING Make sure the power circuit voltage is the same as shown on the specification plate on the machine Make sure the On Off trigger switch is in the Off position before plugging in the machine image 3 1 ...

Page 20: ...e speed and up to decrease the machine speed Switching off If the lock pin is not engaged release the On Off trigger switch If the lock pin is engaged squeeze and release the On Off trigger switch WARNING The milling head of the machine needs a couple of seconds to come to a complete standstill after the machine has been switched off Be careful for any chips that may be released by the rotation an...

Page 21: ...ve the machine in the correct direction to make the bevel Avoid collisions during processing WARNING From the users perspective the milling head is spinning clockwise The machine must always be guided from left to right conventional up milling or clockwise when processing inside bevels 5 Once the bevelling pass is completed take the machine from the workpiece WARNING Do not bevel more than 2 mm de...

Page 22: ...our EUROBOOR beveling machine also needs regular maintenance service A few recommendations follow Visually check the machine for damage The machine must be checked before operating for any signs of damage that will affect the operation of the machine Particular notice must be taken of the main cable if the machine appears to be damaged it should not be used Failure to do so may cause injury or dea...

Page 23: ...ther harsh chemicals for cleaning the non metallic parts of the tool These chemicals may weaken the materials used in these parts Use a cloth dampened only with water and mild soap Never let any liquid get inside the tool never immerse any part of the tool into a liquid Check machine grease The gearbox grease should be checked and replaced at least once a year or every 100 hours of operation to en...

Page 24: ...ing head the replacement procedure is the same 1 Loosen the clamping ring lever 2 Rotate the entire support deck assembly until it comes off the machine 3 Use the supplied spanner 22 mm to hold the spindle in place 4 Use the supplied C spanner to loosen the milling head and turn it off the machine Assembly in reversed order Always check for damaged or worn out parts and replace them when necessary...

Page 25: ... 2 Clamp the milling head in a vice on the far outer rim 3 Mark dull side on all 3 cutting plates 4 Undo mounting screw with the supplied L type Torx wrench 5 Take of cutting plate rotate 120 and put it back in place 6 Fasten the mounting screw with the supplied L type Torx wrench 7 Refit the milling head and other components as described in previous paragraph Changing or replacing the milling hea...

Page 26: ...s which are subject to regular wear A worn out impeller results in a roughly operating machine and an uneven bevel It can be replaced as follows image 4 3 1 Remove the milling head as described in paragraph Changing or replacing the milling head 2 Clamp the milling head in a vice on the far outer rim 3 Undo the locking nut 4 Use a small pulley puller to pull the impeller with its bearings off the ...

Page 27: ...acing the carbon brushes when they reach their wear limit is advised image 4 4 1 Unscrew the 4 screws from the top cover 2 Take of the top cover 3 Withdraw the old carbon brushes 4 Place the new carbon brushes in the destined slots ensuring they align properly and slide freely 5 Place back the top cover and screw in all four screws WARNING Always replace carbon brushes as a pair Always use officia...

Page 28: ...www euroboor com 28 6 Exploded view spare part list 6 1 Exploded view ...

Page 29: ...tting plate 30 45 3 LKS 20 R Cutting plate R2 5 3 14 B45S 1019 Milling head 45 1 B45S 1019A Milling head 30 1 B45S 1019B Milling head R2 5 1 15 B45S 0014 Output shaft 1 16 B45S 0015 Combined bearing 1 16S B45S 0013 Wool felt ring 1 17 B45S 0101 Screw M5 x 35 4 18 B45S 0206X Gearbox 1 18S B45S 0011 Oil bearing 20 x 28 x 6 1 19 B45S 0196 Sealed bearing 6002 DDU 1 20 B45S 0025 Cylindrical pin 1 21 04...

Page 30: ...ver 1 49 050 0106 Screw 4 8 x 45 4 50 B45S 0027 Handle part right 1 50A B45S 0035 Speed adjustment wheel 1 50B 100 4572 Speed potentiometer 100 K 1 51 020 0257 Capacitance 1 52 B45S 0023 Switch 1 53 B45S 0024 Main cable protection sleeve 1 54 B45S 0005 Main cable EU 220V 1 B45S 0005A Main cable USA 110V 1 B45S 0005BX Main cable UK 110V 1 B45S 0005BP Main cable AU 220V 1 B45S 0005FZE Main cable UK ...

Page 31: ...haft extending from the motor is bent Motor humming big sparks and motor has no force Armature damaged burned Field burned Carbon brushes worn out Overheating Blocked motor housing vents Forcing tool to work too fast Tool does not bevel effectively Accessory may be damaged worn or tool is used on the wrong type of material If any problem that you are having with your EUROBOOR B45S cannot be solved...

Page 32: ...iod can be extended to 24 months in total by registering the product on our website https EUROBOOR com support register Service To maximize the lifetime of your EUROBOOR bevelling machine always use service and parts from an official EUROBOOR distribution channel Whenever in need of such always contact original point of sales or if no longer existent the distributor of EUROBOOR products in your co...

Page 33: ...EUROBOOR BV Designation function Bevelling Machine Brand EUROBOOR Types B45S Ratings and principal 220 230V AC 50 60Hz Class II Characteristics Power 1 150W Speed 1 750 5 250 rpm no load Used standards EN 55014 1 2017 EN IEC 61000 3 2 2019 EN 61000 3 3 2013 A1 2019 IEC 62841 1 2014 COR1 2014 COR2 2015 Report numbers 4789544699 1 4789275120 1 1 04 4789275120 2 1 04 Testing laboratory UL CCIC Compan...

Page 34: ...L US Mark USA standard conformity certificate The Certificate is based on a valid applicable U S national standard in combination with all the related services such as regular factory inspections The UL test mark is proof of compliance with U S national standards It shows the buyer customer local authority having jurisdiction or consumer that a device has been successfully tested and certified by ...

Page 35: ...rtificate Date of Issue 08 09 2021 Certificate Type UL CA Mark Approval for the Canadian Market This accredited test mark referred to as the UL mark serves as proof of compliance with the Canadian national standards set by the Standards Council of Canada SCC Provincial Regulators across Canada recognize the UL mark as proof of product compliance to mandatory Canadian regulatory and code requiremen...

Reviews: