background image

EN 14

Start cooking

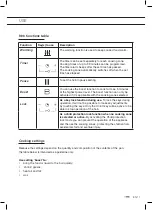
Use of the touch keys
Place the tip of your finger flat on a key or the slider to achieve the best results. You do not 
have to apply any pressure. The touch keys only react to the light pressure of a fingertip. 
Do not operate the controls with any other objects.  
Each key or the slider activation is followed by a sound signal.

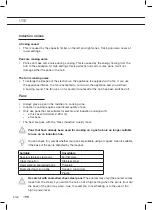
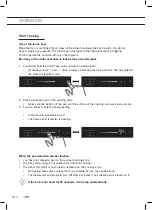
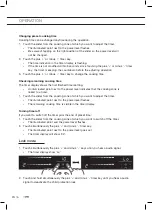
1.  Touch and hold the On/Off key until you hear an audio signal. 


All displays show ‘-’ and ‘--’ (timer display), indicating that the induction hob has entered 
the state of standby mode. 

2.  Place a suitable pan on the cooking zone.


Make sure the bottom of the pan and the surface of the cooking zone are clean and dry.

3.  Touch a slider to select a power setting. 


A short audio signal will sound. 


The power level indicator is flashing. 

<--------------------->

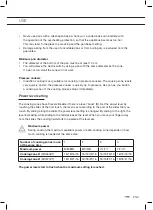
When the pan detection symbol flashes:
•  you have not placed a pan on the correct cooking zone; 
•  the pan you’re using is not suitable for induction cooking;
•  the pan is too small or not properly centered on the cooking zone.


No heating takes place unless there is a suitable pan on the cooking zone.


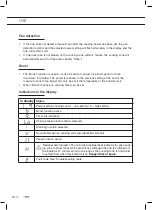
The display will automatically turn Off after 2 minutes if no suitable pan is placed on it. 

 If the hob is not used for 60 seconds, it will stop automatically.

OPERATION

Summary of Contents for KIS560ZT

Page 1: ...GEBRUIKSAANWIJZING INSTRUCTIONS FOR USE MODE D EMPLOI BEDIENUNGSANLEITUNG INDUCTIEKOOKPLAAT INDUCTION HOB TABLE DE CUISSON INDUCTION INDUKTIONSKOCHFELD KIS560ZT KIS577ZT...

Page 2: ...ed Pictogrammes utilis s Benutzte Piktogramme Gevaar Gevaar voor letsel Danger Risk of injury Danger Risque de blessure Gefahr Verletzungsgefahr Waarschuwing Risico op beschadigen van het toestel Caut...

Page 3: ...etectie 10 Boost 10 Meldingen op het display 10 Functietabel 11 Kookinstellingen 11 Kooktips 12 Bediening Bereiding starten 14 Klaar met koken 15 Timerbediening 15 Slot functie 16 Koken pauzeren 17 Wa...

Page 4: ...rdere temperatuurbeveiligingen en een restwarmte indicator die laat zien welke kookzones nog heet zijn In deze gebruiksaanwijzing staat beschreven hoe u de inductiekookplaat optimaal kunt gebruiken Na...

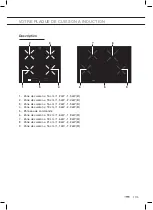
Page 5: ...kW 2 0 kW B 3 Kookzone 16 cm 1 2 kW 1 5 kW B 4 Kookzone 18 cm 1 5 kW 2 0 kW B 5 Bedieningspaneel 6 Kookzone 18 cm 1 6 kW 1 8 kW B 7 Kookzone 18 cm 1 6 kW 1 8 kW B 8 Kookzone 21 cm 1 8 kW 2 2 kW B 9 K...

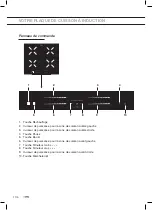
Page 6: ...voor kookzone linksachter 3 Vermogenschuifregelaar voor kookzone rechtsachter 4 Pauzetoets 5 Boosttoets 6 Vermogenschuifregelaar voor kookzone linksvoor 7 Mintoets van timer 8 Plustoets van timer 9 Ve...

Page 7: ...uw kookplaat Deze wordt geactiveerd als u vergeet de kookplaat uit te schakelen Afhankelijk van de gekozen instelling wordt de kookduur als volgt begrensd Kookniveau Maximale gebruikstijd uur 1 8 uur...

Page 8: ...nd geluid De ventilator blijft nog enkele minuten doorwerken nadat de kookplaat is uitgeschakeld Pannen Plaats een pan altijd in het midden van een kookzone Voor inductiekoken zijn pannen van een bepa...

Page 9: ...De kookzone reageert zeer snel waardoor de snelkookpan ook snel op druk is Het kookproces stopt onmiddellijk zodra u een kookzone uitschakelt Vermogen instellen De kookzones hebben 9 niveaus Daarnaas...

Page 10: ...e boostfunctie kan alleen worden ingesteld als de temperatuur van de kookplaat dit toestaat Zolang de boostfunctie actief is kan er geen kookwekker worden ingesteld Meldingen op het display Op display...

Page 11: ...lot Als toetsvergrendelingsfunctie tijdens gebruik Voor het vergrendelen van de toetsen tijdens gebruik Als deze functie actief is is het niet mogelijk om aanpassingen te maken door de toetsen aan te...

Page 12: ...telling 4 6 voor doorkoken van grote hoeveelheden ontdooien van harde groenten bakken van dikke lappen gepaneerd vlees Gebruik instelling 1 3 voor trekken van bouillon stoven van vlees zacht koken van...

Page 13: ...volgens in de hete pan Draai de steak slechts eenmaal om tijdens het bakken De precieze baktijd is afhankelijk van de dikte van de steak en van hoe doorbakken u het vlees wilt De tijd verschilt van 2...

Page 14: ...op een kookzone Zorg ervoor dat de onderzijde van de pan en het oppervlak van de kookzone schoon en droog zijn 3 Raak een schuifregelaar aan om een vermogensstand te selecteren Er klinkt een kort gelu...

Page 15: ...u de timer wilt instellen 3 Stel de tijd in door de mintoets of plustoets van de timer aan te raken Raak de mintoets of plustoets eenmaal aan om de tijd met 1 minuut te verkorten of verlengen Houd de...

Page 16: ...timerstand weergegeven Een verlichte stip naast de vermogensstand geeft aan dat de kookzone is gekoppeld aan een timer 1 Raak de schuifregelaar aan van de kookzone waarvoor u de timer wilt aanpassen D...

Page 17: ...eselecteerde vermogensstand De kooktimers beginnen met aftellen Alle toetsen zijn inactief behalve de Aan uit toets en de pauzetoets Gebruik de pauzefunctie om de gehele kookplaat tijdens het koken ge...

Page 18: ...iddel afwasmiddel om het apparaat te reinigen Droog het apparaat af met een stukje keukenrol of een doek Gebruik een glasschraper om overgebleven voedselresten gesmolten kunststof of suiker te verwijd...

Page 19: ...utine Normale werking De ventilator blijft nog enkele minuten doorwerken nadat de kookplaat is uitgeschakeld De kookplaat koelt af Normale werking In het begin is het mogelijk dat u een lichte geur ru...

Page 20: ...erkende installateur Foutcode E3 of E4 Interne temperatuur van de kookplaat is te hoog Schakel de kookplaat uit en laat deze afkoelen H verdwijnt van de displays Schakel de kookplaat in Als dezelfde f...

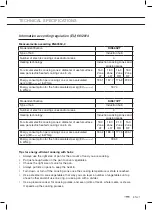
Page 21: ...okzones de diameter van het bruikbare oppervlak per elektrisch verwarmde kookzone in cm 18 0 Zone LV 18 0 Zone LA 21 0 Zone RA 16 0 Zone RV Energieverbruik per kookzone of kookgebied berekend per kg E...

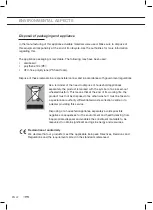
Page 22: ...is op het product het symbool van een doorgekruiste vuilnisbak aangebracht Dit betekent dat het apparaat aan het einde van zijn levensduur niet met het gewone huisvuil mag worden meegegeven Het appara...

Page 23: ...ng timer minute minder 10 Boost 10 Indications in the display 11 Hob functions table 11 Cooking settings 11 Cooking tips 12 Operation Start cooking 14 Finish cooking 15 Timer control 15 Lock mode 16 P...

Page 24: ...ature protections and a residual heat indicator which shows which cooking zones are still hot This manual describes how you can make the best possible use of the induction hob In addition to informati...

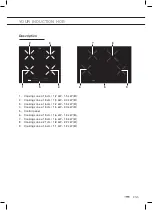
Page 25: ...0 kW B 3 Cooking zone 16 cm 1 2 kW 1 5 kW B 4 Cooking zone 18 cm 1 5 kW 2 0 kW B 5 Control panel 6 Cooking zone 18 cm 1 6 kW 1 8 kW B 7 Cooking zone 18 cm 1 6 kW 1 8 kW B 8 Cooking zone 21 cm 1 8 kW 2...

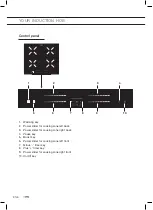
Page 26: ...slider for cooking zone left back 3 Power slider for cooking zone right back 4 Pause key 5 Boost key 6 Power slider for cooking zone left front 7 Minus timer key 8 Plus timer key 9 Power slider for c...

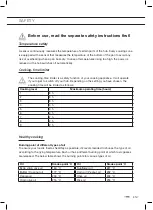
Page 27: ...off your hob Depending on the setting you have chosen the cooking time will be limited as follows Cooking level Maximum operating time hours 1 8 h 2 8 h 3 8 h 4 4 h 5 4 h 6 4 h 7 2 h 8 2 h 9 2 h Heal...

Page 28: ...e Induction cooking requires a particular quality of pan Only use pans that are suitable for electric and induction cooking with a thick base minimum 2 25 mm a flat base The best are pans with the Cla...

Page 29: ...off the cooking process stops immediately Power level setting The cooking zones have 9 levels Beside it there is a level boost B Set the power level by touching the slider At the first touch the leve...

Page 30: ...t time Boost can only be set if the temperature of the hob allows it When Boost is active no cooking timer can be set Indications in the display In display Status Power setting cooking zone 1 low sett...

Page 31: ...e cooking zone selected Lock As a key lock function during use To lock the keys during operation It will not be possible to make any adjustments by touching the keys Only the On off key will be active...

Page 32: ...6 to complete the cooking of large quantities defrost hard vegetables fry thick slices of breaded meat Use settings 1 3 to simmer bouillon stew meats simmer vegetables melt chocolate poach melt cheese...

Page 33: ...the meat onto the hot pan Turn the steak only once during cooking The exact cooking time will depend on the thickness of the steak and how cooked you want it Times may vary from about 2 8 minutes per...

Page 34: ...by mode 2 Place a suitable pan on the cooking zone Make sure the bottom of the pan and the surface of the cooking zone are clean and dry 3 Touch a slider to select a power setting A short audio signal...

Page 35: ...the cooking zone you want to set the timer for 3 Set the time by touching the minus or plus timer key Touch the minus or plus key once will decrease or increase by 1 minute Touch and hold the minus or...

Page 36: ...setting An illuminated point next to the power level indicates that the cooking zone is linked to a timer 1 Touch the slider from the cooking zone of which you want to adjust the timer The illuminate...

Page 37: ...sume previous selected power levels Cooking timers start countdown All keys are inactive exept the On Off key and the pause key Use the pause function to pause the whole hob for max 10 minutes while c...

Page 38: ...and a mild cleaning agent washing up liquid to clean the appliance Dry the appliance with a paper towel or a cloth Use a glass scraper to remove remaining food melted plastic or sugar Do not use abra...

Page 39: ...is noticeable the first few times the hob is used The new appliance is heating up This is normal and will disappear once it has been used a few times Ventilate the kitchen The pans make a noise while...

Page 40: ...down H disappears from the displays Switch on the hob If the same error is displayed again call an authorised service agent Error code E5 or E6 Internal temperature of hob is too high Check if hob ha...

Page 41: ...ooking areas For circular electric cooking zones diameter of useful surface area per electric heated cooking zone in cm 18 0 Zone LF 18 0 Zone LR 21 0 Zone RR 16 0 Zone RF Energy consumption per cooki...

Page 42: ...pliances separately the product is marked with the symbol of a crossed out wheeled dustbin This means that at the end of its working life the product must not be disposed of as urban waste It must be...

Page 43: ...ications dans l affichage 11 Tableau des fonctions de la plaque 11 Minuteur 11 Pause 11 Boost 11 R glages de cuisson 12 Conseils de cuisson 13 Fonctionnement Lancer la cuisson 14 Finir la cuisson 15 C...

Page 44: ...est quip e de plusieurs dispositifs de s curit thermique et d un indicateur de chaleur r siduelle Ce dernier signale les zones de cuisson qui sont encore chaudes Ce manuel indique comment utiliser la...

Page 45: ...cuisson 16 cm 1 2 kW 1 5 kW B 4 Zone de cuisson 18 cm 1 5 kW 2 0 kW B 5 Panneau de commande 6 Zone de cuisson 18 cm 1 6 kW 1 8 kW B 7 Zone de cuisson 18 cm 1 6 kW 1 8 kW B 8 Zone de cuisson 21 cm 1 8...

Page 46: ...sson arri re gauche 3 Curseur de puissance pour la zone de cuisson arri re droite 4 Touche Pause 5 Touche Boost 6 Curseur de puissance pour la zone de cuisson avant gauche 7 Touche Minuteur moins 8 To...

Page 47: ...Selon le r glage choisi le temps de cuisson est limit comme suit Niveau de cuisson Temps de fonctionnement maximal heures 1 8 h 2 8 h 3 8 h 4 4 h 5 4 h 6 4 h 7 2 h 8 2 h 9 2 h Cuisson saine Point de f...

Page 48: ...de fonctionner quelques minutes apr s l arr t de la plaque de cuisson Casseroles Placez toujours une casserole au centre d une zone de cuisson La cuisson par induction impose certaines caract ristiqu...

Page 49: ...a zone de cuisson r agit tr s vite et l autocuiseur se trouve rapidement sous pression D s que vous teignez une zone de cuisson le processus de cuisson s arr te imm diatement R glage de la puissance L...

Page 50: ...onn e que si la temp rature de la plaque le permet Lorsque la fonction Boost est active vous ne pouvez pas r gler le minuteur de cuisson Indications dans l affichage Affichage tat R glage de puissance...

Page 51: ...ge lors de l utilisation Pour verrouiller les touches pendant le fonctionnement Il n est pas possible d effectuer de r glages en appuyant sur les touches Seule la touche Marche Arr t sera active pour...

Page 52: ...la cuisson de grandes quantit s d aliments d congeler des l gumes durs frire des tranches paisses de viande pan e Utilisez les r glages 1 3 pour faire fr mir du bouillon faire mijoter des viandes tuve...

Page 53: ...le Tournez le steak une seule fois durant la cuisson La dur e de cuisson exacte d pendra de l paisseur du steak et de la cuisson souhait e La dur e peut varier entre 2 et 8 minutes par c t Appuyez sur...

Page 54: ...e adapt e sur la zone de cuisson Assurez vous que le fond de la casserole et la surface de la zone de cuisson sont propres et secs 3 Touchez un curseur pour s lectionner une puissance de cuisson Un br...

Page 55: ...ne de cuisson pour laquelle vous souhaitez r gler le minuteur 3 R glez la dur e l aide de la touche Minuteur moins ou plus Appuyer sur la touche Moins ou Plus une seule fois permet de r duire ou d aug...

Page 56: ...teur indique le temps de cuisson coul du premier r glage Un point lumineux c t du niveau de puissance indique que la zone de cuisson est reli e un minuteur 1 Touchez le curseur de la zone de cuisson p...

Page 57: ...es minuteurs de cuisson reprennent le d compte Toutes les touches sont inactives l exception de la touche Marche arr t et de la touche Pause Utilisez la fonction Pause pour mettre en pause toute la pl...

Page 58: ...mide et un d tergent doux produit vaisselle pour nettoyer l appareil Essuyez l appareil avec un essuie tout ou un torchon Utilisez un racloir vitre pour retirer les r sidus d aliments le plastique ou...

Page 59: ...que de cuisson est activ e pour la premi re fois Il s agit de la proc dure de d marrage standard Fonctionnement normal La ventilation continue de fonctionner quelques minutes apr s l arr t de la plaqu...

Page 60: ...sion ou la fr quence d alimentation est diff rente des valeurs nominales Contactez un installateur agr Code de panne E3 ou E4 La temp rature interne de la plaque de cuisson est trop lev e teignez la p...

Page 61: ...am tre de la surface utile par zone de cuisson lectrique chauff e en cm 18 0 Zone AG 18 0 Zone AA 21 0 Zone DA 16 0 Zone DG Consommation nerg tique par zone ou espace de cuisson calcul e par kg CEcuis...

Page 62: ...agers s par ment le produit est marqu du symbole repr sentant une poubelle roulante barr e Ce symbole indique qu au terme de son utilisation le produit ne doit pas tre limin en tant que d chet urbain...

Page 63: ...10 Boost 10 Anzeigen auf dem Display 11 Tabelle der Kochfeldfunktionen 11 Zeit steuerung 11 Pause 11 Boost 11 Leistungsstufen 12 Kochtipps 13 Bedienung Kochvorgang starten 14 Kochen beenden 15 Timer S...

Page 64: ...nen zum berhitzungsschutz sowie eine Restw rmeanzeige In dieser Bedienungsanleitung wird beschrieben wie Sie Ihr Induktionskochfeld optimal verwenden k nnen Neben Informationen zur Bedienung erhalten...

Page 65: ...18 cm 1 5 2 0 kW B 3 Kochzone 16 cm 1 2 1 5 kW B 4 Kochzone 18 cm 1 5 2 0 kW B 5 Bedienleiste 6 Kochzone 18 cm 1 6 1 8 kW B 7 Kochzone 18 cm 1 6 1 8 kW B 8 Kochzone 21 cm 1 8 2 2 kW B 9 Kochzone 16 c...

Page 66: ...rmhalten 2 Schieberegler Kochzone links hinten 3 Schieberegler Kochzone rechts hinten 4 Pause 5 Boost 6 Schieberegler Kochzone links vorn 7 Zeitsteuerung 8 Zeitsteuerung 9 Schieberegler Kochzone recht...

Page 67: ...ch ein wenn Sie vergessen sollten das Kochfeld auszuschalten Je nach gew hlter Einstellung wird die Kochdauer wie folgt begrenzt Leistungsstufe Maximale Betriebszeit Stunden 1 8 h 2 8 h 3 8 h 4 4 h 5...

Page 68: ...in brummendes Ger usch Die L ftung l uft noch einige Minuten weiter nachdem das Kochfeld ausgeschaltet wurde Kochgeschirr Stellen Sie T pfe und Pfannen stets in die Mitte einer Kochzone F r das Indukt...

Page 69: ...gut zum Kochen auf dem Induktionskochfeld Die Kochzone reagiert sehr schnell wodurch auch der Schnellkochtopf schnell seinen Druck erreicht Sofort nach dem Ausschalten einer Kochzone wird der Kochvorg...

Page 70: ...ellung zur ckgesetzt Die Boost Funktion l sst sich nur aktivieren wenn das Kochfeld nicht zu hei ist Bei aktivierter Boost Funktion kann keine Garzeit eingestellt werden Anzeigen auf dem Display Auf d...

Page 71: ...wendbar ist Sperre Als Tastensperre w hrend des Gebrauchs Tastensperre w hrend des Betriebs Bei aktivierter Tastensperre sind alle Bedienvorg nge ber Tasten blockiert Sie k nnen jedoch weiterhin mit d...

Page 72: ...en f r Gro e Mengen Speisen fertig garen Gefrorenes hartes Gem se auftauen Dicke Scheiben paniertes Fleisch braten Leistungsstufen 1 3 verwenden f r Bouillon k cheln lassen Fleisch schmoren Gem se k c...

Page 73: ...enge l in die hei e Pfanne Geben Sie dann langsam das Fleisch in die hei e Pfanne Steak w hrend des Bratens nur einmal wenden Die genaue Bratzeit h ngt von der Dicke des Steaks ab sowie davon wie gut...

Page 74: ...h das Induktionskochfeld im Standbymodus befindet 2 Setzen Sie einen passenden Topf auf eine Kochzone Achten Sie darauf dass die Topfunterseite sowie die Oberfl che der Kochzone sauber sind 3 Tippen S...

Page 75: ...n Sie mit und die gew nschte Zeit ein Mit den Tasten und k nnen Sie die Zeiteinstellung in Minutenschritten erh hen reduzieren Halten Sie die beziehungsweise gedr ckt um die Zeiteinstellung in 10 Minu...

Page 76: ...nden Zeitsteuerung angezeigt Neben der Leistungsanzeige leuchtet ein roter Punkt Damit wird signalisiert dass die Kochzone mit der Zeitsteuerung gekoppelt ist 1 Tippen Sie auf den Schieberegler der ge...

Page 77: ...en aktiviert Eventuell eingestellte Garzeiten laufen weiter Alle Tasten sind inaktiv bis auf EIN AUS Taste und Pausentaste Mit der Pausenfunktion k nnen Sie das gesamte Kochfeld w hrend des Kochvorgan...

Page 78: ...Sie ein mildes Reinigungsmittel Sp lmittel und ein feuchtes Tuch Mit Tuch oder Papiertuch abtrocknen Entfernen Sie R ckst nde wie Speisereste geschmolzenen Kunststoff und Zucker mit einem Glasschaber...

Page 79: ...em das Kochfeld ausgeschaltet wurde Das Kochfeld wird gek hlt Das ist normal Bei den ersten Garvorg ngen ist ein f r neue Ger te typischer Geruch wahrnehmbar Der Geruch wird aufgrund der Erw rmung des...

Page 80: ...enden Sie sich an einen Elektriker Fehlercode E3 oder E4 Innentemperatur des Kochfelds berschreitet zul ssigen Wert Kochfeld ausschalten und abk hlen lassen bis auf den Displays H ausgeblendet wird Sc...

Page 81: ...che f r jede Kochzone in cm 18 0 Zone LV 18 0 Zone LH 21 0 Zone RH 16 0 Zone RV Energieverbrauch pro Kochzone oder bereich berechnet pro kg ECElektrokochfeld in Wh kg 184 2 188 0 177 3 203 7 Energiev...

Page 82: ...gekennzeichnet Mit diesem Symbol wird darauf hingewiesen dass Haushaltsger te separat entsorgt werden m ssen Dies bedeutet dass das Ger t am Ende seiner Lebensdauer nicht mit dem normalen Hausm ll en...

Page 83: ...DE 23...

Page 84: ...anneer u contact opneemt met de serviceafdeling het complete typenummer bij de hand When contacting the service department have the complete type number to hand En cas de contact avec le service apr s...

Reviews: