


SETTING THE INITIAL IP ADDRESS
Once logged in the user can now configure the switch per the network requirements. The
two major addressing options are:
Simple IP addressing
Multiple VLAN addressing (See
Add an IP to the Management VLAN
on page
).
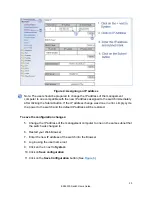
Simple IP Addressing
A new IP address can now be assigned to the switch. From the System Information screen,
go to the left hand navigation menu.
1. Click on the
+
next to
System
2. Click on
IP address
3. Enter the desired IP address and subnet mask in the
IP Address/Subnet Mask
fields associated with VLAN 1
4. Click the
Submit
22
EX24000 Switch Users Guide
Summary of Contents for EX24000
Page 32: ...Figure 8 IP Address 32 EX24000 Switch Users Guide ...
Page 42: ...Figure 14 Remote Logging Page 42 EX24000 Switch Users Guide ...
Page 53: ...Figure 22 Port Security 53 EX24000 Switch Users Guide ...
Page 61: ...Figure 23 Bridging 61 EX24000 Switch Users Guide ...
Page 67: ...Figure 26 Storm Detect 67 EX24000 Switch Users Guide ...
Page 72: ...Figure 31 Port Mirroring 72 EX24000 Switch Users Guide ...
Page 88: ...Figure 38 LACP Trunking 88 EX24000 Switch Users Guide ...
Page 93: ...Figure 39 STP Ring Global Configuration 93 EX24000 Switch Users Guide ...
Page 97: ...Figure 42 Max Age Hello Timer Forward Delay 97 EX24000 Switch Users Guide ...
Page 116: ...Figure 55 Port Cost Priority 116 EX24000 Switch Users Guide ...
Page 132: ...Figure 63 Advanced Per Port Configuration 132 EX24000 Switch Users Guide ...
Page 163: ...Figure 78 SNMP General Settings 163 EX24000 Switch Users Guide ...
Page 181: ...Figure 91 LLDP Global Settings 181 EX24000 Switch Users Guide ...
Page 183: ...Figure 92 LLDP Ports Settings 183 EX24000 Switch Users Guide ...
Page 193: ...Figure 95 GVRP 193 EX24000 Switch Users Guide ...
Page 198: ...Figure 98 GVRP Per Port Settings 198 EX24000 Switch Users Guide ...
Page 223: ...Figure 110 Daylight Savings Date Mode 223 EX24000 Switch Users Guide ...


