


switch_a(config)#
q
switch_a#
IEEE 802.1X
EtherWAN switches support the IEEE 802.1X protocol to provide port based security on a
switch port against unauthorized access. In order for this protocol to work, two additional
components are required; an EAP (Extensible Authentication Protocol) compatible RADIUS
server to authenticate a client station that is trying to gain access to the network through a
port on the switch, and an 802.1X client software (known as the “Supplicant” software) used
on the end device to communicate with the RADIUS server for the purposes of
authenticating the end device that is trying to gain access to the network through the switch
port.
When an end device is initially connected to a port on the EtherWAN switch where the
802.1X protocol is enabled on the port, the switch will only pass 802.1X authentication traffic
(known as EAPOL traffic) on that port between the Supplicant on the end device and the
RADIUS server, and will not allow any other traffic to pass. After the initial connection, the
EtherWAN switch will request authentication credentials from the Supplicant in the end
device that has just connected to the port. After the switch receives the proper authentication
credentials from the Supplicant in the end device, the switch will sent the credentials to the
EAP compatible RADIUS server that’s configured in the switch for the purpose of
authenticating the end device. If the end device is successfully authenticated by the RADIUS
server, the RADIUS server will sent an “Access-Accept” message to the switch; at this point
the EtherWAN switch will inform the Supplicant in the end device of the successful
authentication and open up the port for all network traffic to pass.
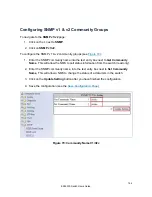
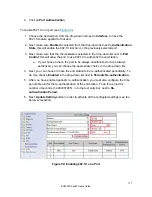
Configuring 802.1X from the GUI system
To navigate to the
802.1X / Radius Configuration
page:
1. Click on the
+
next to
802.1X
2. Click on
Radius Configuration
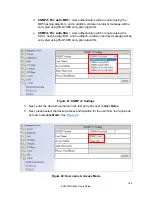
Enabling Radius
By default, the 802.1X function is globally disabled on the EtherWAN switch. If you want to
use the 802.1X port based security on a port, you must enable it globally on the switch first,
and then enable it on a per port basis.
174
EX24000 Switch Users Guide
Summary of Contents for EX24000
Page 32: ...Figure 8 IP Address 32 EX24000 Switch Users Guide ...
Page 42: ...Figure 14 Remote Logging Page 42 EX24000 Switch Users Guide ...
Page 53: ...Figure 22 Port Security 53 EX24000 Switch Users Guide ...
Page 61: ...Figure 23 Bridging 61 EX24000 Switch Users Guide ...
Page 67: ...Figure 26 Storm Detect 67 EX24000 Switch Users Guide ...
Page 72: ...Figure 31 Port Mirroring 72 EX24000 Switch Users Guide ...
Page 88: ...Figure 38 LACP Trunking 88 EX24000 Switch Users Guide ...
Page 93: ...Figure 39 STP Ring Global Configuration 93 EX24000 Switch Users Guide ...
Page 97: ...Figure 42 Max Age Hello Timer Forward Delay 97 EX24000 Switch Users Guide ...
Page 116: ...Figure 55 Port Cost Priority 116 EX24000 Switch Users Guide ...
Page 132: ...Figure 63 Advanced Per Port Configuration 132 EX24000 Switch Users Guide ...
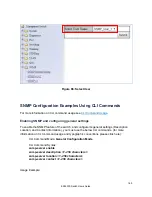
Page 163: ...Figure 78 SNMP General Settings 163 EX24000 Switch Users Guide ...
Page 181: ...Figure 91 LLDP Global Settings 181 EX24000 Switch Users Guide ...
Page 183: ...Figure 92 LLDP Ports Settings 183 EX24000 Switch Users Guide ...
Page 193: ...Figure 95 GVRP 193 EX24000 Switch Users Guide ...
Page 198: ...Figure 98 GVRP Per Port Settings 198 EX24000 Switch Users Guide ...
Page 223: ...Figure 110 Daylight Savings Date Mode 223 EX24000 Switch Users Guide ...


