


USER MANUAL > CENTERING A LENS
58
Mr Blue 2.0 > v4.0 -09.16
4
3
2
1
Press
to select the type of progressive lens.
Press
to select the manual centering mode.
Enter the half-PD and pupillary height.
Position the lens on the clamps and center it in keeping with the target.
You can control the opening and closing of the clamps for better control of the stability of the lens:
Press
to open the clamps.
Press
to close the clamps.
You can choose to center the lens on the protective glass: open the clamps completely.
Do not manually center the
(thickness < 0.8 mm) directly on the window. The
precalibrated lenses
(p.149)
lenses would be liable to break during blocking.
Take care not to damage the protective glass with glass lenses.
Press
to zoom.
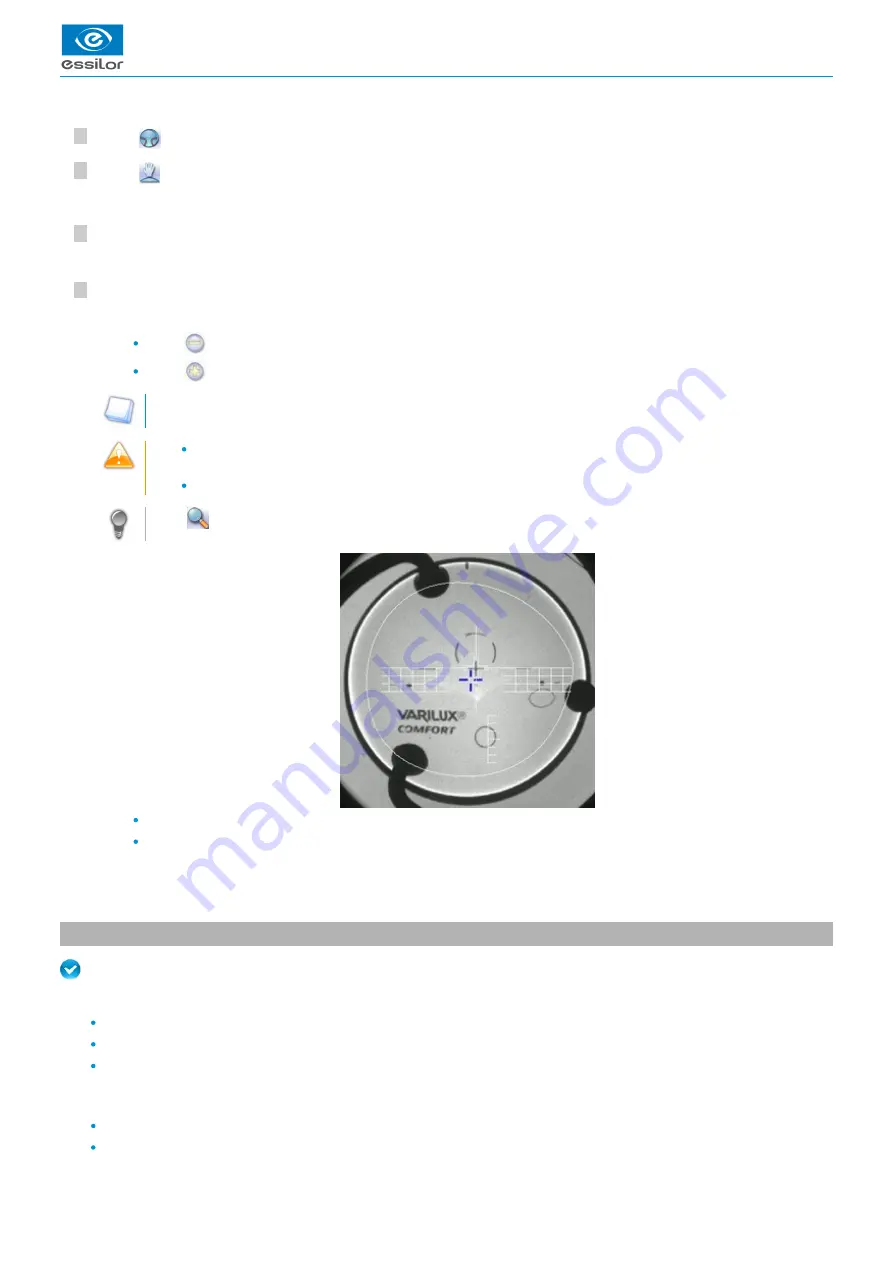
The centering cross present on the lens must be superimposed on the target centering cross.
Make sure that the target centering marks line up with the lens centering marks.
To carry out lens blocking, refer to the section
.
Centering a lens > Blocking a lens
(p.80)
4. Centering bifocal / trifocal lenses
Prerequisite: Before centering the lens, you must first trace a shape in the centering screen.
If necessary, we recommend the following prior operations:
Modifying or retouching the traced shape
(p.83)
Preparing drilling points
(p.91)
to be created
Place the stickers recommended by the manufacturer on hydrophobic lenses.
This section describes the centering procedures for bifocal and trifocal lenses with a round segment or D-segment:
Centering in automatic mode
(p.59)
Centering using three focimeter dots
(p.61)
The clamps close: the image of the centering chamber is displayed in real time.
>
The target moves.
>
The lens is centered and ready to be blocked.
>
Centering the lens
Summary of Contents for Mr Blue 2.0
Page 1: ...User Manual ...
Page 2: ......
Page 6: ...USER MANUAL CONTENTS ...
Page 8: ...USER MANUAL INTRODUCTION 8 Mr Blue 2 0 v4 0 09 16 ...
Page 9: ...I FIRST STEPS WITH MR BLUE 2 0 ...
Page 10: ...USER MANUAL FIRST STEPS WITH MR BLUE 2 0 10 Mr Blue 2 0 v4 0 09 16 ...
Page 17: ...II TRACING ...
Page 18: ...USER MANUAL TRACING 18 Mr Blue 2 0 v4 0 09 16 ...
Page 36: ...USER MANUAL TRACING 36 Mr Blue 2 0 v4 0 09 16 ...
Page 37: ...III CENTERING A LENS ...
Page 38: ...USER MANUAL CENTERING A LENS 38 Mr Blue 2 0 v4 0 09 16 ...
Page 82: ...USER MANUAL CENTERING A LENS 82 Mr Blue 2 0 v4 0 09 16 ...
Page 83: ...IV MODIFYING THE LENS SHAPE ...
Page 84: ...USER MANUAL MODIFYING THE LENS SHAPE 84 Mr Blue 2 0 v4 0 09 16 ...
Page 91: ...V PREPARING A DRILLED JOB ...
Page 92: ...USER MANUAL PREPARING A DRILLED JOB 92 Mr Blue 2 0 v4 0 09 16 ...
Page 103: ...VI PREPARING LENS EDGING ...
Page 104: ...USER MANUAL PREPARING LENS EDGING 104 Mr Blue 2 0 v4 0 09 16 ...
Page 108: ...USER MANUAL PREPARING LENS EDGING 108 Mr Blue 2 0 v4 0 09 16 ...
Page 109: ...VII TRACER CENTERER BLOCKER CONFIGURATION ...
Page 110: ...USER MANUAL TRACER CENTERER BLOCKER CONFIGURATION 110 Mr Blue 2 0 v4 0 09 16 ...
Page 119: ...VIII MAINTENANCE SERVICING ...
Page 120: ...USER MANUAL MAINTENANCE SERVICING 120 Mr Blue 2 0 v4 0 09 16 ...
Page 134: ...USER MANUAL MAINTENANCE SERVICING 134 Mr Blue 2 0 v4 0 09 16 ...
Page 135: ...IX M EYE SIGN AND M EYE TOUCH ...
Page 136: ...USER MANUAL M EYE SIGN AND M EYE TOUCH 136 Mr Blue 2 0 v4 0 09 16 ...
Page 139: ...TECHNICAL DATA ...
Page 142: ...USER MANUAL TECHNICAL DATA 142 Mr Blue 2 0 v4 0 09 16 ...
Page 143: ...GENERAL INFORMATION ...
Page 147: ...GLOSSARY ...
Page 150: ...USER MANUAL GLOSSARY 150 Mr Blue 2 0 v4 0 09 16 ...
Page 151: ...USER MANUAL GLOSSARY Mr Blue 2 0 v4 0 09 16 151 ...