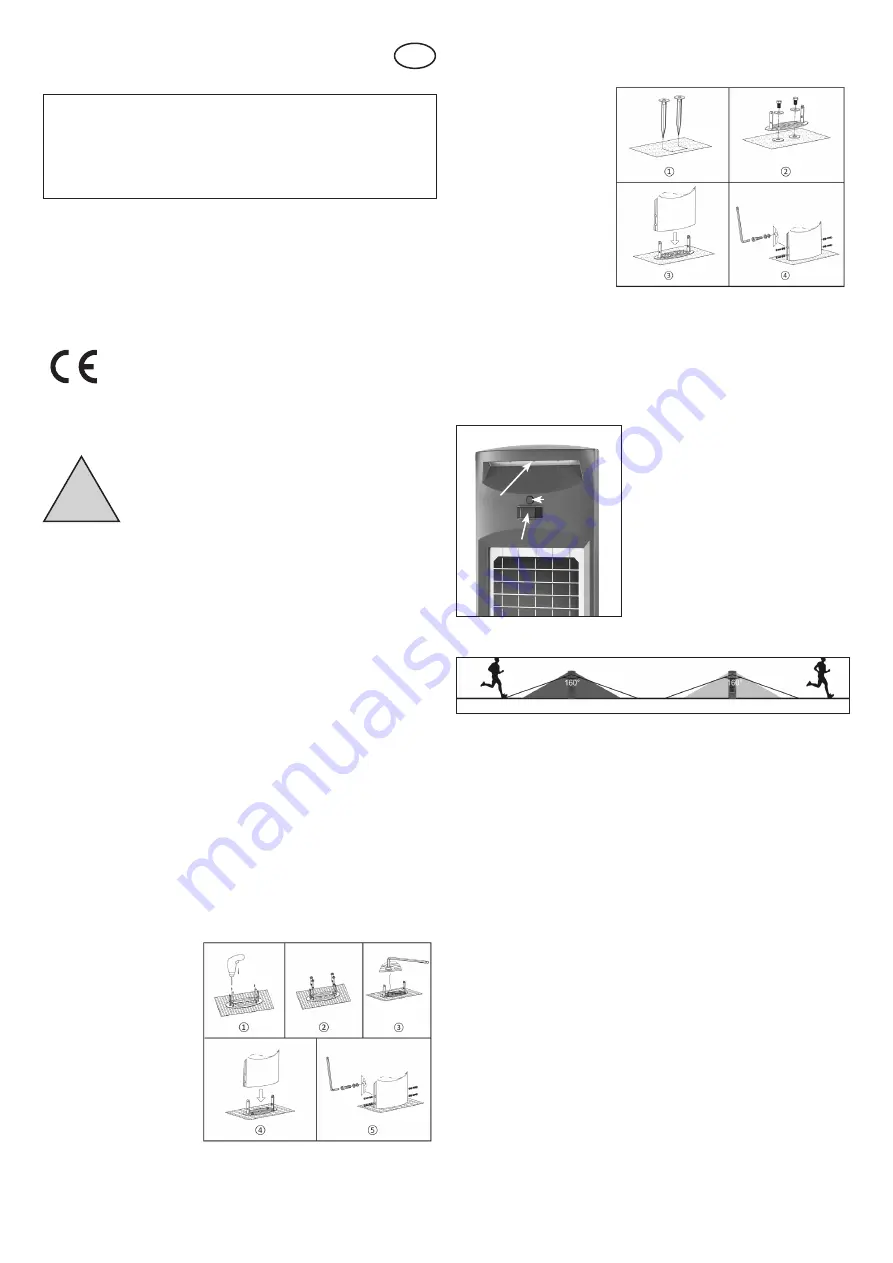
2.2 Mounting on soft ground (e.g. grass)
1. Take the two ground
anchors and knock them
firmly into the ground with
a rubber hammer at a dis-
tance of 6 to 12 cm.
2. Now fasten the mounting
plate with the two ground
anchors using the two
threaded screws.
3. Place the lamp careful-
ly on the mounting plate
and make sure that the 4
holes in the lamp match
the threaded holes of the
base plate.
4. Now take the 4 screws with the washer and the snap ring and screw the
lamp firmly to the mounting plate.
5. Commissioning
The luminaires on both sides can be switched independently of each other.
The setting is made via the switch above the PIR sensor. The battery is
also charged when the light is switched off.
1. switch press = sensor mode
2. switch press = twilight mode
3. switch press = off
Sensor mode:
When a movement is detected, the lamp lights up at full brightness (1000
lm per side). After 20 seconds without movement, the brightness is auto-
matically reduced to approx. 150 lm.
Twilight mode: In darkness, the light switches on automatically and illu-
minates with 500 lm per side. The light is then automatically switched off
again at dawn or when the battery is discharged. The PIR motion sensors
have no function.
The solar light is now activated and ready for use!
6. Malfunctions
Lamp does not switch on in darkness
- An extraneous light source (e.g. street lamp) simulates daylight on the
solar module and prevents the luminaire from switching on. Place the
luminaire in a darker place!
- Battery depleted? Replace the battery!
!
Operating instructions
Solar LED Pillar „Duo Power 2000“
These instructions relate ONLY to this product and contain important infor-
mation for using the product for the first time. Please keep these instructions
for later reference and should always accompany the product in the event of
transference to a new user.
1. Introduction
Dear Costumer,
Thank you for purchasing the solar light.
With this solar light you purchased a product manufactured according to the current
state of technology.
This product fulfils all requirements of the valid European and
national regulations. The conformity was proved. The relevant
declarations and documentation are deposited with the manu-
facturer.
To maintain this state and guarantee a safe operation, you as the user
will have to follow this operating manual!
2. Safety Instructions
- In case of damages caused by not following this
operating manual, the warranty rights will expire!
We exclude liability for any consequential damages!
- We exclude liability for property or personal
damages caused by inappropriate handling
or not following the safety instructions.
- In these cases any guarantee rights will expire.
Due to safety and admission reasons (CE) it is not allowed to arbitrarily reconstruct
and/or change the solar light.
Therefore, please keep to the operating manual. The accident prevention rules of
the association of the industrial trade cooperative association for electric plants and
working material are to be considered in industrial environments
3. Intended use and function
The solar light captivates with its unique design and function. It has two
powerful modules and two independent lighting systems. These can light
up the whole night in the dark or be switched via the two built-in PIR sen-
sors. Both sides can be operated independently. 2 x 20 super-bright LEDs
are installed as illuminants. The built-in LiFePo battery is charged via two
powerful monocrystalline solar modules (11 Wp and 9 Wp).
During longer periods without solar radiation, the battery is insufficiently
charged to ensure constant operational readiness. However, this does not
mean that the solar light is defective. Wait for the next sunny days, the
lamp will function accordingly again.
The lamp is suitable for outdoor use all year round.
Extensive mounting material is included for safe mounting of the luminaire.
4. Mounting
1. Carefully remove the lamp and accessories from their packaging.
2. Various accessories are available for stable mounting. The solar light
must be installed in a shady and sunny place.
2.1 Mounting on solid ground (e.g. stone):
1. Take the mounting plate of
the luminaire and mark the
holes on the floor. Take a
suitable drill with 10 mm
diameter and drill the 4
holes with 70 mm depth.
2. Place the mounting plate
on the holes and insert
the 4 metal plugs into the
holes.
3. Screw the mounting plate
firmly to the floor with the
4 screws.
4. Place the lamp carefully
on the mounting plate and
make sure that the 4 holes in the lamp match the threaded holes of the
base plate.
5. Now take the 4 screws with the washer and the snap ring and screw the
lamp firmly to the mounting plate.
GB
Customer support:
If you have problems or questions regarding this product, simply contact us!
By phone: +49 9605-92206-0
By e-mail for ordering spare parts: [email protected]
By e-mail for questions about the product: [email protected]
Product: Manufacturer Item No.: 102268
PIR-Sensor
switch
LEDs


