ESI DuaFire User Manual Download Page 5

DuaFire 

ESI


2. Description of DuaFire 
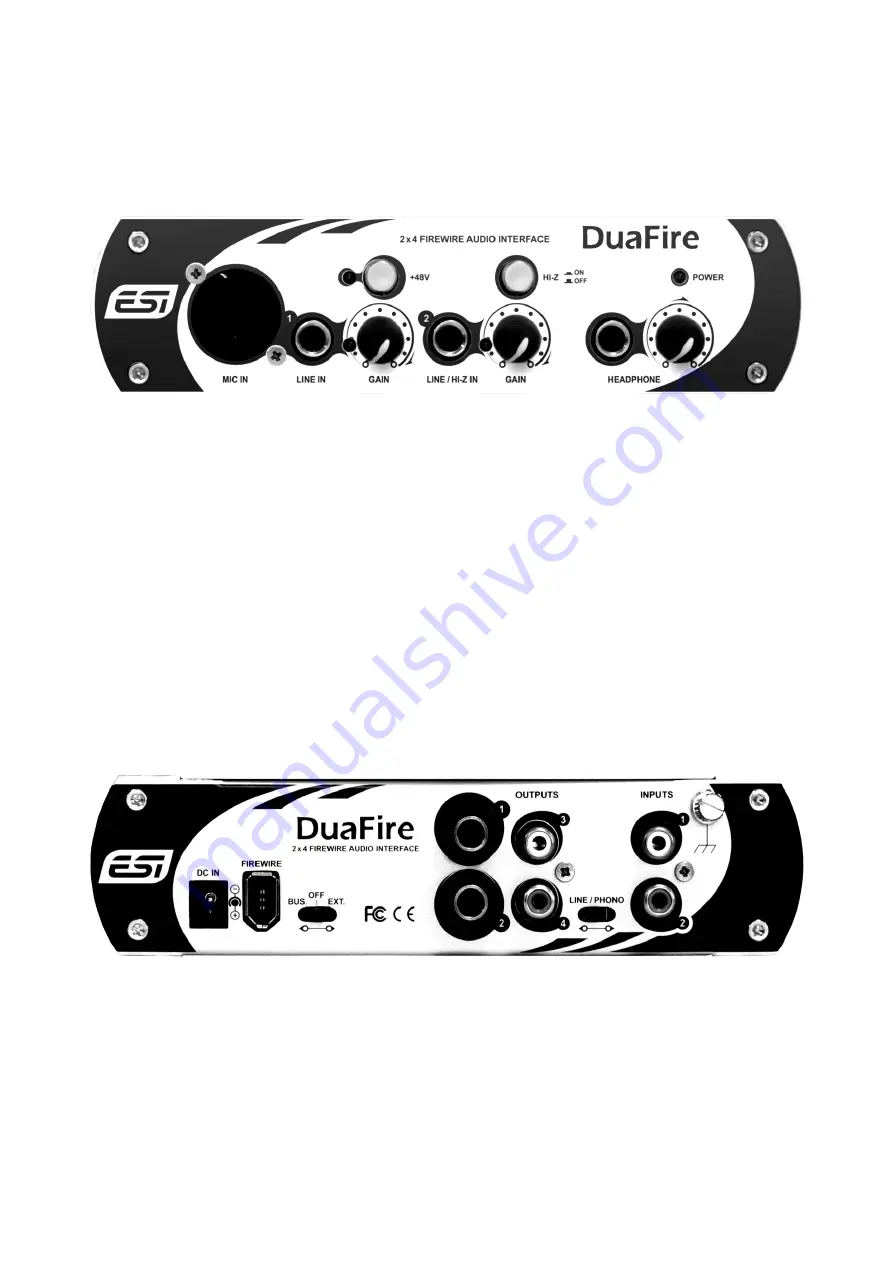
2.1 Front Panel 


The front panel has the following connectors and controls from left to right: 

Input 1:

 the first input channel is provided as balanced XLR input (

MIC IN

) for microphones and 

1/4"-input (

LINE IN

) for line level signals. You can only use one of the two input connectors at a 

time. The input level is controlled by the 

GAIN

 knob with peak LED next to it. Above the gain 

knob is the 

+48V

 phantom power switch with LED that needs to be enabled if you are using a 

condenser microphone. For a dynamic microphone, phantom power does not have to be enabled. 

Input 2:

 the second input channel is provided with a 1/4" connector (

LINE / HI-Z IN

) that can be 

used for line level signals or high impedance instrument signals (like a guitar). Next to it is the 

GAIN

 knob to control the input level. With the 

HI-Z

 switch, you can switch between line level and 

instrument / guitar signals. 

Headphone Out:

 the 

HEADPHONE

 output with 1/4" connector and gain control is located on the 

right side (directly under the 

POWER

 LED). 

2.2 Rear Panel 


The rear panel has the following connectors and controls from left to right: 

Power Connector:

 even though DuaFire is bus-powered, it might be needed to connect an external 

power supply (e.g. when DuaFire is connected to a PC with a 4-pin FireWire port). The power 
supply gets connected to the 

DC IN

 port. 

FireWire port: 

the 

FIREWIRE

 connector is used to connect DuaFire to the computer. 


5

Summary of Contents for DuaFire

Page 1: ...2 in 4 out FireWire Recording Interface User s Guide...

Page 2: ...ESI Copyright 2007 Revision 1 November 2007 www esi audio com...

Page 3: ...s XP 7 3 2 Windows Vista 9 3 3 Mac OS X 10 4 DuaFire Control Panel 11 4 1 Input Monitor controls 11 4 2 Output controls 12 4 3 Master controls 12 4 4 Config controls 13 4 5 DirectWIRE 13 5 Audio Appli...

Page 4: ...berg is bundled The flexible inputs allow you to record from a variety of different sources You can directly connect devices with line level turntables via the built in phono preamp microphones 48V ph...

Page 5: ...ut channel is provided with a 1 4 connector LINE HI Z IN that can be used for line level signals or high impedance instrument signals like a guitar Next to it is the GAIN knob to control the input lev...

Page 6: ...2 In addition to the XLR and 1 4 connectors on the front panel DuaFire also provides RCA inputs for phono signals on the back panel Please note that these inputs cannot be used simultaneously as the i...

Page 7: ...river you are about to install is intended for Windows XP You will now see a dialog as shown on the left picture below Click Next You can define the target directory for the installation now Confirm i...

Page 8: ...tware automatically Recommended and click Next Windows will again prompt you to confirm the Windows Logo testing dialog with Continue Anway before the driver installation is finalized Confirm it with...

Page 9: ...irm it with Next The installer now informs you that the driver installation will start as shown on the left picture below Confirm this with Next During the following process you will see a Windows Sec...

Page 10: ...ully 3 3 Mac OS X Mac OS X already provides support for class compliant FireWire audio devices such as DuaFire This means that no software or driver needs to be installed to use DuaFire under Mac OS X...

Page 11: ...means that you listen to it via the outputs All the monitoring features of DuaFire provided in this Control Panel are controlling the actual hardware i e there is no delay latency involved everything...

Page 12: ...k 4 2 Output controls The Output section controls the playback volume of each playback signal from your audio applications There are four individual faders for each playback channel divided into the O...

Page 13: ...panel will appear visible on screen even if another application has the focus Clone 2 way from Out 1 2 When this option is enabled playback from channel 1 2 is cloned to output channel 3 4 This is a g...

Page 14: ...ral application s I O Ex WinAmp WaveLab non ASIO mode Cakewalk Audition Vegas etc WDM section represents Multi MME application s I O Ex SONAR when using WDM KS PowerDVD WinDVD etc ASIO section represe...

Page 15: ...ESI EX2 Recording from WinAmp MME to SONAR WDM EX3 Recording from WinAmp MME to Cubase Logic Nuendo ASIO EX4 Recording from GigaStudio GSIF to SONAR WDM EX5 Recording from GigaStudio GSIF to Cubase A...

Page 16: ...ult of a smaller buffer size Depending on the typical application e g for playback of software synthesizers a smaller latency is an advantage At the same time the best latency setting indirectly depen...

Page 17: ...te that such a setup is not required for multi channel applications i e Cubase LE 4 Only the output routing for applications that are only supporting stereo should be adjusted by this 5 4 Cubase LE 4...

Page 18: ...rs Select the Inputs tab For every input channel you are intending to use simultaneously you need to create a separate bus Cubase LE 4 allows you add mono or stereo busses what is better for your appl...

Page 19: ...t accept any interference received including interference that may cause undesired operation Caution Any changes or modifications in construction of this device with are not expressly approved by the...

Page 20: ...laimer All features and specifications subject to change without notice Parts of this manual are continually being updated Please check our web site www esi audio com occasionally for the most recent...

Reviews: